Happy Tuesday! I am so excited for this post today because I want to introduce you to my very first guest blogger on Ski Boots in the Kitchen! Paige from ‘Champagne in my Boots’ has chosen one of her favorite southern family recipes to share with you all today! Check out her awesome recipe below as well as more info about Paige and her blog! I hope you enjoy! Thank you, Paige for sharing! Bon Appetit!
  Hey y’all, I’m Paige of Champagne in my Boots—a food blog dedicated to bringing the gourmet to the everyday. I am so excited to be sharing a little bit of myself and my blog on Ski Boots in the Kitchen and hope that you will enjoy it!
As a native North Carolinian who has since settled in South Carolina, I have spent my life surrounded by good food. I was recently asked by a Yankee Northern acquaintance where I learned to cook, and I had trouble coming up with a concrete answer because I can honestly say that I was never taught to cook. Rather, it was something that I absorbed, seemingly through osmosis.
I spent much of my formative years doing homework at the kitchen island as my mother prepared dinner, and warmer months were spent accompanying her to farmers markets, grocery stores, fish markets, roadside produce stands and the like as she shuttled me to and from tennis lessons, pool parties and camp. So, I started learning about seasonal and local foods, how they are prepared and how to combine flavors long before I decided to pick up a chef’s knife myself. To this day, I can always depend on my mom to offer sage advice when I find myself stuck during a recipe experiment.
If there is one thing Southern women are known for—well, besides our pearls and being “steel magnolias,”—it is our cooking. Pretty much every Southern woman has a signature dish for which she is known, and those who do not, quickly learn the best establishments for take-out and/or catering and, subsequently, perfect the art of being the model hostess. Even those who do not possess the cooking gene typically find some recipe they are able to perfect over time.
Down here, we take our food pretty seriously, which means that the concept of secret family recipes can be taken to a whole new level. Many people are not able to get their hands on their grandmother’s famous chocolate cake recipe until said grandmother passes away, and even then, you can almost guarantee that grandma was sneaky enough to leave out some ingredient or another just so that no one can ever replicate the dish to the same level at which she made it.
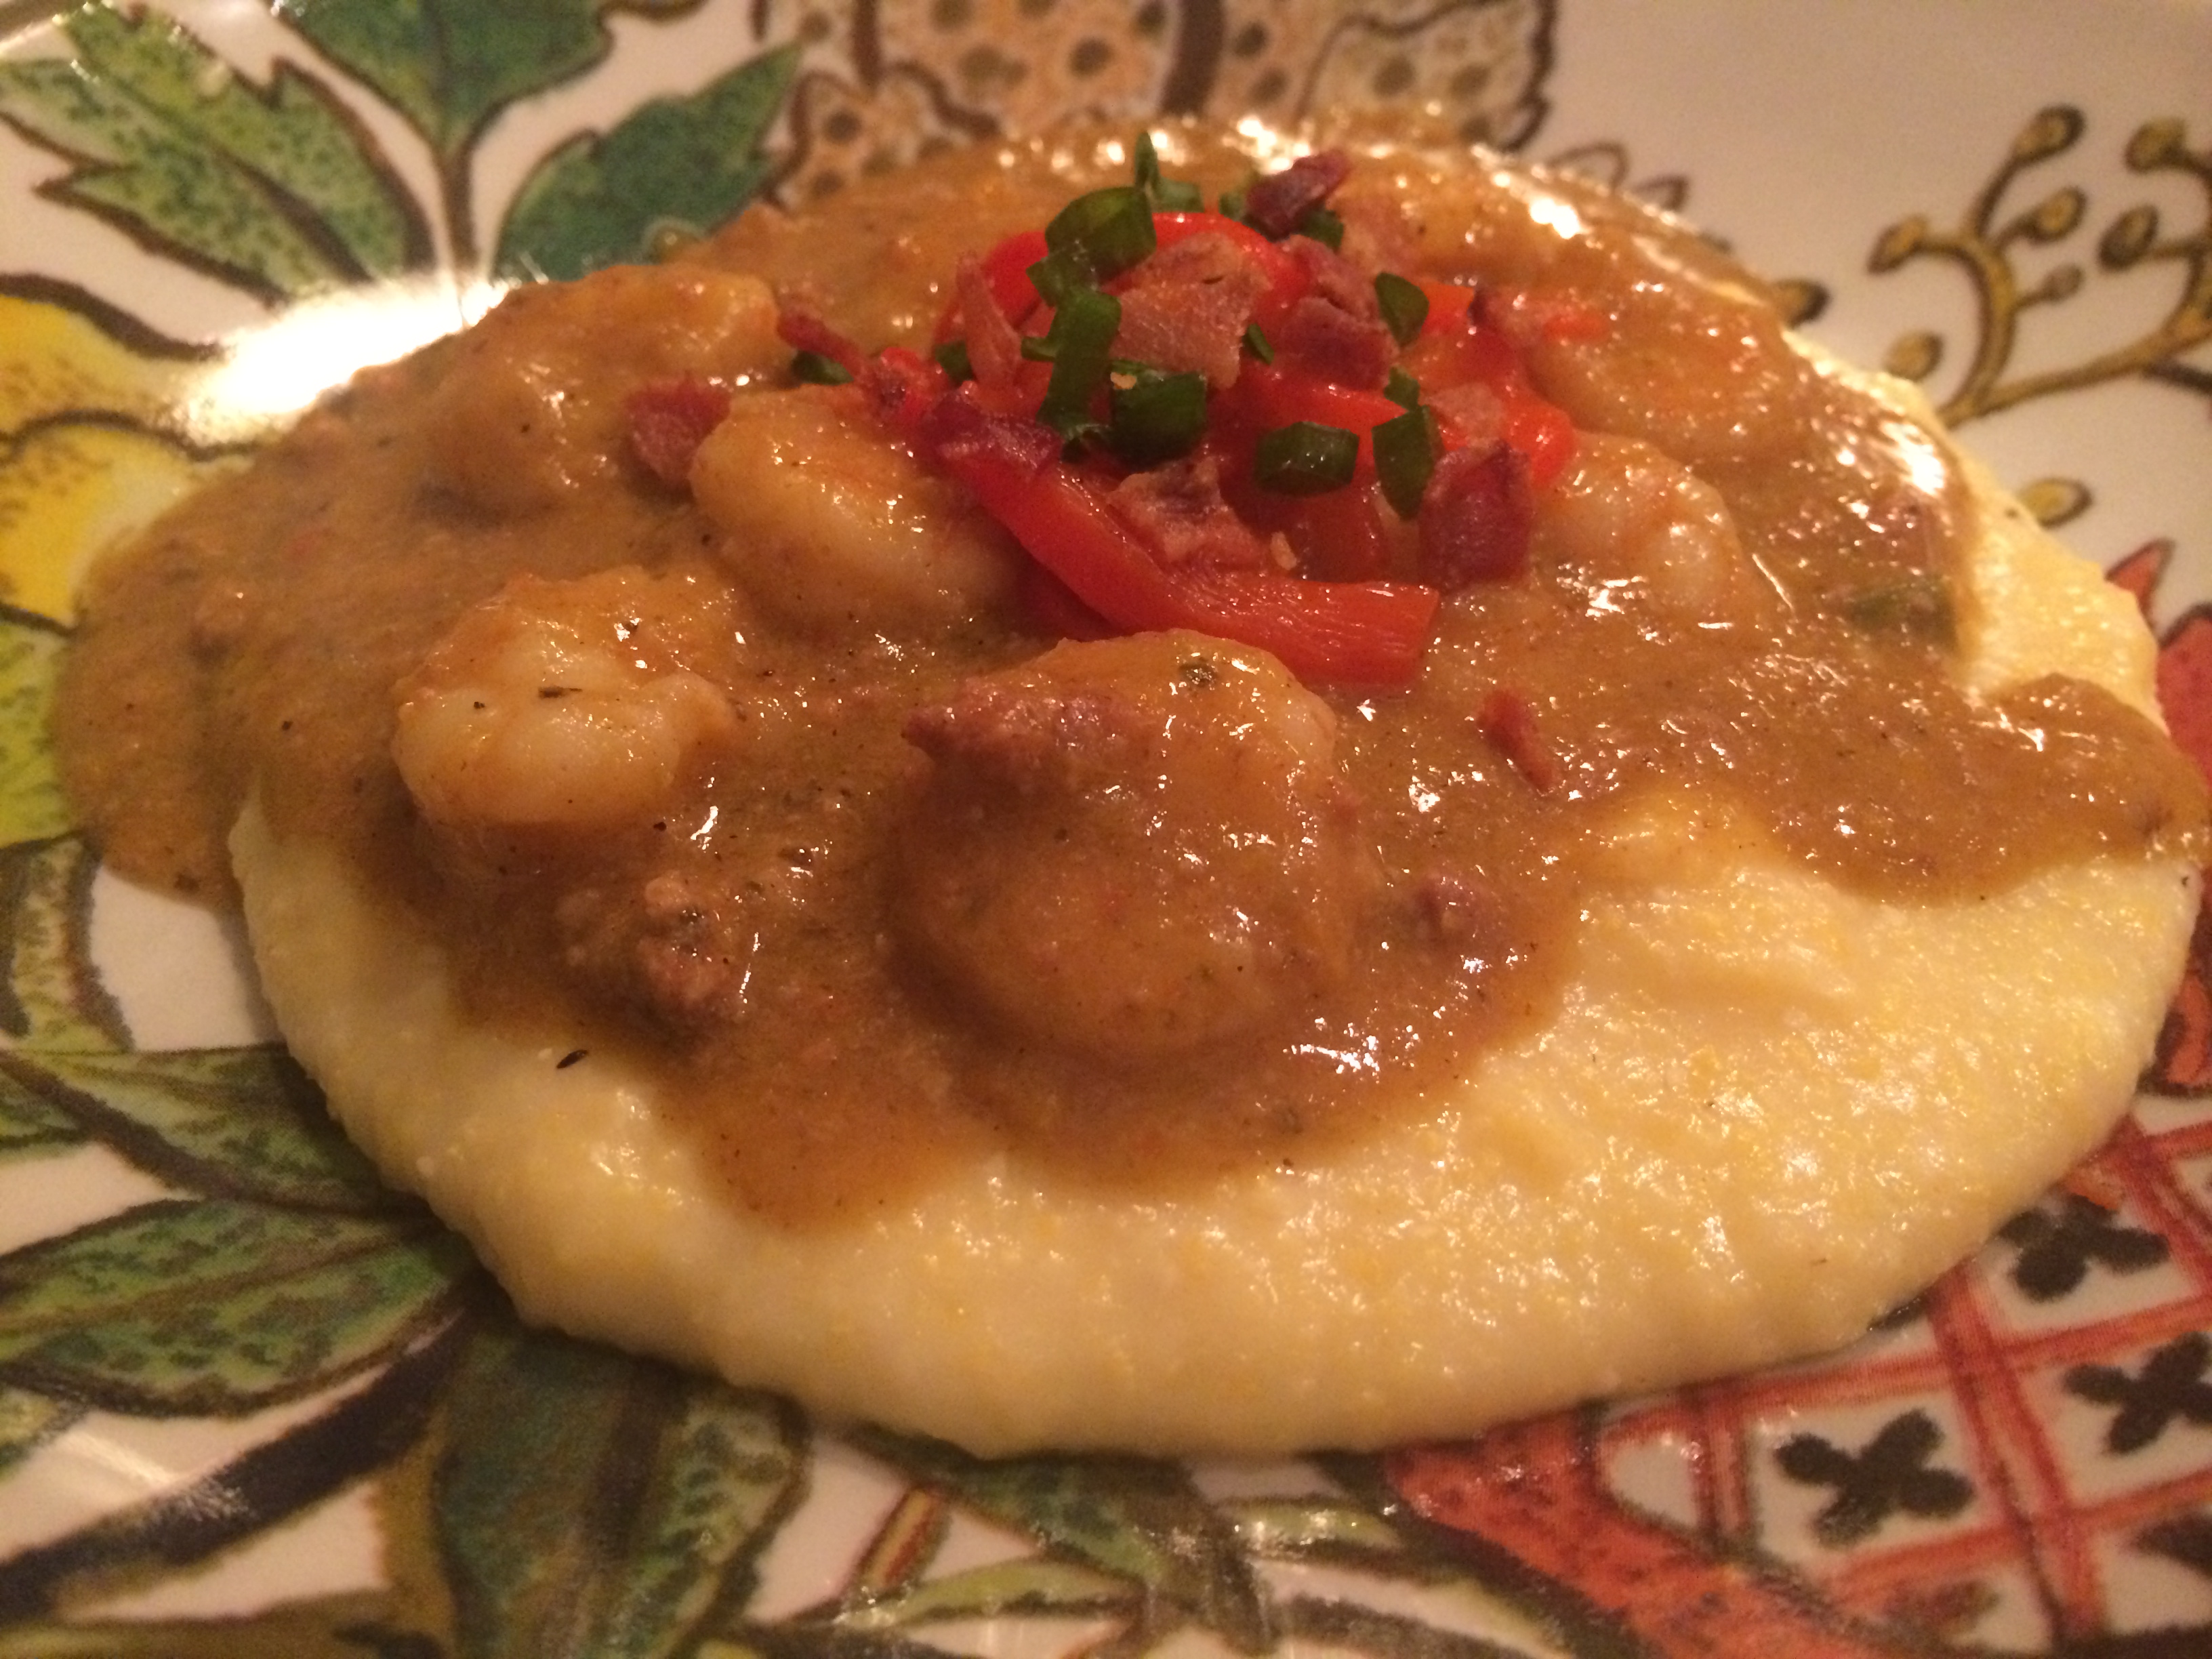
Fortunately for all of you, I am not one of these women (though, admittedly, I do freehand a lot of my cooking, so measurements are not always as precise as you may find elsewhere), and I am about to break a cardinal rule and share with you my recipe for true Charleston Shrimp & Grits. It has been adapted from my husband’s great-aunt’s recipe, and I am quite confident that your first bite will transport you straight to the Lowcountry—the cultural mecca of South Carolina that I am fortunate to be able to call home.
Before I share the specifics, I thought I would give you a small piece of advice. What I am about to say might sound a little harsh, but for your sake, I think that it is important for me to share. Before you consider “lightening up” this recipe or trying to substitute ingredients for what you found on sale at the market, you should check yourself. I am all for lightening up recipes and making them healthier when possible, and I am a big advocate of “using what you have,” but this is not one of those times. Some recipes just are not the same without the fat, and considering I make my “buttermilk” fried green tomatoes with Greek yogurt, you can trust me when I say that this recipe should not be messed with. I did quite a bit of experimenting with it so that I could share it with you without my husband’s great-aunt banishing me from her kitchen forever (aka I was not given permission to share her exact recipe), and as a result of my own trials, I very strongly urge you to stick to the recipe in this case if you want authentic Lowcountry shrimp & grits.
Charleston Shrimp & Grits (click for printer friendly version)
GRAVY
Ingredients (serves 4)
- 2 strips bacon (I use uncured)
- 2 links andouille sausage, casings removed
- 1 medium yellow onion, chopped
- 1 sweet bell pepper, chopped (red, yellow or orange—or a combo)
- 1 stalk celery, thinly sliced or chopped
- 2 cloves garlic, minced/grated/pressed
- 1 jalapeño, minced (for spicier gravy, do not discard seeds)
- 6 Tbsp flour
- 4 cups unsalted chicken stock
- kosher salt
- 1 red bell pepper
- 1 lb shrimp**
**Cook’s note: I like to buy peeled & deveined shrimp when possible. If this is not available or not what you prefer, you will need to peel & devein the shrimp prior to cooking. I like to brine my shrimp overnight in a salt water mixture because it gives them more flavor, but this is optional.
Preparation
- Cook bacon over medium heat in a large cast iron skillet until browned and crispy. Transfer to paper towel to drain.
- Meanwhile, place red bell pepper under the broiler, turning as the skin chars, until all sides are slightly charred and skin is separating from the flesh. Enclose in a paper bag to cool for 10 minutes. Once cool, peel off skin, remove stem & seeds and thinly slice.
- Cook sausage in the same pan until cooked through. Transfer to paper towel to drain.
- Add onions, bell pepper, celery & jalapeño and cook until tender, about 7 minutes. Add 1 clove garlic and cook another minute. Use a slotted spoon to remove from pan and set aside.

- Sprinkle flour onto skillet and use a wooden spoon to scrape the bits off the bottom until all of the fat is absorbed. If there is not enough rendered fat, you can melt a Tbsp of butter or two and use that to help make the rouxe.

- Whisk in 1/2 of the stock and bring to a simmer. Let simmer for about 10 minutes until thickened then add back in the vegetables & 1/2 of the sausage. Stir in remaining clove of garlic and whisk in remaining stock. Use a stick blender (or regular blender or food processor) to blend the vegetables and sausage with the gravy and let simmer for 20 minutes. Taste for seasoning and season with salt and freshly ground black pepper as needed.

- Add shrimp to gravy before serving, and cook until cooked through. They are ready when they have curled into a C shape. Be careful not to overcook—they are overcooked if they curl into a tight C that resembles a curly-q.

- Serve over grits and garnish with crumbled bacon, additional sausage, roasted red pepper, green onion, diced tomatoes, parmesan or other garnish of your choice. Enjoy!

GRITS
Ingredients
- 2 + 2/3 cups water
- 2/3 cups stone ground grits (or hominy, y’all!)
- 1/4 – 1/2 tsp salt (or to taste)
- 1 Tbsp unsalted butter
- 2/3 cup whole milk, divided
- freshly ground black pepper
- 1/4 cup parmesan
- parsley to garnish (optional)
Preparation
- Bring water to boil. Stir in grits, salt & butter. Reduce heat to low and cover. Let simmer for 10-15 minutes until most water is absorbed.
- Uncover, stir in 1/3 cup milk and let simmer, partially covered, for 10 mins, stirring every few minutes to prevent the grits from sticking to the bottom of the pan. Stir in remaining milk and simmer for 10 more minutes, continuing to stir every few minutes.

- Stir in Parmesan and season to taste with freshly ground black pepper. Serve garnished with parsley. Enjoy!
 I hope you will enjoy this dish as much as I do, and for more of my recipes, don’t forget to pop over to champagneinmyboots.com. You can also find me on Facebook, Instagram (@champagneinmyboots), twitter (@champagneboots) and Pinterest! And be sure to check out the guest post on Mahi Mahi Tacos that Perry did for me!
 Hey Y’all, I hope you had a great weekend and celebrated all the wonderful fathers out there! Dads are the best aren’t they? One thing my father and I have in common, among many other things, is our love for dessert. We could both eat the largest dinner and be stuffed to the gills and somehow, find a little extra space for a piece of chocolate cake or pie. I always think a summertime camping and BBQ dessert staple are S’mores!


 Howdy there y’all! I am so sorry for my long absence in posts! Last week I was on vacation (in beautiful Mexico!) and it took me a little while to get back in the swing of things. Sometimes I feel like I need a vacation after my vacation! Be near the ocean again made me realize how much I miss it! I love the sound of the ocean and the salt air! Don’t get me wrong, I love Utah but after growing up near the ocean there is nothing more comforting than hearing the waves on the shore as you fall asleep.
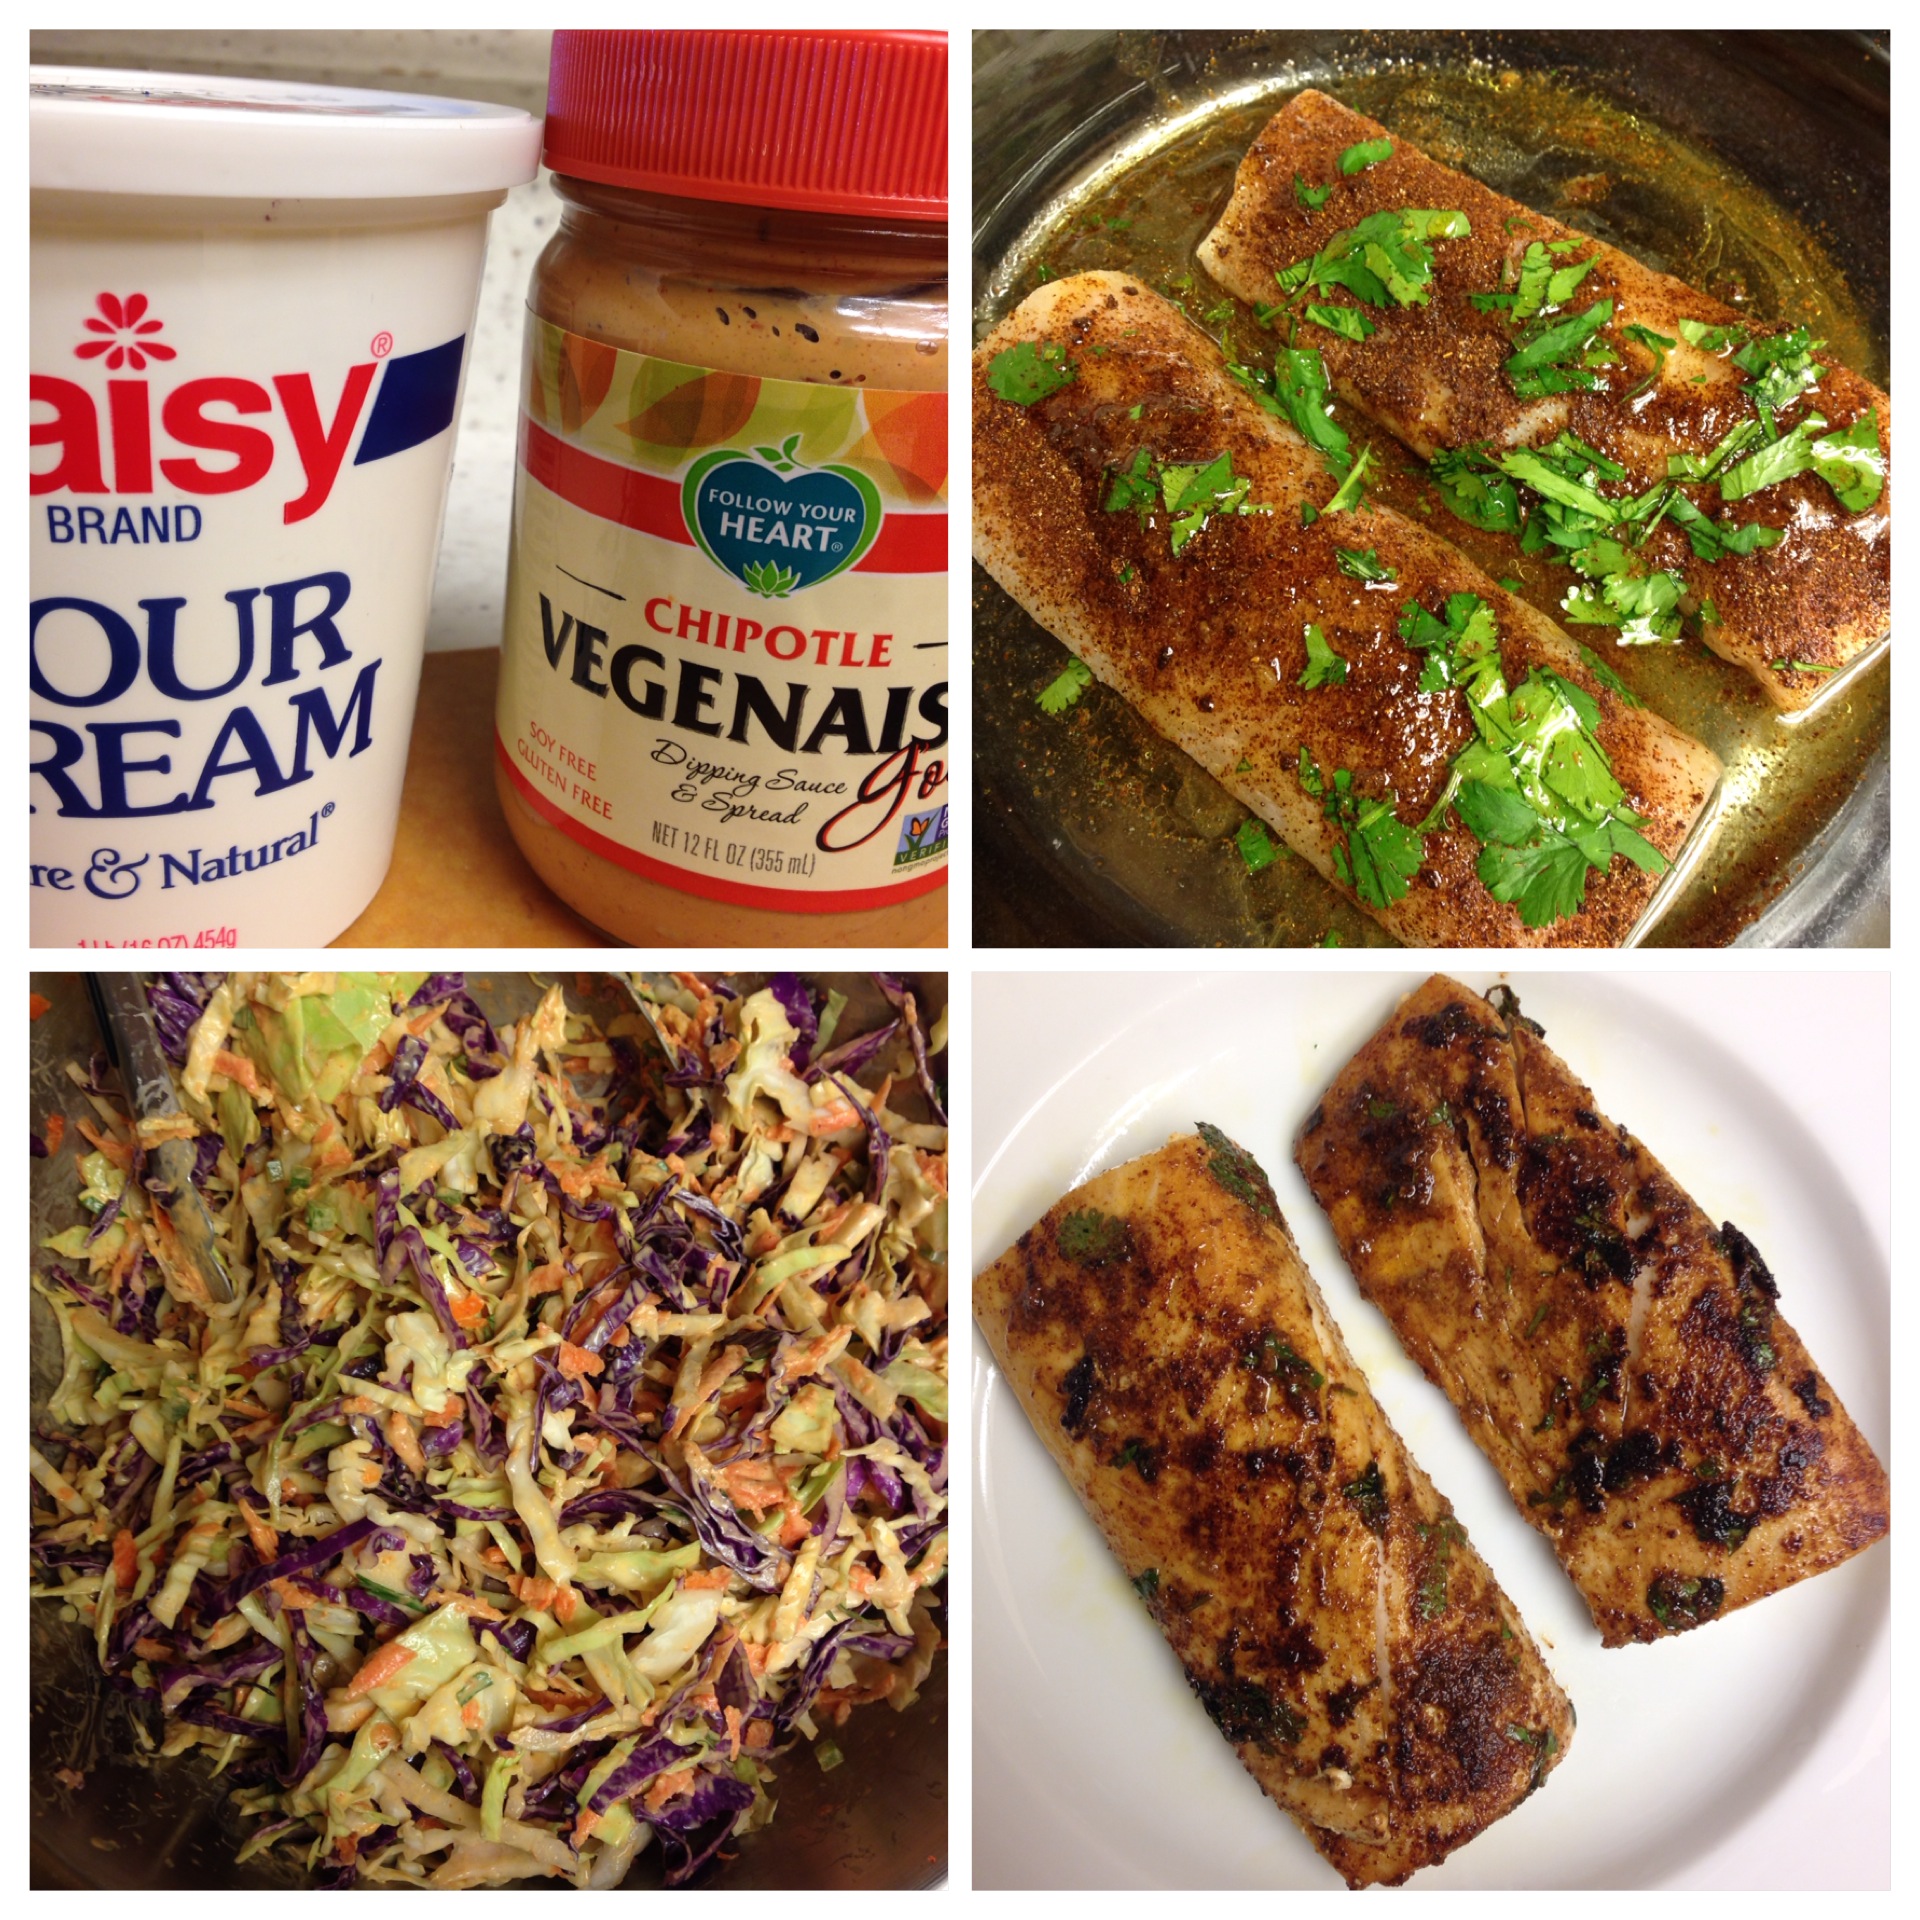
 So I looked to one of my favorite fish taco recipes to easy my “the vacation is over” pains! I love all the fresh flavors of these tacos, the Chipotle slaw has a little spice which is balanced nicely by fresh cool mango and avocado.