Tzatziki Dip

photo-606I hope you all had a wonderful Labor Day weekend! We had gorgeous weather in Park City, which was a welcomed change from all the rain and gloomy weather we’ve been having here. I keep telling myself that all this rain now… means LOTS of snow this winter, right? I kicked off my long weekend with a BBQ with some friends, like I am sure many of you did as well. I was looking for a different appetizer to bring to the BBQ than the usual hummus and carrots or veggie platter which are so over done!

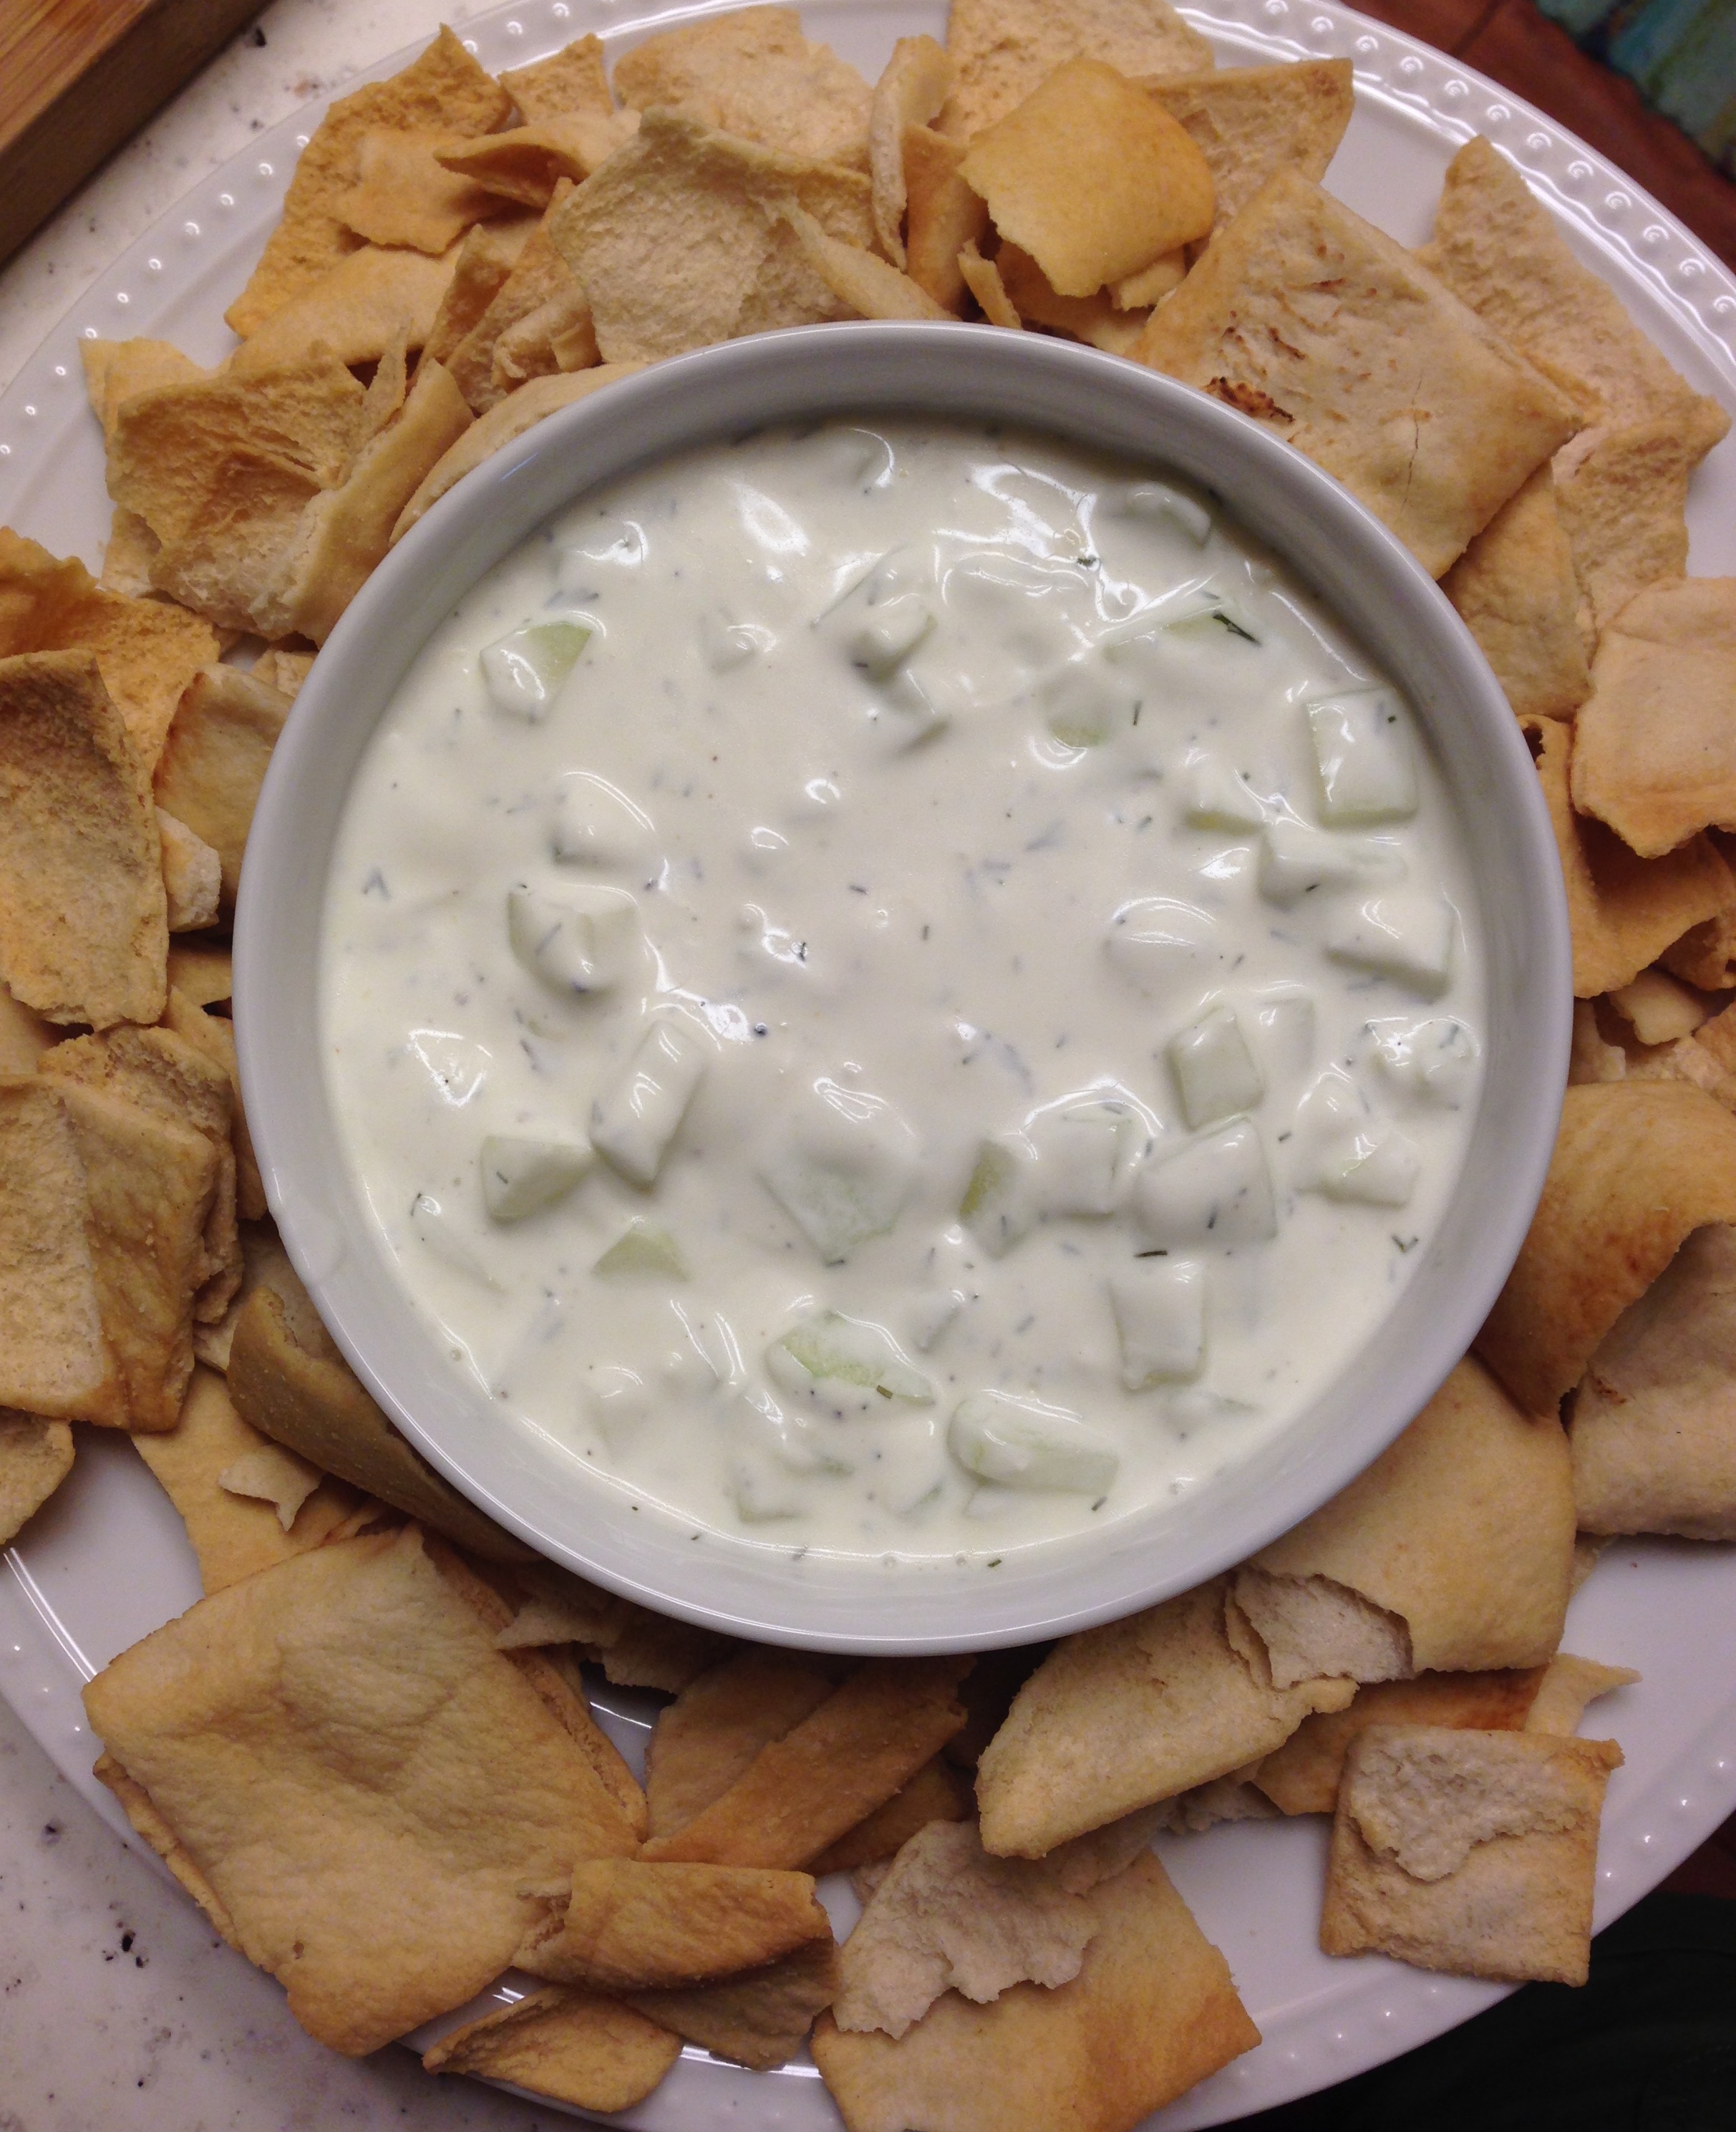
We have been getting a lot of cucumbers in our CSA lately so I thought it would be perfect to use some of them up. This recipe for Tzatziki is super light and refreshing- it uses about half the amount of sour cream that most recipes call for, making this the perfect dip or condiment! I also love putting this Tzatziki on my Greek chicken gryo’s (recipe to come!) Serve this dip with some pita chips and enjoy!!

Greek Tzatziki Dip

Ingredients:

  • 3 Tablespoons Olive Oil
  • 1 Tablespoon white wine or champagne vinegar
  • 2 gloves garlic, minced or pressed using a garlic press
  • 1/2 lemon, juiced
  • 1/2 teaspoon salt (more to taste)
  • 4-5 turns of fresh pepper
  • 1 cup Greek yogurt
  • 1 cup sour cream
  • 2 cucumbers, peeled, seeded and diced (smaller is better)
  • 1 teaspoon chopped fresh dill (I use freeze dried sometimes too)

Directions:

  1. In a small bowl, combine olive oil, vinegar, lemon juice, garlic, salt and pepper. Mix to combine, set aside.
  2. Peel cucumbers and slice them lengthwise. Using a spoon, scoop the seeds from the flesh and discard them. Diced the cucumber into small bite size cubes.
  3. In another medium bowl, use a whisk to blend yogurt with sour cream.
  4. Add the olive oil mixture to the yogurt mixture and stir until none of the oil remains.
  5. Fold in cucumber and dill until fully incorporated. Chill for 1-2 hours before serving.
  6. Serve with pita chips
Advertisement

Forbidden Rice and Bean Salad with Orange Dressing

IMG_8070Labor day weekend has crept up on me all to quickly. The last two weeks we have been getting a stead stream of midday/afternoon rain and thunder storms, which were accompanied by a big temperature drop (we even got a little snow on the very top of the high mountains). All those rain clouds do make for beautiful sunsets!

I am feeling cheated out of the last few warm weekends of summer and so do the leaves on the trees… they are starting to turn yellow and orange, oh no! I start to feel that end of summer sadness when the air gets crisp at night and the smell of wood burning stove lingers in the air. I hate to see summer go, but fall is one of my favorite times of year! IMG_7878This recipe for forbidden rice salad is wonderful as a summer or fall recipe. It is hearty enough for lunch or dinner as a vegetarian dish, or it’s perfect as a side to steak, burgers or grilled chicken (like in the Blonded by Style and SBITK Mexican Fiesta). I think it’s even better when it sits in the fridge overnight, allowing the juices to meld and marinate.

Feel free to use green beans or asparagus for the salad (I personally prefer the flavor of the asparagus in this recipe!) However, I have made it both ways and both are equally delectable! I hope you enjoy!

Forbidden Rice and Bean Salad with Orange Dressing

  • 2 cups black forbidden rice, cooked to package directions and cooled
  • 2 14 oz. cans garbanzo beans, drained and rinsed
  • 1 12 oz. package shelled edamame, thawed/cooked to package directions
  • 1 bunch asparagus or 1/2lb fresh green beans, blanched and cut into ½” pieces
  • ¾ cup golden raisins
  • ¾ cup dried cranberries
  • ¼ cup parsley, chopped

For the orange dressing

  • ½ cup orange juice
  • ¼ cup cider vinegar
  • 2 tablespoons grated orange peel
  • ½ cup olive oil
  • Salt and pepper to taste

Directions:

  1. In a small bowl using a whisk, combine dressing ingredients, set aside.
  2. Bring 2 cups of water to a boil in a medium saucepan. Blanch the asparagus (or green beans) for 3-4 minutes. Remove immediately from the hot water and place in an ice bath or run under cold water to stop them from over cooking and becoming too soft.
  3. Combine rice, garbanzo beans, edamame, asparagus, raisins, cranberries, and parsley and toss to combine. Drizzle half the orange dressing over the top and toss to coat all the ingredients. Add more dressing if desired. Cover and chill before serving (over night is better!)
  4. Extra dressing can be covered and stored in the refrigerator up to 1 week.

Thanks to Mia from Blonded by Style for taking all the food pictures!

Mexican Fiesta with Blonded by Style & SBITK

IMG_7800One of my favorite things about food and cooking is that it brings people together. No matter what language you speak or what country you are in, food is the universal language. I love bringing people together around my kitchen table to share a meal with good friends, drinks and food, there is nothing better! Last week my friend Mia, one of the stylish chicks behind the blog Blonded By Style, and I got together to throw a fun Mexican themed fiesta for our friends. She and her sister Zoe started their fashion blog to showcase their fabulous style with beautiful photographs, clothing and food! IMG_8064We thought it would be fun to collaborate on how to throw a stylish and delicious summer BBQ! Stay tuned for all the great recipes coming soon! To give you a taste of what we did here is our menu!

Summer Mexican Fiesta with Ski Boots in the Kitchen and Blonded By Style

  • Pineapple Tequila Crushers with Fresh Basil
  • Jalapeno Poppers with Pineapple and Bacon
  • Guacamole and Chips
  • Drunken Chicken with Pineapple Salsa
  • Forbidden Rice and Bean Salad with Orange Dressing
  • Mexican Corn off the Cob
  • Death by Chocolate Mexican Chocolate Cake with Chocolate Frosting

Mia headed over to the beautiful farm stand at Copper Moose Farm to gather some fresh ingredients for our BBQ.

Fresh green beans, basil and flowers all grown here in Park City. The difference in flavors of freshly grown ingredients vs. store bought is amazing. Buying fresh and local is the way to go!

We had the best time cooking together… We even got a little silly and I put on some ski boots to show that sometimes, I actually do cook in my ski boots! The goggles were helpful when I was cutting the onions, my eyes didn’t water! Thanks to Mia for taking all the beautiful photos! Check back soon for the Drunken Chicken with Pineapple Salsa recipe and other recipes next week!


Strawberry Rhubarb Pie

photo-591There is something about fresh pies that make me think of summer and Martha’s Vineyard. Maybe it’s because as a child my family only ate pie in the summer, or maybe it had to do with one of my favorite summer activities… going over to bake pies with my Aunt Harriet.

I loved that she would always let me steal one of the sugar coated apples out of the bowl before we’d bake the pie (or maybe I always stole it with out her noticing…?) Either way, sleepovers and pie making at Aunt Harriet’s house were the best!

My absolute favorite pie flavor is strawberry rhubarb, I love how the tartness of the rhubarb balances the sweetness of the strawberries and flaky pie crust. photo 1-38While the pie is still warm you’ve got to top it with a big scoop of vanilla ice cream, so it melts into the cracks and crevices of the pie… there is nothing better! I adapted this recipe from a few of my favorites, The Black Dog, Smitten Kitchen, and my Aunt Harriet’s recipe. This week in our CSA we got 1 pound of fresh delicious strawberries and the first thing I thought of doing with them, was make a pie! Hope you enjoy!photo-594

Strawberry Rhubarb Pie (Serves 6-8)

  • 3 1/2 cups (about 5-7 stalks) rhubarb, sliced into 1/2inch pieces
  • 3 1/2 cups (about 16oz) strawberries, stems removed and cut in half (quartered if the strawberries are big)
  • 1/2 granulated sugar
  • 1/2 packed brown sugar
  • 1 Tablespoon lemon juice
  • 2 teaspoons lemon zest
  • pinch of kosher salt
  • 1/4 teaspoon nutmeg
  • 1/4 cup quick cooking tapioca
  • 2 tablespoons butter, cut into small pieces
  • 2 tablespoons heavy cream (for glaze)
  • Turbinado sugar (for crust)
  • 2 pie crusts, either homemade or store bought

Directions:

  1. Preheat the oven to 400 degrees. On a well-floured surface, roll out half of the pie dough into a 12-inch round circle and carefully transfer it into a 9-inch pie plate.
  2. In a large bowl, combine strawberries and rhubarb. In a smaller bowl, mix together sugars, lemon juice and zest, salt and tapioca. Pour sugar mixture over the larger bowl of fruit and gently toss to coat all the fruit being careful not to mash the strawberries.
  3. Mound the filling inside the bottom pie crust and dot with small pieces of butter. Roll the second pie crust out into a circle and cut it into 1-inch strips. Weave the top pieces of pie crust together to form a lattice top (learn how to do it here!) crimp the remaining edges of the pie.
  4. Brush the crust with heavy cream (or 1 egg yolk if you prefer) and sprinkle with turbinado sugar.
  5. Bake at 400 for 20 minutes, then reduce the heat to 350degrees and bake for another 40minutes, until the pie is golden and bubbly.
  6. Top with fresh vanilla ice cream and enjoy!

Rainbow Chard with Parmesan, Pine Nuts & Basil

photo 1-33Happy Wednesday, Y’all! I hope you had a wonderful long Memorial Day weekend! A big thank you to all our Veterans and Military for all you do and sacrifice! One of my fondest memories growing up was watching my grandfather march in his Marine uniform in the Litchfield Memorial Day parade. Memorial Day also officially kicks off SUMMER (and the right to wear white pants!) not to mention lots of BBQs, camping, outdoor activities and lawn games of every kind. This past weekend I went down to southern Utah to explore some of the hidden gems in our state. The longer I live here the more I realize just how cool our state is.

You could spend your whole life visiting the National Parks in Utah and still you wouldn’t see everything the state has to offer.

Last week we received our first CSA delivery from Urban Farm and Feed. We got so many delicious things including fresh eggs, kale, arugula, radishes, oregano and my favorite Rainbow Chard. Look how beautiful it is!

I didn’t even enhance these photos, the chard is naturally this amazing color! What I love about the CSA (other than its local, fresh and amazing) is sometimes you get produce that you wouldn’t normally buy at the store and you are forced to cook something totally new. I am planning on taking you with me on my CSA journey of fun new vegetables, so stay tuned all summer long for great ideas and recipes for your produce, whether it’s from the farmers market or your CSA!

So lets kick off this summer party with some Rainbow chard. This recipe is super easy and takes just a few minutes to saute up. It goes great with chicken, steak, burgers, fish… well just about anything. I hope you enjoy! photo-584

Rainbow Chard with Parmesan, Pine Nuts & Basil (Serves 4)

  • 13 to 14 oz. Rainbow chard (about 1 large bunch)
  • 1 Tbs. extra-virgin olive oil
  • 3 Tbs. pine nuts
  • Kosher salt
  • 1 Tbs. minced garlic (about 2-3 cloves)
  • 2 Tbs. sherry (or dry white wine)
  • 1 Tbs. cold unsalted butter, cut into 4 pieces
  • 1/4 cup grated fresh Parmesan cheese
  • 1/4 cup thinly sliced fresh basil leaves (8 to 10 large)

Directions:

  1. First, wash and dry the chard leaves and stems. Cut the stems from the chard leaves. Cut the leaves into 2- to 3-inch pieces. Slice the stems crosswise 1/4 inch thick.
  2. In a medium sauté pan or skillet, heat the olive oil over medium heat. Add the pine nuts and cook, stirring constantly, until lightly browned, 2 to 3 minutes. Using a slotted spoon, transfer the pine nuts to a plate, leaving behind as much oil as possible.
  3. Return the pan to medium-high heat, add the chard stems and a pinch of salt, and cook, stirring occasionally, until shrunken and beginning to brown lightly, 6 to 7 minutes. Add the garlic and cook just until fragrant, about 15 seconds.
  4. Add the chard leaves, 1/4 tsp. salt and sherry. Toss with tongs until just wilted, 1 to 2 minutes. (If using a skillet, you may need to add the chard in batches, letting the first batch wilt before adding more.)
  5. Remove the pan from the heat, add the butter pieces, Parmesan and basil, stir to combine.
  6. Using tongs, immediately transfer to a serving plate. Sprinkle toasted pine nuts and extra Parmesan if desired. Serve immediately.