S’more Banana Boats

photo 1-39Hey Y’all, I hope you had a great weekend and celebrated all the wonderful fathers out there! Dads are the best aren’t they? One thing my father and I have in common, among many other things, is our love for dessert. We could both eat the largest dinner and be stuffed to the gills and somehow, find a little extra space for a piece of chocolate cake or pie. I always think a summertime camping and BBQ dessert staple are S’mores!

But its time to jazz up the classic campfire treat with a little something extra… The banana boat s’more! Don’t get me wrong, this is not replacing the traditional s’more, it is merely keeping your campfire from getting bored! Plus an added bonus, you don’t need any extra ingredients (other than the banana) from the classic s’more.

This is a really fun dessert for kids to do too since they get to eat it right out of the banana! It may not look pretty but it sure does taste amazing!!!

Ingredients:

  • 2 banana
  • 4 large marshmallows, cut into small pieces
  • 4-6 pieces of Hershey’s chocolate, Snickers or Reeses peanut buttercups
  • 2 graham crackers or Oreos, crumbled
  • Tin foil

Directions:

  1. Using a knife, make a deep lengthwise cut along the inside curve of the bananas making sure you don’t cut all the way through. Open slit to form a pocket.
  2. Fill the bananas with marshmallows, chocolate and 1/2 the graham cracker.
  3. Wrap the bananas in foil and place them on the grill, or if you have tongs, place it on the campfire for about 5-6 minutes. Carefully remove from the fire/grill.
  4. Peel back the foil and sprinkle the remaining graham cracker over the top, enjoy with a fork or spoon!

*Cooks note- Get creative with the ingredients and toppings- any kind of candy or dark chocolate you have on hand would be good. You can also use Golden Grahams cereal, cinnamon toast crunch cereal or thin mint cookies to crumble on top. I love adding peanut butter or almond butter to these as well!

Advertisement

Chocolate Guinness Cake *Happy St. Patrick’s Day*

photo-531Happy St. Patrick’s Day! Hopefully you had a wonderful weekend and celebrated St. Paddy’s day a little early! Yesterday was a beautiful day! My mom is in town so we went skiing, then had a few apres drinks and I got my nails painted green to match my ski pants (and to feel festive!)

I was also in the mood to make a festive St. Paddy’s day dish but I am not a huge fan of corned beef and cabbage. For some reason I just can’t bring myself to eat it! So I decided to go for something I love to eat… chocolate! I saw this recipe a long time ago on Food52, but I was a little thrown off by the name of it… “Snake Bite.”

This cake is named after a traditional British drink called the Snake Bite which is the combination of beer and hard cider. Its named after the drink because there is stout in the cake and hard cider in the frosting, which makes for the most perfect combination ever! Last week I was looking for a good St. Paddy’s day dish and I realized this Guinness laced cake would be perfect!

Not to mention the cider you use for the frosting is called PERRY CIDER! Then I knew it was meant to be, I had to make it! Turns out it is so quick and easy and its totally delicious! So take that left over Guinness out of the fridge and whip up this perfect cake to celebrate!

Chocolate Guinness Cake with Hard Cider Cream Cheese Frosting: “Snake Bite”  Makes one nine-inch cake (Recipe from Food52)

For the Cake

  • 1 cup all-purpose flour
  • 1 cup granulated sugar
  • 1/2 cup good cocoa powder
  • 1 teaspoon baking soda
  • 1/2 teaspoon kosher salt
  • 1 large egg, at room temperature
  • 1/2 cup sour cream, at room temperature
  • 1/2 cup (1 stick) butter, melted and cooled
  • 3/4 cups Guinness Extra Stout, at room temperature

For the Frosting

  • 1 stick unsalted butter, at room temperature
  • 8 ounces cream cheese, at room temperature
  • 1 1/2 cup powdered sugar, sifted
  • 1/4 cup fermented pear cider (I like Ace’s)

Directions:

  1. Preheat the oven to 350 degrees. Butter and flour a nine-inch round cake pan.
  2. Mix together the flour, sugar, cocoa powder, baking soda, and salt in a small bowl.
  3. In a large bowl, whisk together the eggs and sour cream. Then whisk in melted butter and Guinness. Add flour mixture to egg mixture and combine with a rubber spatula. Pour into the prepared cake pan and bake 35 minutes, or until a toothpick inserted into the center comes out clean. Allow to cool in the pan for 5 minutes, then transfer to a wire rack to cool completely.
  4. While the cake is baking, prepare the frosting. Put the softened butter and cream cheese in the bowl of an electric mixer fitted with the paddle attachment and beat on medium speed until creamy and well combined, about 2 minutes. Reduce the speed to low and add the powdered sugar and mix until combined. Slowly pour in the pear cider and mix until the frosting comes together. Let the frosting set up a bit in the refrigerator until the cake is ready to frost.
  5. When the cake is cool, transfer it to a platter. Spread the icing on top of the cake, slice and enjoy!

Easy Peasy Peanut Butter Blossoms (Gluten Free too!)

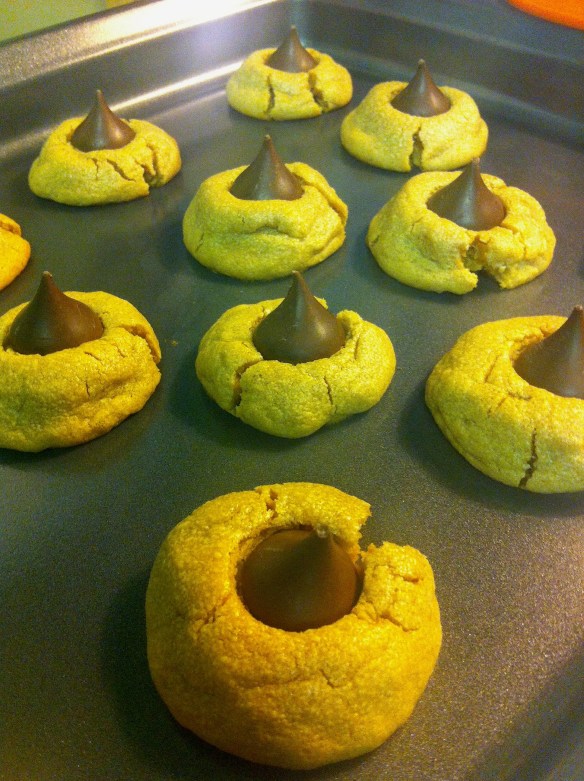
Christmas = peanut butter blossoms (to me). I am a huge fan of peanut butter and chocolate any way you serve it, but these cookies are always the best! I found this easy recipe a long time ago online and since then I’ve tweaked it to make it better. These are gluten free and only require 6 ingredients that you probably already have laying around in your kitchen! Whats better than not having to go to the store? I always manage to go in to the grocery store only needing bananas and almond milk and I some how end up with $60 worth of crap in my cart (even when I use the small one!) needless to say saving a trip to the store is good for my bank account! Here’s what you’ll need..

Ingredients-

  • 1 cup creamy peanut butter (don’t use the fancy stuff for this, Jiff or Skippy works best)
  • 1/2 cup white sugar
  • 1/2 cup packed brown sugar
  • 1 egg
  • 1/2 teaspoon vanilla (optional)
  • Hershey’s Kisses (unwrapped please!)

Instructions-

Preheat oven to 350. Combine sugars in medium bowl. Beat egg and vanilla, combine with sugar. Add peanut butter and stir until completely incorporated. Using your hands, roll dough (about 1 to 1 1/2 tablespoons) into balls and evenly place them on a un-greased cookie sheet. Bake at 350 for 10-12 minutes. Remove from oven and let cool on the cookie sheet for 2-3 minutes before pushing a kiss gently into the center of the cookie. Allow to cool completely before covering (the kisses will be soft while cookies are cooling down) Enjoy!

The Best Cookies You’ll Ever Eat

I found this recipe on one of my favorite food blogs, Food52. Named “Magical Marvelous Memorable Cookies” I was intrigued…Then I saw the ingredients list and I knew I had to make these cookies. If you have left over Halloween candy laying around- these cookies are perfect! Any kind of chocolate will do- these are fun to make because you can really add whatever you like. The result, amazingly crispy (almost like brittle) irresistible – you will eat the whole plate of cookies and much of the raw dough, cookies! ENJOY (I did!)

Ingredients

  • 1 1/2 cups unbleached all purpose flour
  • 1 teaspoon baking powder
  • 1/2 teaspoon baking soda
  • 1 teaspoon kosher salt
  • 1 3/4 sticks unsalted butter, room temperature
  • 1 cup granulated sugar
  • 1/2 cup light brown sugar
  • 1 egg
  • 1 teaspoon vanilla extract
  • 1 cup granola (or other cereal)
  • 1/2 cup crushed salted pretzel pieces (or other salty snack food)
  • 1 cup semi-sweet chocolate chips, chopped chocolate candies, or small bar of good dark chocolate, chopped into chunks
  • 1/2 cup chopped pecans or other nuts, optional (I didn’t add nuts because I used Snickers which already has peanuts)
  • If you don’t add nuts you may want to add more cereal, snacks or chocolate to compensate
  • You may want to add a little cinnamon, allspice, cardamom, or whatever your favorite spice is. I didn’t because I wanted the taste of the granola to come through

Heat the oven to 375. Line 2 large baking sheets with parchment paper or aluminum foil. Whisk flour baking powder, baking soda, and salt in medium bowl.

In another bowl, beat butter and sugars at medium-low speed (or hand whisk) until light and fluffy. Add egg and vanilla and beat on medium-low until fully incorporated. Scrape down the sides of the bowl with a rubber spatula.

Add Flour mixture and mix until smooth with a wooden spoon. Gradually add granola, pretzels, chocolate and nuts, and mix until well incorporated, ensuring that no flour pockets remain and ingredients are evenly distributed. (Restrain yourself from eating the the dough).

Scoop dough into balls, each about 1 1/2 tablespoons then roll between palms into balls (now its literally impossible not to eat the dough). Place cookies on prepared baking sheets, spacing them about 2 1/2 inches apart, 8-12 per sheet. (I did not follow this step exactly.. I tried to get more cookies on the sheet then recommended. These cookies spread A LOT, see picture below. Try to space cookies with plenty of space to bake so they do not stick together.) Freeze dough at least 20 minutes or refrigerate for one hour before baking.

Example of what not to do- add as many cookies as you can fit on the baking sheet.

Bake one sheet at time until cookies are deep golden brown about 13-15 minutes. Let them cool completely on the baking sheets before moving to wire rack. They will be fragile.

Whoops.. one solid cookie… Don’t worry the flavor wasn’t compromised. (I cut cookies apart before they cooled- if you wait until they are cool they will break)

These are even better once they are completely cooled and become crispy. They would be great crumbed over a bowl of ice cream or as is!