Pumpkin Chocolate Chip Bars

photo 4-23Happy third day of Fall! I totally planned on getting this post out on the first day of fall however, my last two weeks have been just slightly crazy with traveling and work, which has left me with little time to cook, eat or sleep for that matter!  I just returned from a week in New York City which was a blast and very busy! I got to see some friends and family between the work I was doing there. I also got to eat at some fun new restaurants! Two of my favorites were The Meatball Shop, where I stuffed my face with an espresso ice cream and chocolate chip cookie sandwich (drool) and Artichoke Basille’s with their classic artichoke pizza which was so rich and decedent I was only able to eat one piece (drool again)! If you’re in New York in the near future I highly recommend you check them out! Anyways, I got back to Utah and it was full on on FALL here.

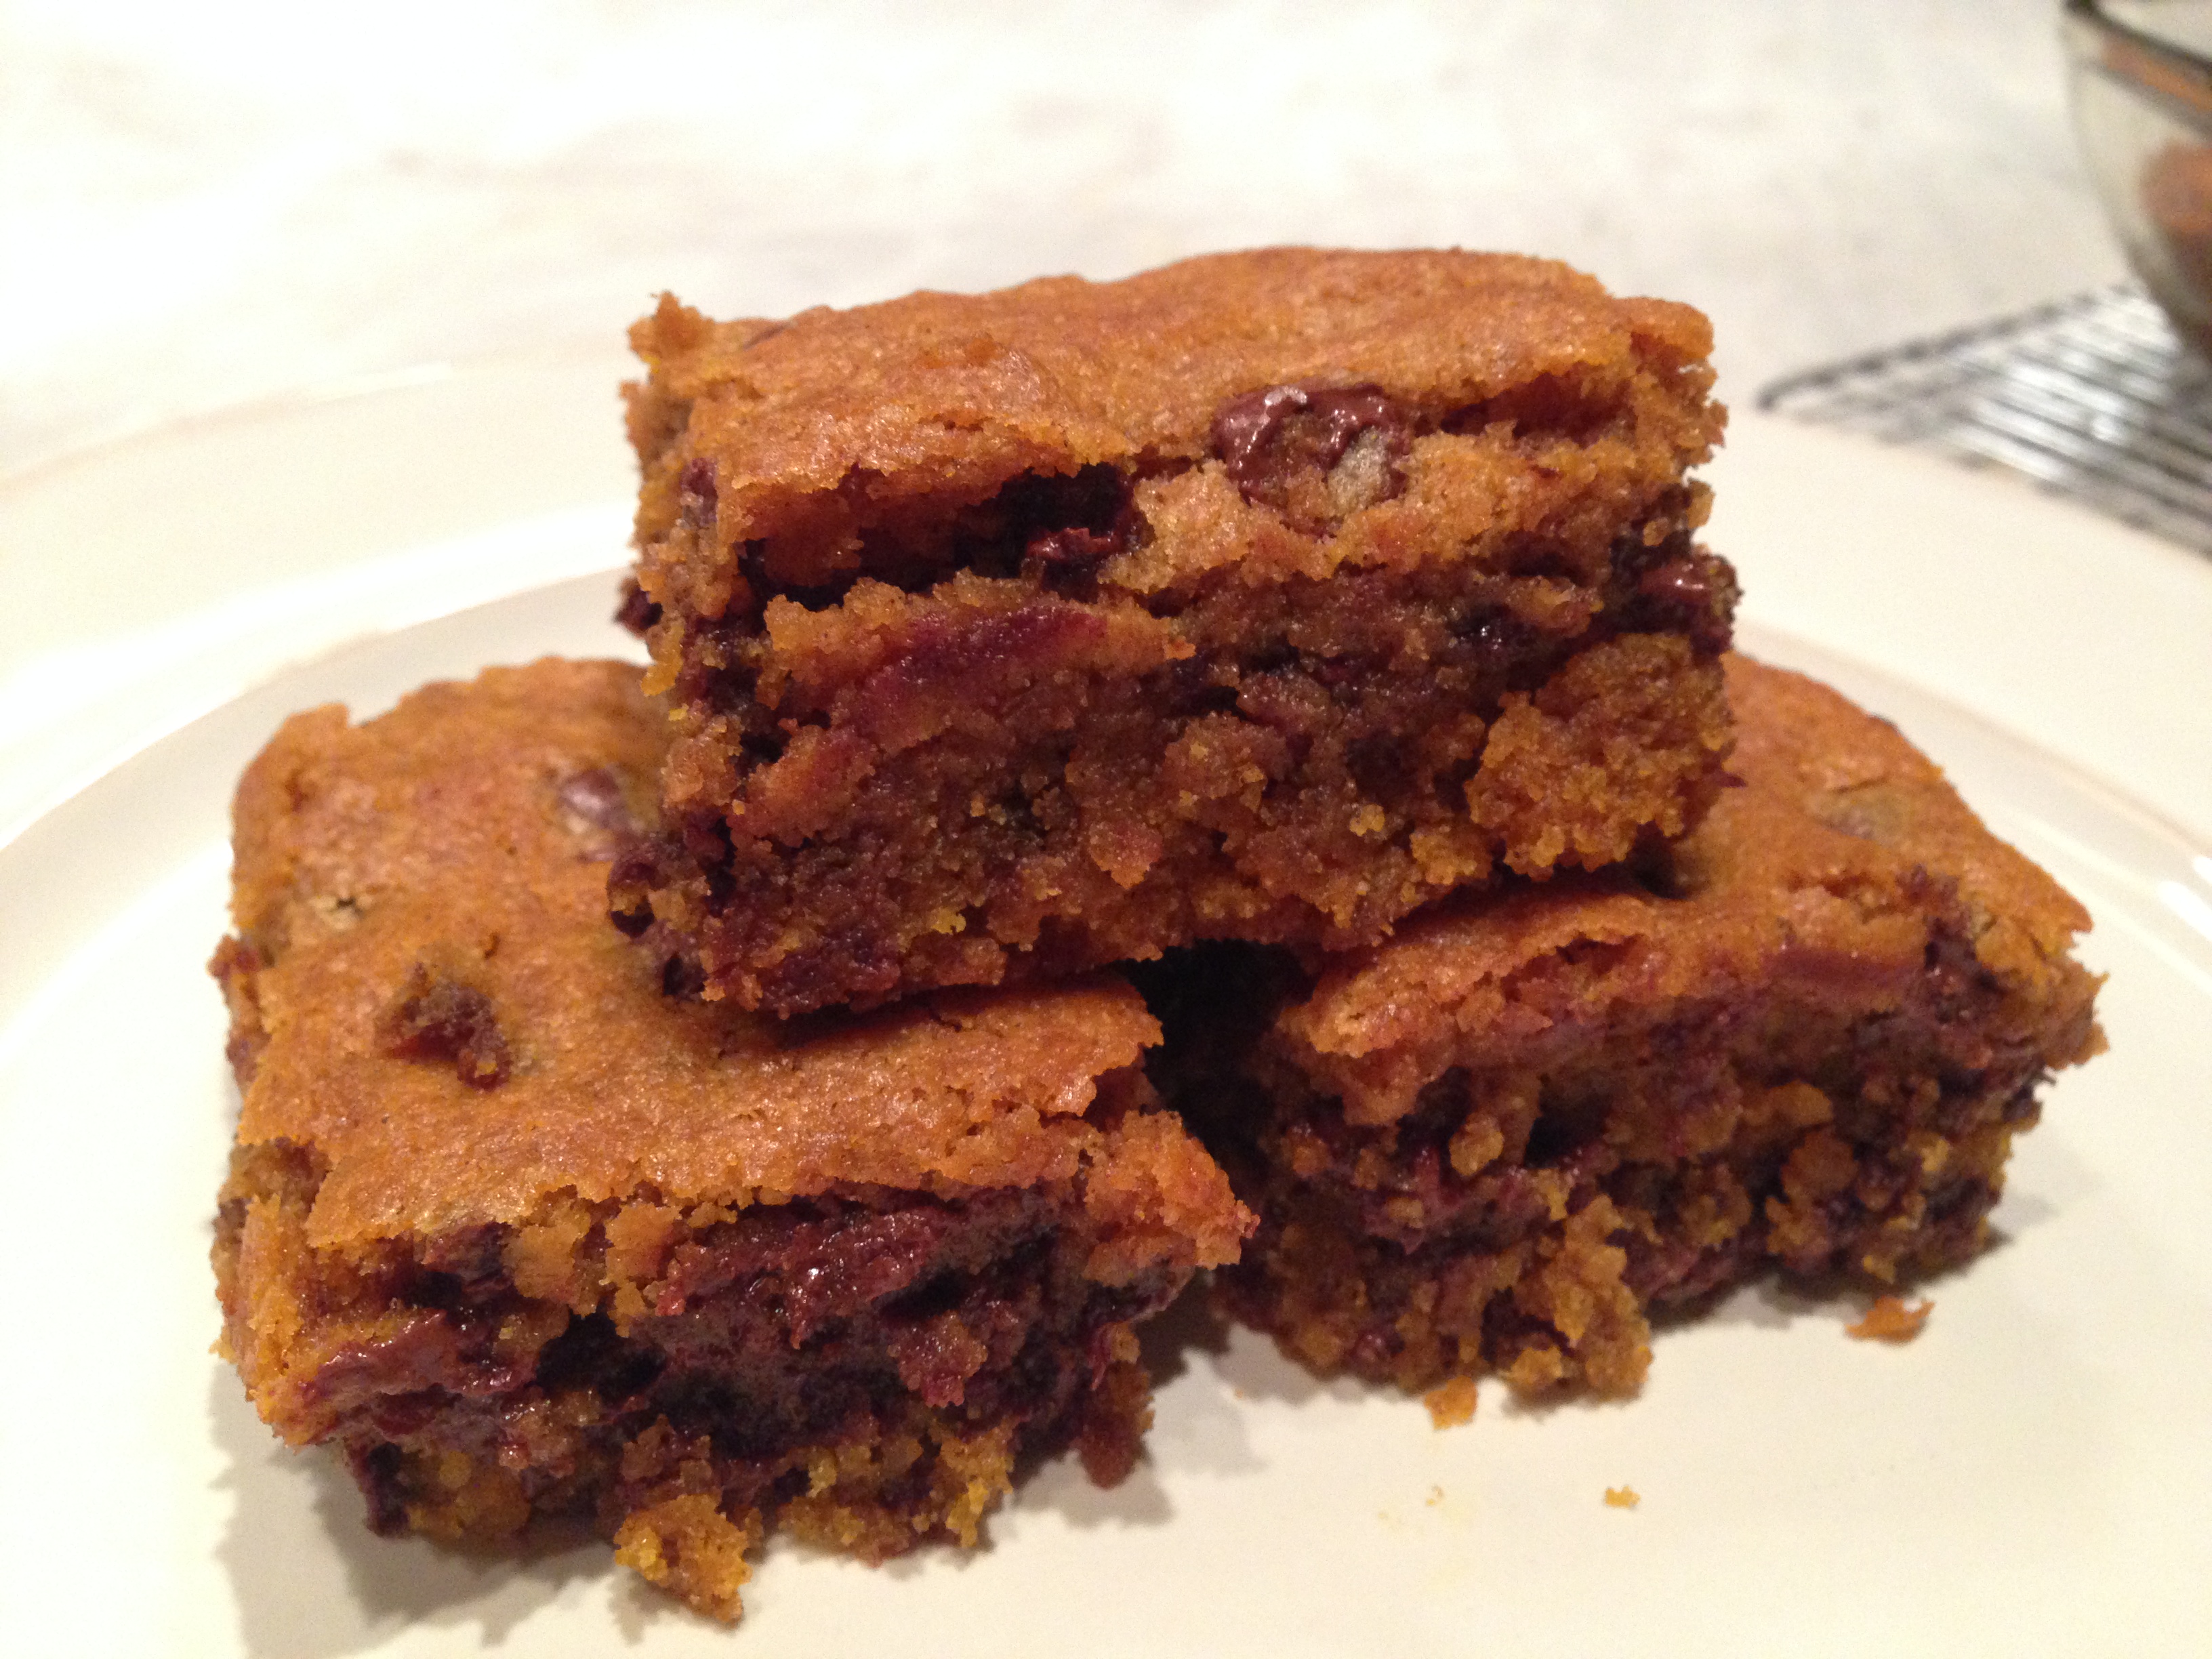
Yellow and Orange leaves, a chill in the air and that overall feeling and smell of fall. It got me thinking I wanted some delicious pumpkin treats! I tweaked this recipe from another one I found by substituting coconut oil for butter, I was so pleased with the result! photo 5-15Rich and moist with just a hint of pumpkin and sweetness from the chocolate chips. The coconut oil gave it a wonderful texture and kept them from getting to dry! If you’d prefer to use butter you can easily substitute it back in, (if you must!) its a 1:1 ratio so you’ll use 1 cup of butter instead of oil. Coconut oil is a great vegan baking substitute and I love the flavor and texture it brings to my baked goods! Cheers to you, enjoy! photo-609

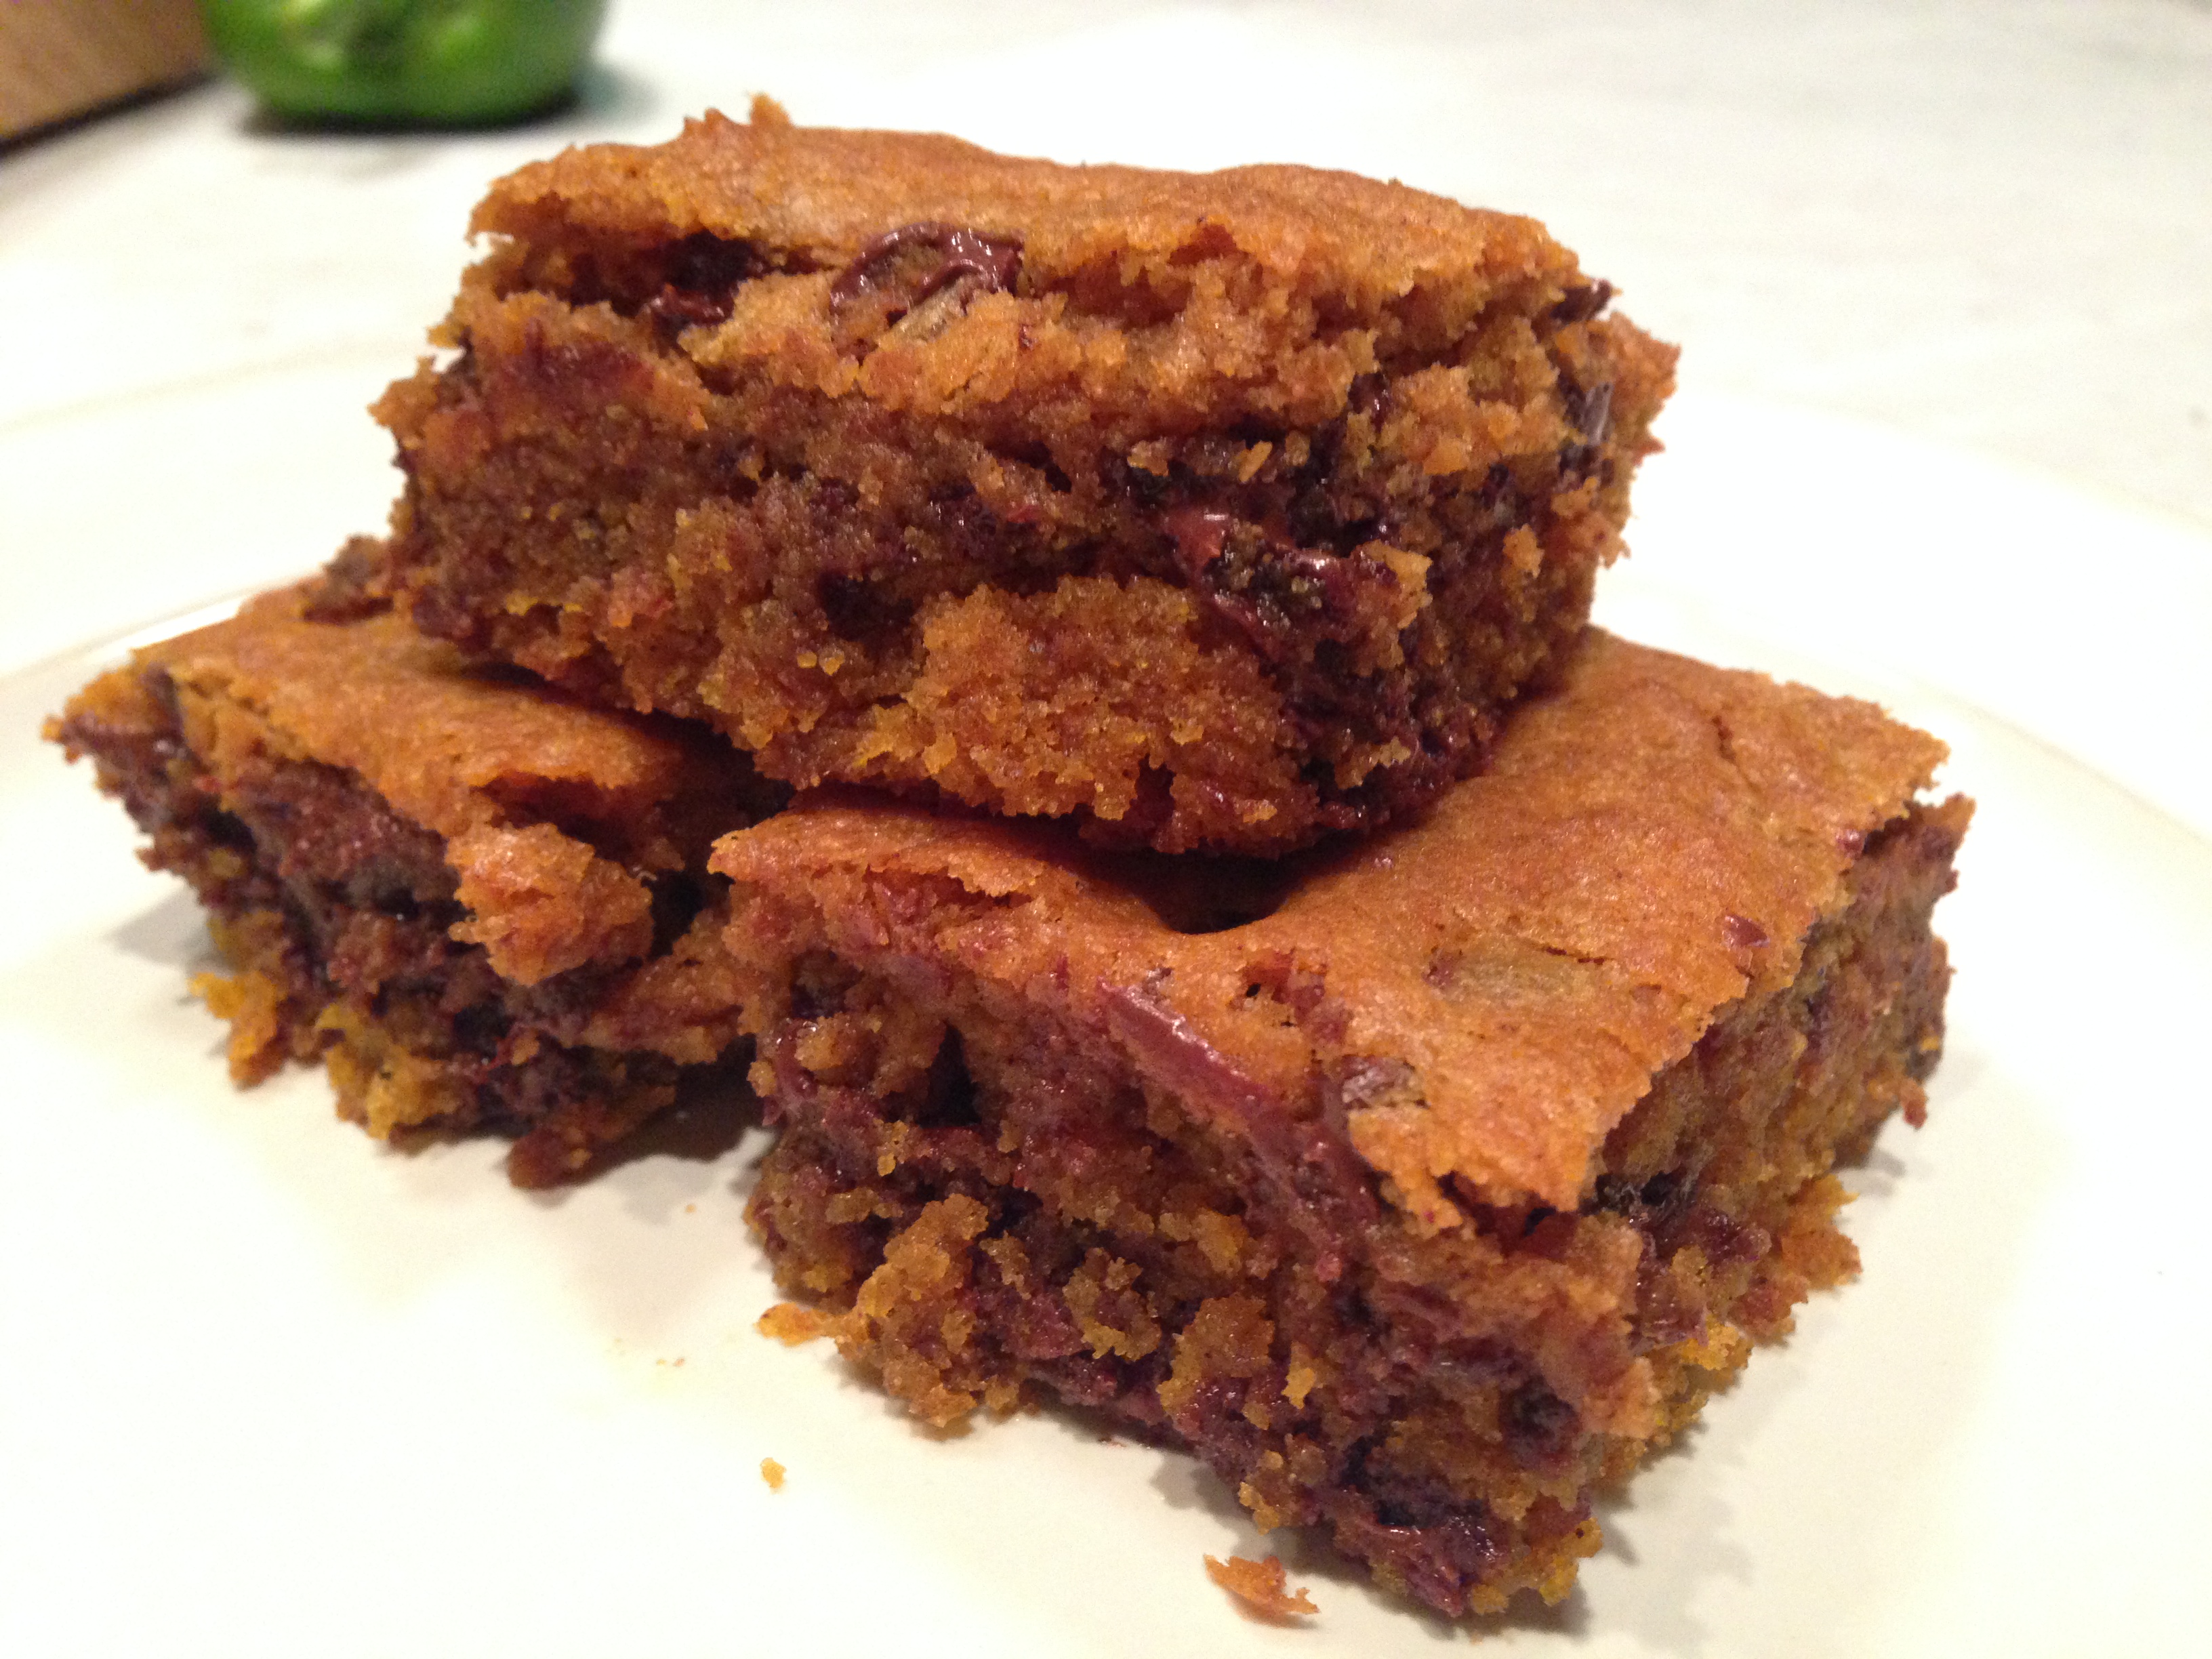
Pumpkin Chocolate Chip Bars (click for printer friendly version)
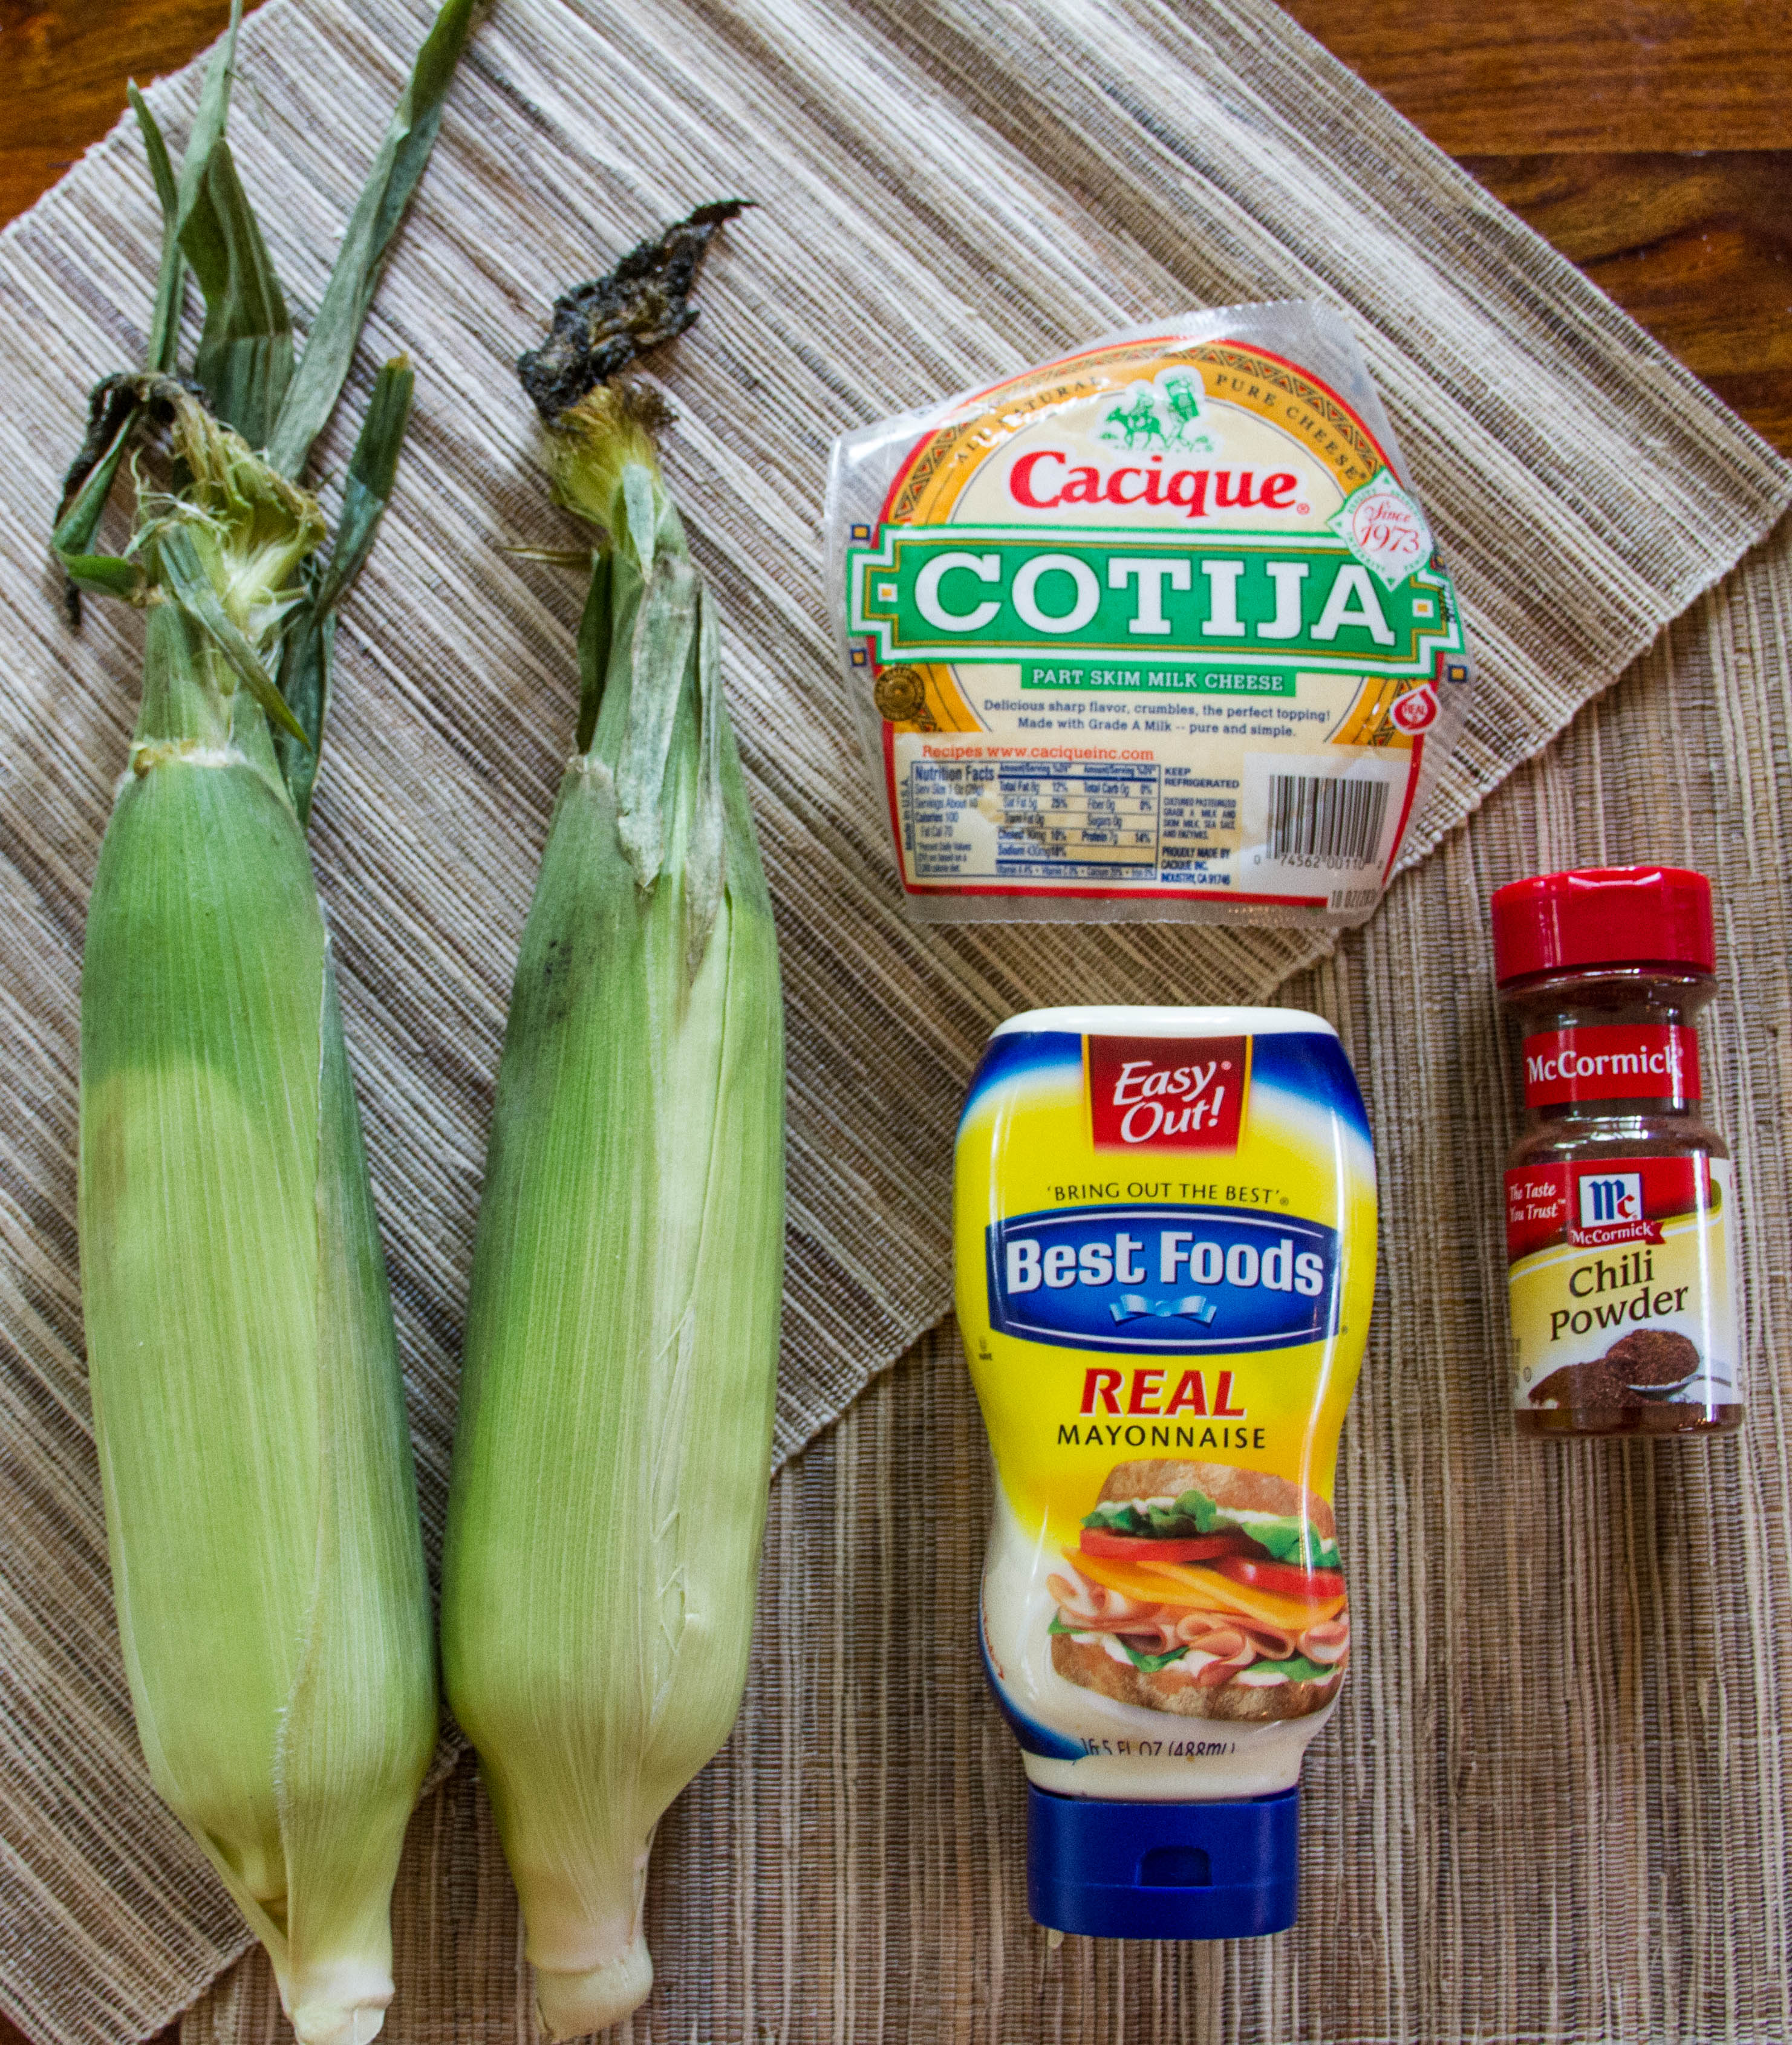
Ingredients:

  • 2 cups all-purpose flour
  • 1 tablespoon pumpkin-pie spice
  • 1 teaspoon baking soda
  • 3/4 teaspoon salt
  • 1 cup coconut oil, melted (put the coconut oil in the microwave for 10-15 seconds until it becomes liquid and easy to pour.
  • 1 1/4 cups granulated sugar
  • 1 large egg
  • 2 teaspoons vanilla extract
  • 1 cup canned pumpkin puree (not pumpkin pie filling)
  • 1 package (12 ounces) semisweet chocolate chips

Directions:

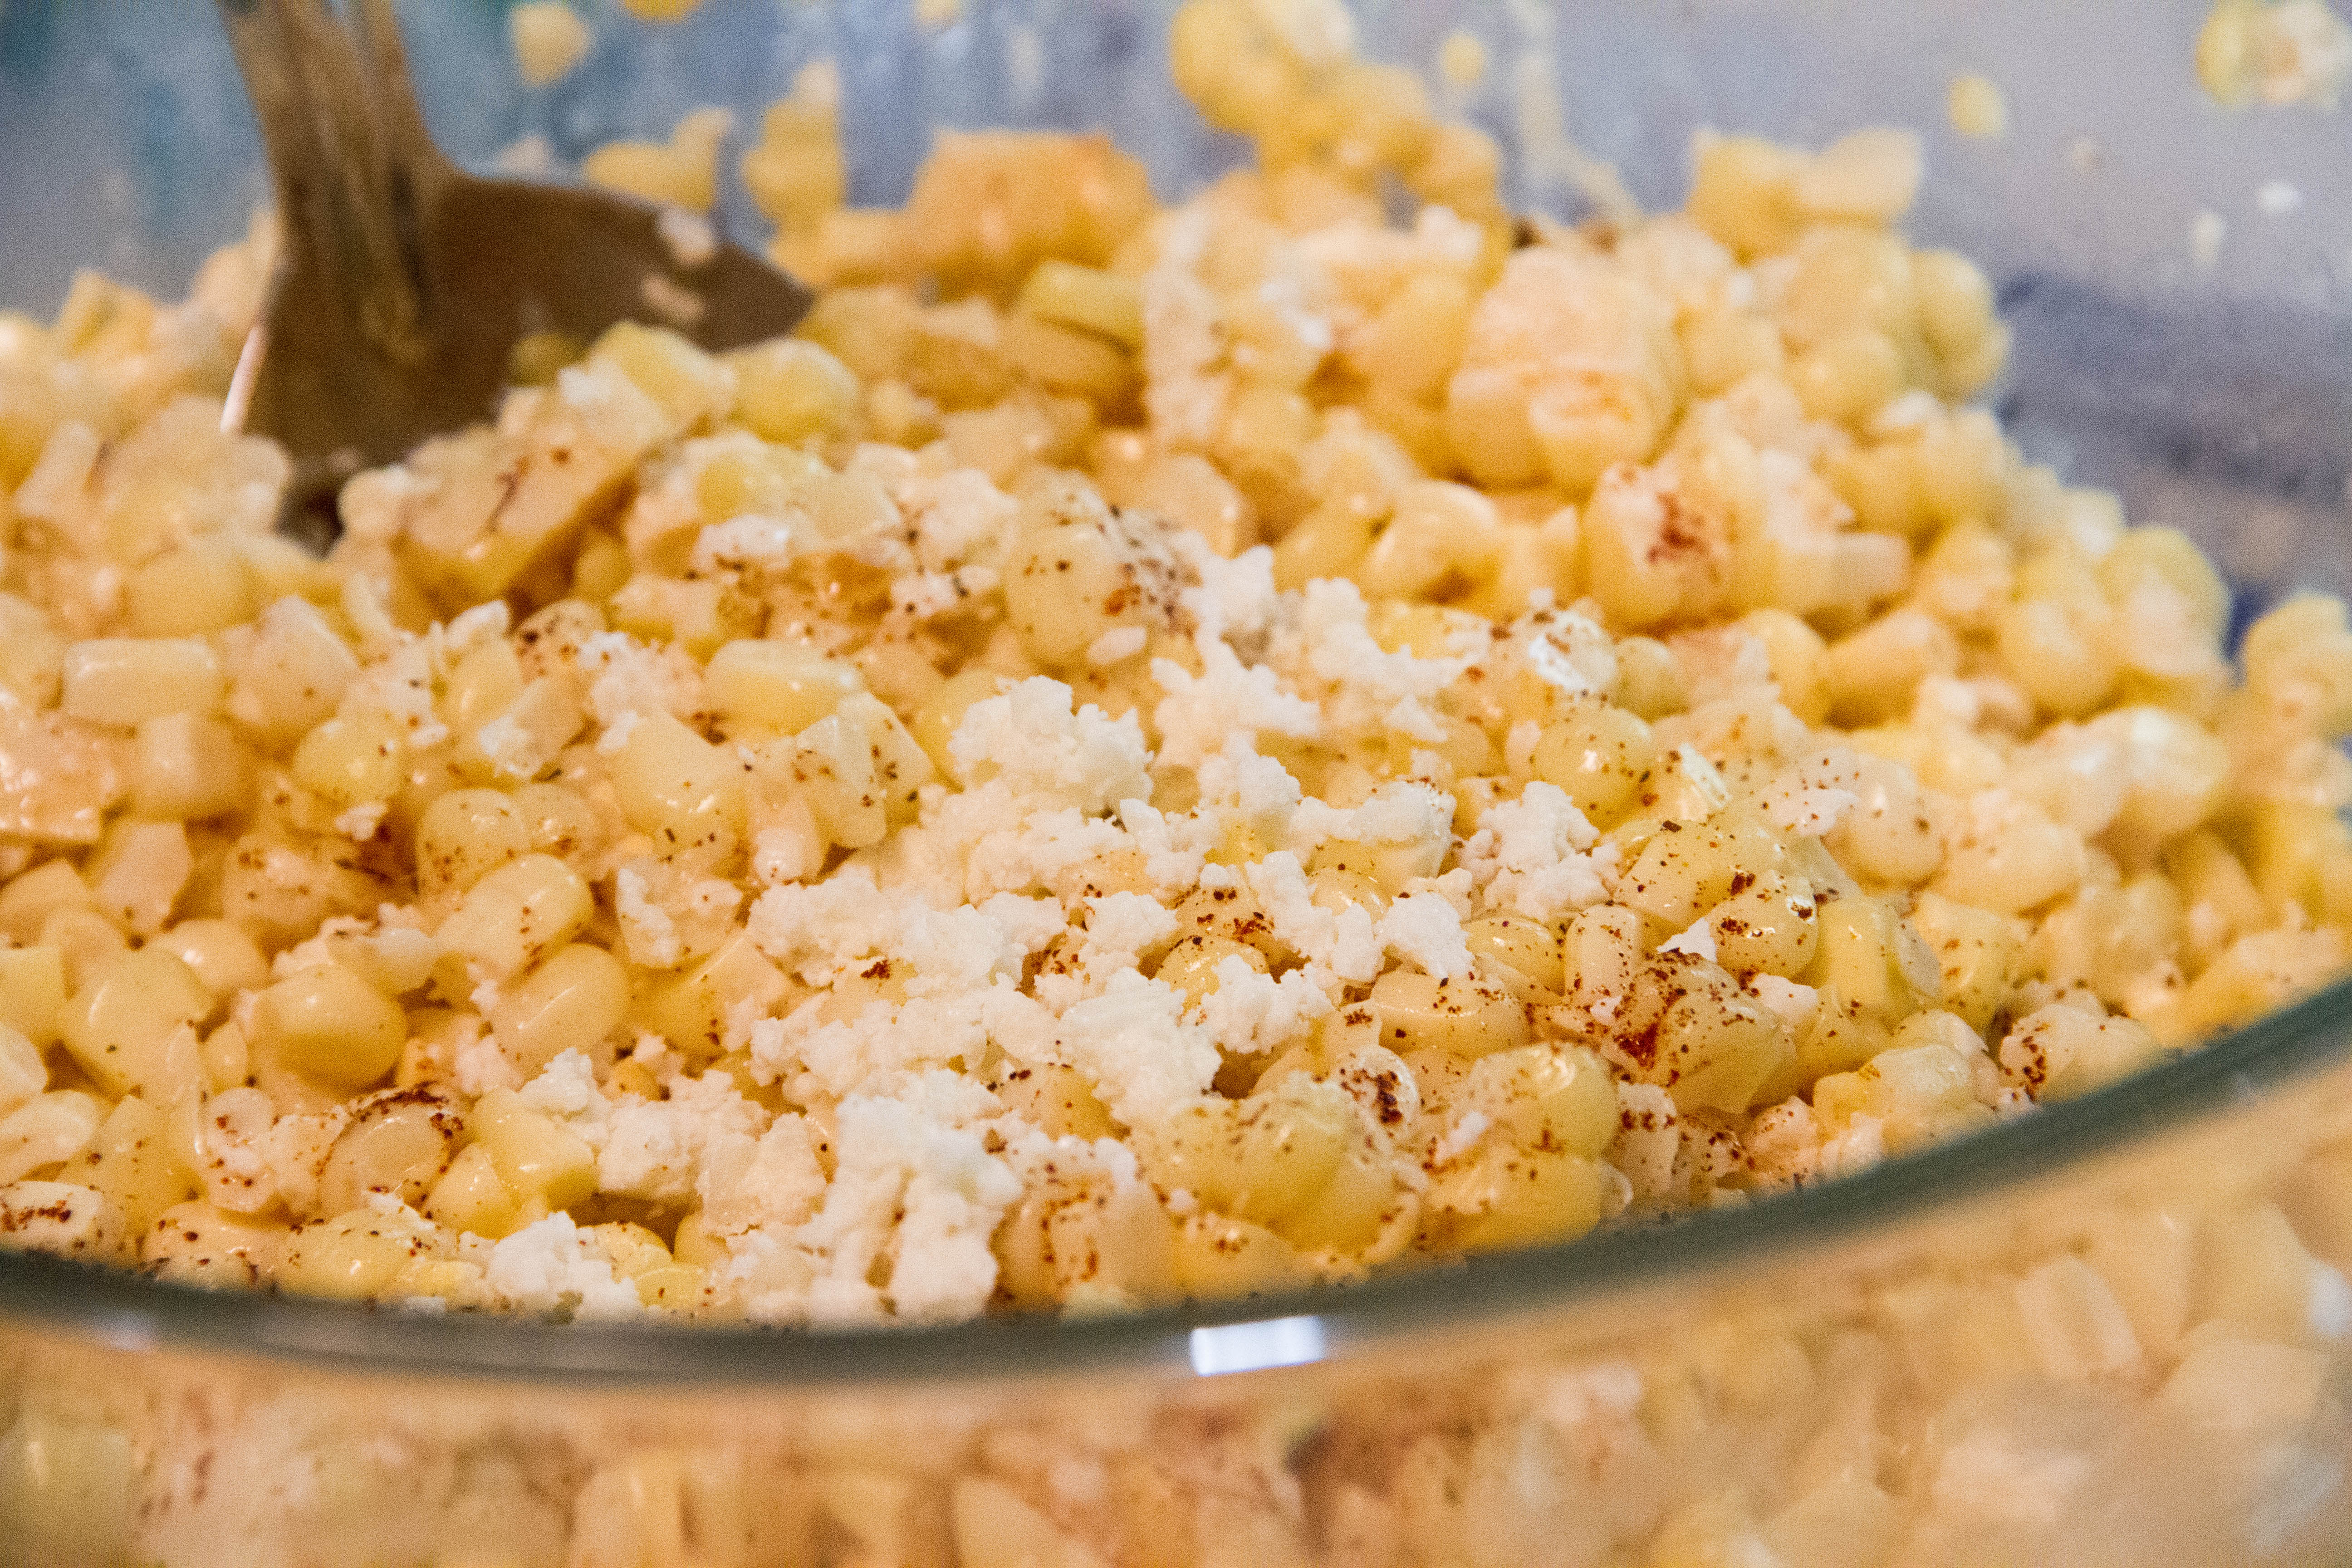
  1. Preheat the oven to 350 degrees. Grease a 9x13inch baking dish. In a medium bowl, combine flour, pumpkin pie spice, baking soda and salt. set aside.
  2. With a standing or hand mixer beat coconut oil and sugar on medium speed until fully incorporated. Mix in egg and vanilla. Add pumpkin puree and mix well. (if you are using butter don’t worry if the mixture looks a little curdled.)
  3. Reduce speed to low and slowly mix in dry ingredients until fully incorporated. Fold in chocolate chips with a spatula.
  4. Spread batter into the prepared baking pan. Bake the bars for 35-40 minutes or until the top and edges are brown. A toothpick inserted in the center should come out with a few moist crumbs on it.
  5. This is the hardest part.. WAIT until the bars are almost fully cooled before cutting them. I obviously did not wait and they were very difficult to get out of the pan in once piece! Enjoy!

Recipe slightly adapted from Two Peas and Their Pod

Crock-pot BBQ Pulled Pork with Slaw

photo 4-21I was feeling very festive with the start of NFL regular season this weekend. I got up early on Sunday morning to get all the ingredients to make this crock-pot pork for Sunday night football. I also made one of my other favorite recipes for the afternoon football games, Buffalo Chicken Dip, which is super easy and delicious! Crock-pots are the best inventions in the world!

You throw a bunch of stuff together, set the cooker and let it do its thing. I turned this pork on at 10am Sunday morning and by 6pm that night we had the most delicious, tender and finger licking good BBQ pulled pork and I didn’t spend my day in the kitchen! Best part is this recipe feeds a crowd and is great for hungry football fans or a large group of hungry people. And the left overs are amazing too.

Pulled pork tacos, pulled pork nachos and sandwiches, the options are endless! Top your pork off with this crunchy cabbage slaw and you’ve got yourself a crowd pleasing meal.

BBQ Pulled Pork and Slaw (Click for printer friendly version)

(Serves 6-8)

Ingredients:

  • 2 medium yellow onions, thinly sliced
  • 4 medium garlic gloves, thinly sliced
  • 1 cup chicken broth
  • 1 tablespoon packed dark brown sugar
  • 1 tablespoon chili powder
  • 1 tablespoon kosher salt
  • 1/2 teaspoon ground cumin
  • 1/4 teaspoon ground cinnamon
  • 1 (4-1/2 to 5-1/2 pound) boneless or bone-in Boston pork butt, twince or netting removed
  • 2 cups of your favorite barbecue sauce, plus more for serving (such as Sweet Baby Rays or any other sweet and smokey BBQ sauce… I used Motherload which I purchased from Whole Foods)
  • 8-10 potato or white hamburger buns

Cabbage Slaw

  • 4 cups shredded cabbage and carrot coleslaw
  • 1/2 cup plain Vegenaise or mayonnaise
  • 2 tablespoons pickle juice (or white vinegar)
  • large pinch of sugar
  • large pinch of salt

Directions:

  1. Place the onions and garlic in an even layer in the slow cooker and pour in the chicken stock.
  2. In a small bowl, combine sugar, chili powder, salt, cumin and cinnamon. Pat the pork dry with paper towels before rubbing the spice mixture all over the pork. Place the meat on top of the onions and garlic. Cover and cook until the pork if fork tender, about 7-8 hours on high or 8-10 hours on low.
  3. Meanwhile combine all the ingredients for the slaw in a large bowl, mix well to combined and refrigerate while pork cooks.
  4. Turn off the slow cooker and remove the pork to a cutting board. Set a fine-mesh strainer over a medium bowl, pour onion mixture from the slow cooker. Return onions back to the slow cooker and discard strained liquid.
  5. Using two forks, shred the meat into bite-sized pieces, discarding any large pieces of fat. Return the shredded meat to the slow cooker, add the barbecue sauce and mix to combine.
  6. Serve on a hamburger bun topped with extra BBQ sauce (if desired) and loaded with cabbage slaw… ENJOY!

Slightly adapted from CHOW.com

Tzatziki Dip

photo-606I hope you all had a wonderful Labor Day weekend! We had gorgeous weather in Park City, which was a welcomed change from all the rain and gloomy weather we’ve been having here. I keep telling myself that all this rain now… means LOTS of snow this winter, right? I kicked off my long weekend with a BBQ with some friends, like I am sure many of you did as well. I was looking for a different appetizer to bring to the BBQ than the usual hummus and carrots or veggie platter which are so over done!

We have been getting a lot of cucumbers in our CSA lately so I thought it would be perfect to use some of them up. This recipe for Tzatziki is super light and refreshing- it uses about half the amount of sour cream that most recipes call for, making this the perfect dip or condiment! I also love putting this Tzatziki on my Greek chicken gryo’s (recipe to come!) Serve this dip with some pita chips and enjoy!!

Greek Tzatziki Dip

Ingredients:

  • 3 Tablespoons Olive Oil
  • 1 Tablespoon white wine or champagne vinegar
  • 2 gloves garlic, minced or pressed using a garlic press
  • 1/2 lemon, juiced
  • 1/2 teaspoon salt (more to taste)
  • 4-5 turns of fresh pepper
  • 1 cup Greek yogurt
  • 1 cup sour cream
  • 2 cucumbers, peeled, seeded and diced (smaller is better)
  • 1 teaspoon chopped fresh dill (I use freeze dried sometimes too)

Directions:

  1. In a small bowl, combine olive oil, vinegar, lemon juice, garlic, salt and pepper. Mix to combine, set aside.
  2. Peel cucumbers and slice them lengthwise. Using a spoon, scoop the seeds from the flesh and discard them. Diced the cucumber into small bite size cubes.
  3. In another medium bowl, use a whisk to blend yogurt with sour cream.
  4. Add the olive oil mixture to the yogurt mixture and stir until none of the oil remains.
  5. Fold in cucumber and dill until fully incorporated. Chill for 1-2 hours before serving.
  6. Serve with pita chips

Forbidden Rice and Bean Salad with Orange Dressing

IMG_8070Labor day weekend has crept up on me all to quickly. The last two weeks we have been getting a stead stream of midday/afternoon rain and thunder storms, which were accompanied by a big temperature drop (we even got a little snow on the very top of the high mountains). All those rain clouds do make for beautiful sunsets!

I am feeling cheated out of the last few warm weekends of summer and so do the leaves on the trees… they are starting to turn yellow and orange, oh no! I start to feel that end of summer sadness when the air gets crisp at night and the smell of wood burning stove lingers in the air. I hate to see summer go, but fall is one of my favorite times of year! IMG_7878This recipe for forbidden rice salad is wonderful as a summer or fall recipe. It is hearty enough for lunch or dinner as a vegetarian dish, or it’s perfect as a side to steak, burgers or grilled chicken (like in the Blonded by Style and SBITK Mexican Fiesta). I think it’s even better when it sits in the fridge overnight, allowing the juices to meld and marinate.

Feel free to use green beans or asparagus for the salad (I personally prefer the flavor of the asparagus in this recipe!) However, I have made it both ways and both are equally delectable! I hope you enjoy!

Forbidden Rice and Bean Salad with Orange Dressing

  • 2 cups black forbidden rice, cooked to package directions and cooled
  • 2 14 oz. cans garbanzo beans, drained and rinsed
  • 1 12 oz. package shelled edamame, thawed/cooked to package directions
  • 1 bunch asparagus or 1/2lb fresh green beans, blanched and cut into ½” pieces
  • ¾ cup golden raisins
  • ¾ cup dried cranberries
  • ¼ cup parsley, chopped

For the orange dressing

  • ½ cup orange juice
  • ¼ cup cider vinegar
  • 2 tablespoons grated orange peel
  • ½ cup olive oil
  • Salt and pepper to taste

Directions:

  1. In a small bowl using a whisk, combine dressing ingredients, set aside.
  2. Bring 2 cups of water to a boil in a medium saucepan. Blanch the asparagus (or green beans) for 3-4 minutes. Remove immediately from the hot water and place in an ice bath or run under cold water to stop them from over cooking and becoming too soft.
  3. Combine rice, garbanzo beans, edamame, asparagus, raisins, cranberries, and parsley and toss to combine. Drizzle half the orange dressing over the top and toss to coat all the ingredients. Add more dressing if desired. Cover and chill before serving (over night is better!)
  4. Extra dressing can be covered and stored in the refrigerator up to 1 week.

Thanks to Mia from Blonded by Style for taking all the food pictures!

Jalapeno Poppers with Pineapple and Bacon

IMG_7869It’s hard to believe that kids are starting to go back to school already! Park City public schools start on Thursday, some other schools in the state started last week! But, but wait… summer was just getting started!! Even crazier… some of the leaves are starting to change already! I am not ready for this!

One thing I am ready for… football season! We are just two weeks away from the start of regular season NFL games and I am so excited. One my favorite fall actives is getting together at someones house and watching the Patriots play. It’s one of my East coast traditions I’ve taken with me to the West… Sunday is Pats day. Ok, so you don’t need to love football or the Patriots to love these jalapeno poppers because they are down right delicious and perfect for any occasion. IMG_8015The spice from the jalapeno, the creaminess of the cheese, sweet from the pineapple and salt from the bacon come together for one popping popper! Bring this to your next cocktail party, cook-out or tailgate party and you’ll be everyone’s favorite person. Enjoy!

Jalapeno Poppers with Pineapple and Bacon

  • 10-12 medium/large Jalapenos (or 15-18 small ones)
  • 1 8 oz. block cream cheese, at room temperature
  • 1 8 oz. can crushed pineapple, drained
  • ¼ cup shredded white cheddar
  • 3-4 pieces bacon, cooked

Directions:

  1. Pre-heat the oven to 400 degrees
  2. Cook the bacon in a skillet until crispy, place on paper towels to cool. Chop into small pieces and set aside.
  3. Remove the stems of the Jalapenos, cut them in half lengthwise, and remove the seeds and ribs. Be careful not to touch your face or eyes during this process you will burn yourself and regret it!
  4. In a medium bowl combine cream cheese, pineapple and cheddar cheese.
  5. Using a spoon stuff each jalapeno half with the cream cheese mixture so it is even with the sides of the jalapeno (about 1 or 2 tablespoons of filling depending on how large your jalapenos are)
  6. Place cheese side up on a baking dish and bake at 400 degrees for 15-20 minutes or until the cheese is slightly brown and bubbly. Remove from the oven and allow them to cool about 5 minutes.
  7. Sprinkle with chopped bacon and serve!

**Thanks to Mia from Blonded by Style for taking the pictures. This post was part of our Mexican Fiesta, check out the whole menu here.

Mexican Corn Off the Cob

IMG_7871

Good Morning! I am just back from a wonderful vacation with my family and friends! Celebrating weddings, birthdays and enjoying some time by the ocean. It was nice to unwind! Even though I was not posting recipes on my blog, I was doing some cooking and research on some delicious new recipes to post and boy did I test some good ones!! photo-604Since I was by the ocean, I was cooking a lot of seafood- clams, mussels, lobster and fresh stripped bass. There is nothing better than super fresh, local seafood. It is one of the things I miss most about living in a land locked state! Stay tuned for some of those tasty recipes, I will post them soon! But for now, one of my new favorite ways to eat corn… Mexican corn OFF the cob… because no one likes getting corn stuck in their teeth. IMG_8049Don’t judge the fact that there is mayonnaise in the recipe, a friend who hates mayonnaise, LOVED this dish. The comb of lime juice, cheese and the little kick from the chili powder is the perfect balance of salty, spicy and tangy! You’ll have trouble eating corn the “normal” way every again! This recipe was part of my collaboration with Blonded by Style, see our full menu here!

Mexican Corn Off the Cob

  • 8 ears of fresh corn, grilled with the husk on.
  • ½ cup mayonnaise
  • 3 tablespoons butter
  • 2 limes, juiced
  • 1 tablespoon chili powder
  • Salt to taste
  • ½ cup crumbled Cotija Mexican Cheese (You can substitute Queso Fresco or Kraft Parmesan cheese if your grocery store does not have Cotija)

Directions:

  1. Wet the outside of the corn-husks with water, and place them on a pre-heated grill. Turn ever 2-3 minutes until the outside of the corn is charred but not burned. Once the corn has cooled, shuck the husks off. Cut the kernels off the corn and place in a large bowl.
  2. In a small bowl, whisk together mayonnaise, lime juice, chili powder and generous pinch of salt. The dressing should have a similar consistency as creamy ranch dressing. Pour mixture over the corn, sprinkle with cheese and toss to combine.
  3. Season to taste with salt. Garnish with more crumbled cheese and a dash or two of chili powder on top. Serve immediately.

Pineapple Tequila Crushers with Fresh Basil

IMG_7986Anyone else throwing up their hands and screaming TGIF? I am! To celebrate the weekend, why don’t you make yourself a “It’s 5 o’clock somewhere” drink… right now. Ok, so it’s 10am? Maybe wait until you leave work before throwing back the tequila, I’m sure your boss will appreciate it! IMG_7988But seriously, this drink is killer and deliciously refreshing! Another tasty concoction from the Blonded by Style and Ski Boots in the Kitchen Mexican Fiesta collaboration! (Check out the full menu here!) We hope you enjoy… we did! Happy Weekend to you all!

Pineapple Tequila Crushers with Fresh Basil

  • 2 oz. Reposado Tequila
  • ¾ oz. Agave Nectar
  • 1 oz. Fresh Lime Juice
  • 4 Fresh Pineapple Chunks
  • 2 Basil Leaves
  • Soda water

Directions:

  1. Muddle Pineapple and basil leaves in a glass.
  2. Add remaining ingredients and shake vigorously with ice until well blended.
  3. Strain into a rocks glass with fresh ice. Top with a splash of soda water and garnish with a chunk of fresh pineapple.
  4. Optional* Add a few thin slices of fresh jalapeno to the mixture after shaking for a spicy version!

Drunken Chicken with Pineapple Salsa (BBS/SBITK Collaboration)

IMG_7852In order to throw the ultimate summer BBQ you need a few key ingredients. First, a theme is helpful (and fun!) to help guide your guests on what they can bring that will complement the meal you’re preparing. For the BBQ collaboration I did with Mia from Blonded by Style we chose a Mexican Fiesta theme with a few reoccurring ingredients such as Tequila, Jalapenos, Cilantro, Pineapple and Lime. See the whole menu here.

Using the same ingredients in all your dishes helps save some money at the store and helps tie the whole meal together! Second, come up with specialty cocktail or drink to go with your theme, everyone loves a specialty drink and it will help make your BBQ more festive! IMG_7988Premixing your cocktail, such as this Pineapple Tequila Crusher or Sangria will help save you time and allow you to mix and mingle more with your friends!

Lastly, festive table decor (plates, glasses and/or flowers) add a fun touch to your party. There is no need to go out and buy all new stuff, find some fun paper napkins or mason jars for your cocktails that you’ll be able to reuse for other parties. No matter what you serve or drink at your next BBQ being surrounded by great friends and food is all that matters! Enjoy!

Drunken Chicken (Blonded by Style & SBITK BBQ Collaboration)

  • ¾ cup Tequila
  • 1/3 cup lime juice
  • ¼ Cup Extra Virgin Olive Oil
  • 5 garlic cloves, minced
  • 1 jalapeño – partially seeded and diced
  • ¼ teaspoon salt and freshly ground pepper
  • 1/8 teaspoon chili powder
  • ½ bunch of cilantro, chopped
  • 9-10 boneless skinless chicken breasts

Directions:

  1. In a medium bowl, whisk together ingredients.
  2. Place the chicken in a 9×13 baking dish, pour marinade over the chicken and allow it to marinate for 3-8hours in the refrigerator.
  3. When ready to cook, heat your grill (medium/high heat). Remove chicken from marinade and place on the grill about 5-7 minutes per side. Flip and continue cooking for 10 minutes or until the chicken is cooked all the way through. Serve with Pineapple salsa (recipe below).

 IMG_7936Pineapple Salsa

  • Half a pineapple, cored, skin removed and diced
  • 1 jalapeño partially seeded and diced
  • ½ cup red onion finely chopped
  • ½ pint of cherry tomatoes, thinly sliced
  • 2 tablespoons cilantro
  • 2 limes, juiced
  • Drizzle of Extra Virgin Olive Oil (1 turn around the bowl)
  • Salt, pepper to taste

Directions:

  1. In a medium bowl combine pineapple, jalapeno, red onion and cilantro, and lime juice, mix to combine. Drizzle with EVOO and season to taste with salt and freshly ground pepper. Serve over chicken

**Thanks to Mia for taking all the beautiful photos!

Key Lime Pie

photo 2-43Happy hump day y’all! You’ve made it through half the work week and lets be honest you deserve a treat for working so hard! There’s pretty much no better way to treat yourself or celebrate than with pie… and more specifically deliciously tart and perfect key lime pie! Last night I was celebrating because our coed rec league softball team went undefeated in our regular season (9-0!) So we are heading into the playoffs ranked #1! We played a double header under beautiful pink Park City skies! photo-604Doesn’t get much better than that! Oh wait it does… Key Lime Pie! This is my all time favorite go to recipe that was passed on to me by a friend. I have tired many variations of key lime pies and this one hands down always wins.

It is the perfect balance of tangy and sweet, it’s so satisfying and refreshing! I have also made it a few different ways, both as a pie and as individual mini tarts! The pie version is definitely less time consuming since you’re not packing the graham cracker crust into each little individual cupcake tin, however the result of the mini tarts is quite chic! Top these little babies off with a dollop of freshly whipped cream and booyah you’re the most popular person at the party!

Key Lime Pie (Serves 8)

Ingredients For the Graham Cracker Crust
1 1/4 cups graham cracker crumbs (about one sleeve of graham crackers, finely crushed)
5-6 tablespoons unsalted butter, melted
For the Key Lime Filling
3 Large egg yolks
1 14oz can sweeten condensed milk
1/2 cup fresh squeezed key lime juice
2 teaspoons freshly grated key lime zest
For the Whipped Topping
1 cup heavy whipping cream
2 tablespoons granulated white sugar

Directions

  1. Preheat oven to 350 degrees
  2. Mix together the graham cracker crumbs and melted butter. Press into the bottom and up the sides of a 9-inch pie pan or large cupcake pan (you may need to do a few batches with the cupcake pan if you only have one). Bake in oven for about 8-10 minutes, until golden brown (don’t allow it to get too brown).
  3. Meanwhile, In the bowl of your electric mixer (you can use a hand mixer or kitchen aide), with the whisk attachment beat the egg yolks until pale and fluffy (about 3 minutes). Gradually add the sweeten condensed milk and beat until you have a light and fluffy mixture (4-5 minutes). Scrape down the sides of the bowl and beat in the limejuice and zest.
  4. Pour the filling into the crust and bake for another 10 minutes, or until the filling has set. Remove from the oven and place on a wire rack to cool. Once it has completely cooled, cover and refrigerate until serving time. (Pie can be made at this point and stored in fridge over night).
  5. Just before serving, make the whipping cream. In a separate bowl, beat the whipping cream until soft peaks form, add sugar and beat until stiff peaks form. Place mounds of whipping cream on top of the pie filling.

Red, White and Blue Ricotta Bites

photo 1-41Happy 4th of July… A few days late! Sorry I have been MIA for the last few weeks, I have been all over the U.S. of A on vacation, visiting family and going to a lot weddings! 3 weddings in 3 weeks, its a new record for us.

I feel like my liver might be failing at this point, especially since we followed up our three week wedding tour with a 3 day 4th of July weekend, which was heavy on the BBQing and drinking too. OUCH. Not to mention its been about 700 degrees here in Utah and I haven’t had the slightest desire to get in the kitchen to cook. I did want to make a fun and festive appetizer for our BBQ that didn’t require going anywhere near the stove.

Thus, these little ricotta bruschetta bites were the perfect option. I picked up the fresh berries at the Canyons farmers market with my mother and father-in-law, they were so fresh and delicious! photo 3-30There is nothing better than plump fresh blueberries. These little ricotta bites are great anytime, not just the 4th of July and as the warm summer months continue you’ll be happy to have a no bake appy for your next gathering!

Ingredients:

  • 1 crispy french baguette, sliced into 1/4-1/2″ pieces
  • 1 small container of whole milk ricotta cheese
  • 1 container blueberries, rinsed and dried
  • 1 container raspberries, rinsed and dried
  • honey for drizzling

Directions:

  1. Arrange the sliced baguette on a platter. Using a knife, evenly spread a thin layer of ricotta cheese on the bread. Place one blueberry and one raspberry on top of the baguette. Finish with a drizzle of honey over the top of each piece of bruschetta.
  2. Serve and enjoy!