Unknown's avatar

About skibootsinthekitchen

I love to cook, eat, travel, & drink wine. I enjoy mountain activities of all kind. Come have a bite with me! www.skibootsinthekitchen.com

Drunken Chicken with Pineapple Salsa (BBS/SBITK Collaboration)

IMG_7852In order to throw the ultimate summer BBQ you need a few key ingredients. First, a theme is helpful (and fun!) to help guide your guests on what they can bring that will complement the meal you’re preparing. For the BBQ collaboration I did with Mia from Blonded by Style we chose a Mexican Fiesta theme with a few reoccurring ingredients such as Tequila, Jalapenos, Cilantro, Pineapple and Lime. See the whole menu here.

Using the same ingredients in all your dishes helps save some money at the store and helps tie the whole meal together! Second, come up with specialty cocktail or drink to go with your theme, everyone loves a specialty drink and it will help make your BBQ more festive! IMG_7988Premixing your cocktail, such as this Pineapple Tequila Crusher or Sangria will help save you time and allow you to mix and mingle more with your friends!

Lastly, festive table decor (plates, glasses and/or flowers) add a fun touch to your party. There is no need to go out and buy all new stuff, find some fun paper napkins or mason jars for your cocktails that you’ll be able to reuse for other parties. No matter what you serve or drink at your next BBQ being surrounded by great friends and food is all that matters! Enjoy!

Drunken Chicken (Blonded by Style & SBITK BBQ Collaboration)

  • ¾ cup Tequila
  • 1/3 cup lime juice
  • ¼ Cup Extra Virgin Olive Oil
  • 5 garlic cloves, minced
  • 1 jalapeño – partially seeded and diced
  • ¼ teaspoon salt and freshly ground pepper
  • 1/8 teaspoon chili powder
  • ½ bunch of cilantro, chopped
  • 9-10 boneless skinless chicken breasts

Directions:

  1. In a medium bowl, whisk together ingredients.
  2. Place the chicken in a 9×13 baking dish, pour marinade over the chicken and allow it to marinate for 3-8hours in the refrigerator.
  3. When ready to cook, heat your grill (medium/high heat). Remove chicken from marinade and place on the grill about 5-7 minutes per side. Flip and continue cooking for 10 minutes or until the chicken is cooked all the way through. Serve with Pineapple salsa (recipe below).

 IMG_7936Pineapple Salsa

  • Half a pineapple, cored, skin removed and diced
  • 1 jalapeño partially seeded and diced
  • ½ cup red onion finely chopped
  • ½ pint of cherry tomatoes, thinly sliced
  • 2 tablespoons cilantro
  • 2 limes, juiced
  • Drizzle of Extra Virgin Olive Oil (1 turn around the bowl)
  • Salt, pepper to taste

Directions:

  1. In a medium bowl combine pineapple, jalapeno, red onion and cilantro, and lime juice, mix to combine. Drizzle with EVOO and season to taste with salt and freshly ground pepper. Serve over chicken

**Thanks to Mia for taking all the beautiful photos!

Mexican Fiesta with Blonded by Style & SBITK

IMG_7800One of my favorite things about food and cooking is that it brings people together. No matter what language you speak or what country you are in, food is the universal language. I love bringing people together around my kitchen table to share a meal with good friends, drinks and food, there is nothing better! Last week my friend Mia, one of the stylish chicks behind the blog Blonded By Style, and I got together to throw a fun Mexican themed fiesta for our friends. She and her sister Zoe started their fashion blog to showcase their fabulous style with beautiful photographs, clothing and food! IMG_8064We thought it would be fun to collaborate on how to throw a stylish and delicious summer BBQ! Stay tuned for all the great recipes coming soon! To give you a taste of what we did here is our menu!

Summer Mexican Fiesta with Ski Boots in the Kitchen and Blonded By Style

  • Pineapple Tequila Crushers with Fresh Basil
  • Jalapeno Poppers with Pineapple and Bacon
  • Guacamole and Chips
  • Drunken Chicken with Pineapple Salsa
  • Forbidden Rice and Bean Salad with Orange Dressing
  • Mexican Corn off the Cob
  • Death by Chocolate Mexican Chocolate Cake with Chocolate Frosting

Mia headed over to the beautiful farm stand at Copper Moose Farm to gather some fresh ingredients for our BBQ.

Fresh green beans, basil and flowers all grown here in Park City. The difference in flavors of freshly grown ingredients vs. store bought is amazing. Buying fresh and local is the way to go!

We had the best time cooking together… We even got a little silly and I put on some ski boots to show that sometimes, I actually do cook in my ski boots! The goggles were helpful when I was cutting the onions, my eyes didn’t water! Thanks to Mia for taking all the beautiful photos! Check back soon for the Drunken Chicken with Pineapple Salsa recipe and other recipes next week!


Key Lime Pie

photo 2-43Happy hump day y’all! You’ve made it through half the work week and lets be honest you deserve a treat for working so hard! There’s pretty much no better way to treat yourself or celebrate than with pie… and more specifically deliciously tart and perfect key lime pie! Last night I was celebrating because our coed rec league softball team went undefeated in our regular season (9-0!) So we are heading into the playoffs ranked #1! We played a double header under beautiful pink Park City skies! photo-604Doesn’t get much better than that! Oh wait it does… Key Lime Pie! This is my all time favorite go to recipe that was passed on to me by a friend. I have tired many variations of key lime pies and this one hands down always wins.

It is the perfect balance of tangy and sweet, it’s so satisfying and refreshing! I have also made it a few different ways, both as a pie and as individual mini tarts! The pie version is definitely less time consuming since you’re not packing the graham cracker crust into each little individual cupcake tin, however the result of the mini tarts is quite chic! Top these little babies off with a dollop of freshly whipped cream and booyah you’re the most popular person at the party!

Key Lime Pie (Serves 8)

Ingredients For the Graham Cracker Crust
1 1/4 cups graham cracker crumbs (about one sleeve of graham crackers, finely crushed)
5-6 tablespoons unsalted butter, melted
For the Key Lime Filling
3 Large egg yolks
1 14oz can sweeten condensed milk
1/2 cup fresh squeezed key lime juice
2 teaspoons freshly grated key lime zest
For the Whipped Topping
1 cup heavy whipping cream
2 tablespoons granulated white sugar

Directions

  1. Preheat oven to 350 degrees
  2. Mix together the graham cracker crumbs and melted butter. Press into the bottom and up the sides of a 9-inch pie pan or large cupcake pan (you may need to do a few batches with the cupcake pan if you only have one). Bake in oven for about 8-10 minutes, until golden brown (don’t allow it to get too brown).
  3. Meanwhile, In the bowl of your electric mixer (you can use a hand mixer or kitchen aide), with the whisk attachment beat the egg yolks until pale and fluffy (about 3 minutes). Gradually add the sweeten condensed milk and beat until you have a light and fluffy mixture (4-5 minutes). Scrape down the sides of the bowl and beat in the limejuice and zest.
  4. Pour the filling into the crust and bake for another 10 minutes, or until the filling has set. Remove from the oven and place on a wire rack to cool. Once it has completely cooled, cover and refrigerate until serving time. (Pie can be made at this point and stored in fridge over night).
  5. Just before serving, make the whipping cream. In a separate bowl, beat the whipping cream until soft peaks form, add sugar and beat until stiff peaks form. Place mounds of whipping cream on top of the pie filling.

Red, White and Blue Ricotta Bites

photo 1-41Happy 4th of July… A few days late! Sorry I have been MIA for the last few weeks, I have been all over the U.S. of A on vacation, visiting family and going to a lot weddings! 3 weddings in 3 weeks, its a new record for us.

I feel like my liver might be failing at this point, especially since we followed up our three week wedding tour with a 3 day 4th of July weekend, which was heavy on the BBQing and drinking too. OUCH. Not to mention its been about 700 degrees here in Utah and I haven’t had the slightest desire to get in the kitchen to cook. I did want to make a fun and festive appetizer for our BBQ that didn’t require going anywhere near the stove.

Thus, these little ricotta bruschetta bites were the perfect option. I picked up the fresh berries at the Canyons farmers market with my mother and father-in-law, they were so fresh and delicious! photo 3-30There is nothing better than plump fresh blueberries. These little ricotta bites are great anytime, not just the 4th of July and as the warm summer months continue you’ll be happy to have a no bake appy for your next gathering!

Ingredients:

  • 1 crispy french baguette, sliced into 1/4-1/2″ pieces
  • 1 small container of whole milk ricotta cheese
  • 1 container blueberries, rinsed and dried
  • 1 container raspberries, rinsed and dried
  • honey for drizzling

Directions:

  1. Arrange the sliced baguette on a platter. Using a knife, evenly spread a thin layer of ricotta cheese on the bread. Place one blueberry and one raspberry on top of the baguette. Finish with a drizzle of honey over the top of each piece of bruschetta.
  2. Serve and enjoy!

S’more Banana Boats

photo 1-39Hey Y’all, I hope you had a great weekend and celebrated all the wonderful fathers out there! Dads are the best aren’t they? One thing my father and I have in common, among many other things, is our love for dessert. We could both eat the largest dinner and be stuffed to the gills and somehow, find a little extra space for a piece of chocolate cake or pie. I always think a summertime camping and BBQ dessert staple are S’mores!

But its time to jazz up the classic campfire treat with a little something extra… The banana boat s’more! Don’t get me wrong, this is not replacing the traditional s’more, it is merely keeping your campfire from getting bored! Plus an added bonus, you don’t need any extra ingredients (other than the banana) from the classic s’more.

This is a really fun dessert for kids to do too since they get to eat it right out of the banana! It may not look pretty but it sure does taste amazing!!!

Ingredients:

  • 2 banana
  • 4 large marshmallows, cut into small pieces
  • 4-6 pieces of Hershey’s chocolate, Snickers or Reeses peanut buttercups
  • 2 graham crackers or Oreos, crumbled
  • Tin foil

Directions:

  1. Using a knife, make a deep lengthwise cut along the inside curve of the bananas making sure you don’t cut all the way through. Open slit to form a pocket.
  2. Fill the bananas with marshmallows, chocolate and 1/2 the graham cracker.
  3. Wrap the bananas in foil and place them on the grill, or if you have tongs, place it on the campfire for about 5-6 minutes. Carefully remove from the fire/grill.
  4. Peel back the foil and sprinkle the remaining graham cracker over the top, enjoy with a fork or spoon!

*Cooks note- Get creative with the ingredients and toppings- any kind of candy or dark chocolate you have on hand would be good. You can also use Golden Grahams cereal, cinnamon toast crunch cereal or thin mint cookies to crumble on top. I love adding peanut butter or almond butter to these as well!

Wine Wednesday: A Summer Rosé

PROVENCEROSEIts been a while since I have done a Wine Wednesday post and I’m very sorry! It’s not because I have stopped drinking it, don’t worry! I’ve just been so busy I haven’t been doing much wine drinking on Wednesdays lately! But now that it’s summer, its time to pull out what I like to call my favorite “patio pounders.” I am normally a red wine drinker 8 months of the year but when summer roles around and the weather is hot, there is nothing more horrific to me than a heavy red wine on 90 degree summer day. I’m sweating just thinking about it. So that’s where the patio pounder comes in- a light white or rose wine that is so refreshing and easy to drink you’d like to sit on your patio and drink the whole bottle (and you will end up drinking the whole thing, promise!) The Provence region of France is known for their Rose. Don’t let the long and hard to read name fool you, this wine is inexpensive and delicious! Time to pull out the white wine glasses from winter storage, cheers! rose

Commanderie de la Bargemone Coteaux d’Aix en Provence Rose 2012

  • Price: $15.99
  • Varietal: Grenache Blend
  • Region: Provence, France
  • Tasting Notes: Very pale in color, it nevertheless has loads of flavor, with plenty of melon, orange peel, and floral aromas to go with a medium-bodied, racy palate that has both richness and freshness.
  • Food Pairing: You don’t need food to drink this wine but… it pairs well with seafood but has enough stuffing to accompany pizza, pasta and acidic dishes such as ratatouille.
  • Score: 90 points


Strawberry Rhubarb Pie

photo-591There is something about fresh pies that make me think of summer and Martha’s Vineyard. Maybe it’s because as a child my family only ate pie in the summer, or maybe it had to do with one of my favorite summer activities… going over to bake pies with my Aunt Harriet.

I loved that she would always let me steal one of the sugar coated apples out of the bowl before we’d bake the pie (or maybe I always stole it with out her noticing…?) Either way, sleepovers and pie making at Aunt Harriet’s house were the best!

My absolute favorite pie flavor is strawberry rhubarb, I love how the tartness of the rhubarb balances the sweetness of the strawberries and flaky pie crust. photo 1-38While the pie is still warm you’ve got to top it with a big scoop of vanilla ice cream, so it melts into the cracks and crevices of the pie… there is nothing better! I adapted this recipe from a few of my favorites, The Black Dog, Smitten Kitchen, and my Aunt Harriet’s recipe. This week in our CSA we got 1 pound of fresh delicious strawberries and the first thing I thought of doing with them, was make a pie! Hope you enjoy!photo-594

Strawberry Rhubarb Pie (Serves 6-8)

  • 3 1/2 cups (about 5-7 stalks) rhubarb, sliced into 1/2inch pieces
  • 3 1/2 cups (about 16oz) strawberries, stems removed and cut in half (quartered if the strawberries are big)
  • 1/2 granulated sugar
  • 1/2 packed brown sugar
  • 1 Tablespoon lemon juice
  • 2 teaspoons lemon zest
  • pinch of kosher salt
  • 1/4 teaspoon nutmeg
  • 1/4 cup quick cooking tapioca
  • 2 tablespoons butter, cut into small pieces
  • 2 tablespoons heavy cream (for glaze)
  • Turbinado sugar (for crust)
  • 2 pie crusts, either homemade or store bought

Directions:

  1. Preheat the oven to 400 degrees. On a well-floured surface, roll out half of the pie dough into a 12-inch round circle and carefully transfer it into a 9-inch pie plate.
  2. In a large bowl, combine strawberries and rhubarb. In a smaller bowl, mix together sugars, lemon juice and zest, salt and tapioca. Pour sugar mixture over the larger bowl of fruit and gently toss to coat all the fruit being careful not to mash the strawberries.
  3. Mound the filling inside the bottom pie crust and dot with small pieces of butter. Roll the second pie crust out into a circle and cut it into 1-inch strips. Weave the top pieces of pie crust together to form a lattice top (learn how to do it here!) crimp the remaining edges of the pie.
  4. Brush the crust with heavy cream (or 1 egg yolk if you prefer) and sprinkle with turbinado sugar.
  5. Bake at 400 for 20 minutes, then reduce the heat to 350degrees and bake for another 40minutes, until the pie is golden and bubbly.
  6. Top with fresh vanilla ice cream and enjoy!

Best Guacamole

photo-590There are a few recipes that should be a staple in everyone’s home. I think guacamole is one of them. Especially in the summer, there is nothing better than a big bowl of fresh Guac and chips. When making a delicious guacamole, there are a few key things to remember…

#1 make sure the avocados are ripe… but not too ripe! no one likes a brown avocado or one that’s so hard you could bite into it like an apple! When picking avocados at the store, be sure they are slightly soft when you push your thumb into the skin, but not mushy.

#2 Dice your onions small, no one likes a big ol’ bite of bitter onion/bad breath! #3 Don’t over mix/mash your guac and leave a little chunk in your avocado, I think it tastes better and its easier to get more on your chip! Guacamole is great on its own as an appetizer or it’s delicious with tacos, burritos, and even on your breakfast sandwich! Happy Monday, hope you enjoy!

Guacamole (Serves 6)

  • 3 avocados, pitted, pealed and mashed
  • 1 lime, juiced
  • 1/2 red onion, diced small
  • 1 roma (plum) tomato, diced
  • 1 1/2 teaspoons kosher salt
  • 1 teaspoon garlic powder
  • 1/4 cup cilantro, chopped
  • Tortilla chips for dipping

Directions:

  1. In a medium bowl, mash avocados and lime juice with a fork, being sure to leave some small chunks of avocado.
  2. Mix in salt, garlic powder, tomato, red onion and cilantro. Mix until fully incorporated.
  3. Taste and adjust seasoning with a pinch more salt if desired.
  4. Cut a piece of Saran Wrap just lager than the bowl, press the plastic wrap down onto the guac so there is no air between the plastic wrap and the avocado, refrigerate for 1 hour. This will prevent the guacamole from turning brown while it is chilling. If you don’t have time to chill it… Serve immediately!


Rainbow Chard with Parmesan, Pine Nuts & Basil

photo 1-33Happy Wednesday, Y’all! I hope you had a wonderful long Memorial Day weekend! A big thank you to all our Veterans and Military for all you do and sacrifice! One of my fondest memories growing up was watching my grandfather march in his Marine uniform in the Litchfield Memorial Day parade. Memorial Day also officially kicks off SUMMER (and the right to wear white pants!) not to mention lots of BBQs, camping, outdoor activities and lawn games of every kind. This past weekend I went down to southern Utah to explore some of the hidden gems in our state. The longer I live here the more I realize just how cool our state is.

You could spend your whole life visiting the National Parks in Utah and still you wouldn’t see everything the state has to offer.

Last week we received our first CSA delivery from Urban Farm and Feed. We got so many delicious things including fresh eggs, kale, arugula, radishes, oregano and my favorite Rainbow Chard. Look how beautiful it is!

I didn’t even enhance these photos, the chard is naturally this amazing color! What I love about the CSA (other than its local, fresh and amazing) is sometimes you get produce that you wouldn’t normally buy at the store and you are forced to cook something totally new. I am planning on taking you with me on my CSA journey of fun new vegetables, so stay tuned all summer long for great ideas and recipes for your produce, whether it’s from the farmers market or your CSA!

So lets kick off this summer party with some Rainbow chard. This recipe is super easy and takes just a few minutes to saute up. It goes great with chicken, steak, burgers, fish… well just about anything. I hope you enjoy! photo-584

Rainbow Chard with Parmesan, Pine Nuts & Basil (Serves 4)

  • 13 to 14 oz. Rainbow chard (about 1 large bunch)
  • 1 Tbs. extra-virgin olive oil
  • 3 Tbs. pine nuts
  • Kosher salt
  • 1 Tbs. minced garlic (about 2-3 cloves)
  • 2 Tbs. sherry (or dry white wine)
  • 1 Tbs. cold unsalted butter, cut into 4 pieces
  • 1/4 cup grated fresh Parmesan cheese
  • 1/4 cup thinly sliced fresh basil leaves (8 to 10 large)

Directions:

  1. First, wash and dry the chard leaves and stems. Cut the stems from the chard leaves. Cut the leaves into 2- to 3-inch pieces. Slice the stems crosswise 1/4 inch thick.
  2. In a medium sauté pan or skillet, heat the olive oil over medium heat. Add the pine nuts and cook, stirring constantly, until lightly browned, 2 to 3 minutes. Using a slotted spoon, transfer the pine nuts to a plate, leaving behind as much oil as possible.
  3. Return the pan to medium-high heat, add the chard stems and a pinch of salt, and cook, stirring occasionally, until shrunken and beginning to brown lightly, 6 to 7 minutes. Add the garlic and cook just until fragrant, about 15 seconds.
  4. Add the chard leaves, 1/4 tsp. salt and sherry. Toss with tongs until just wilted, 1 to 2 minutes. (If using a skillet, you may need to add the chard in batches, letting the first batch wilt before adding more.)
  5. Remove the pan from the heat, add the butter pieces, Parmesan and basil, stir to combine.
  6. Using tongs, immediately transfer to a serving plate. Sprinkle toasted pine nuts and extra Parmesan if desired. Serve immediately.

Mahi Mahi Fish Taco’s with Chipotle Cabbage Slaw and Mango Avocado Salsa

photo-560Howdy there y’all! I am so sorry for my long absence in posts! Last week I was on vacation (in beautiful Mexico!) and it took me a little while to get back in the swing of things. Sometimes I feel like I need a vacation after my vacation! Be near the ocean again made me realize how much I miss it! I love the sound of the ocean and the salt air! Don’t get me wrong, I love Utah but after growing up near the ocean there is nothing more comforting than hearing the waves on the shore as you fall asleep.  10277409_711175476627_4161670422872587142_nWhile we were down in Mexico we ate delicious fresh fish, stopped at little roadside taco stands and washed it all down with Cervezas, it was literally the perfect vacation! Even once we got home, I was still craving tacos!photo 1-21
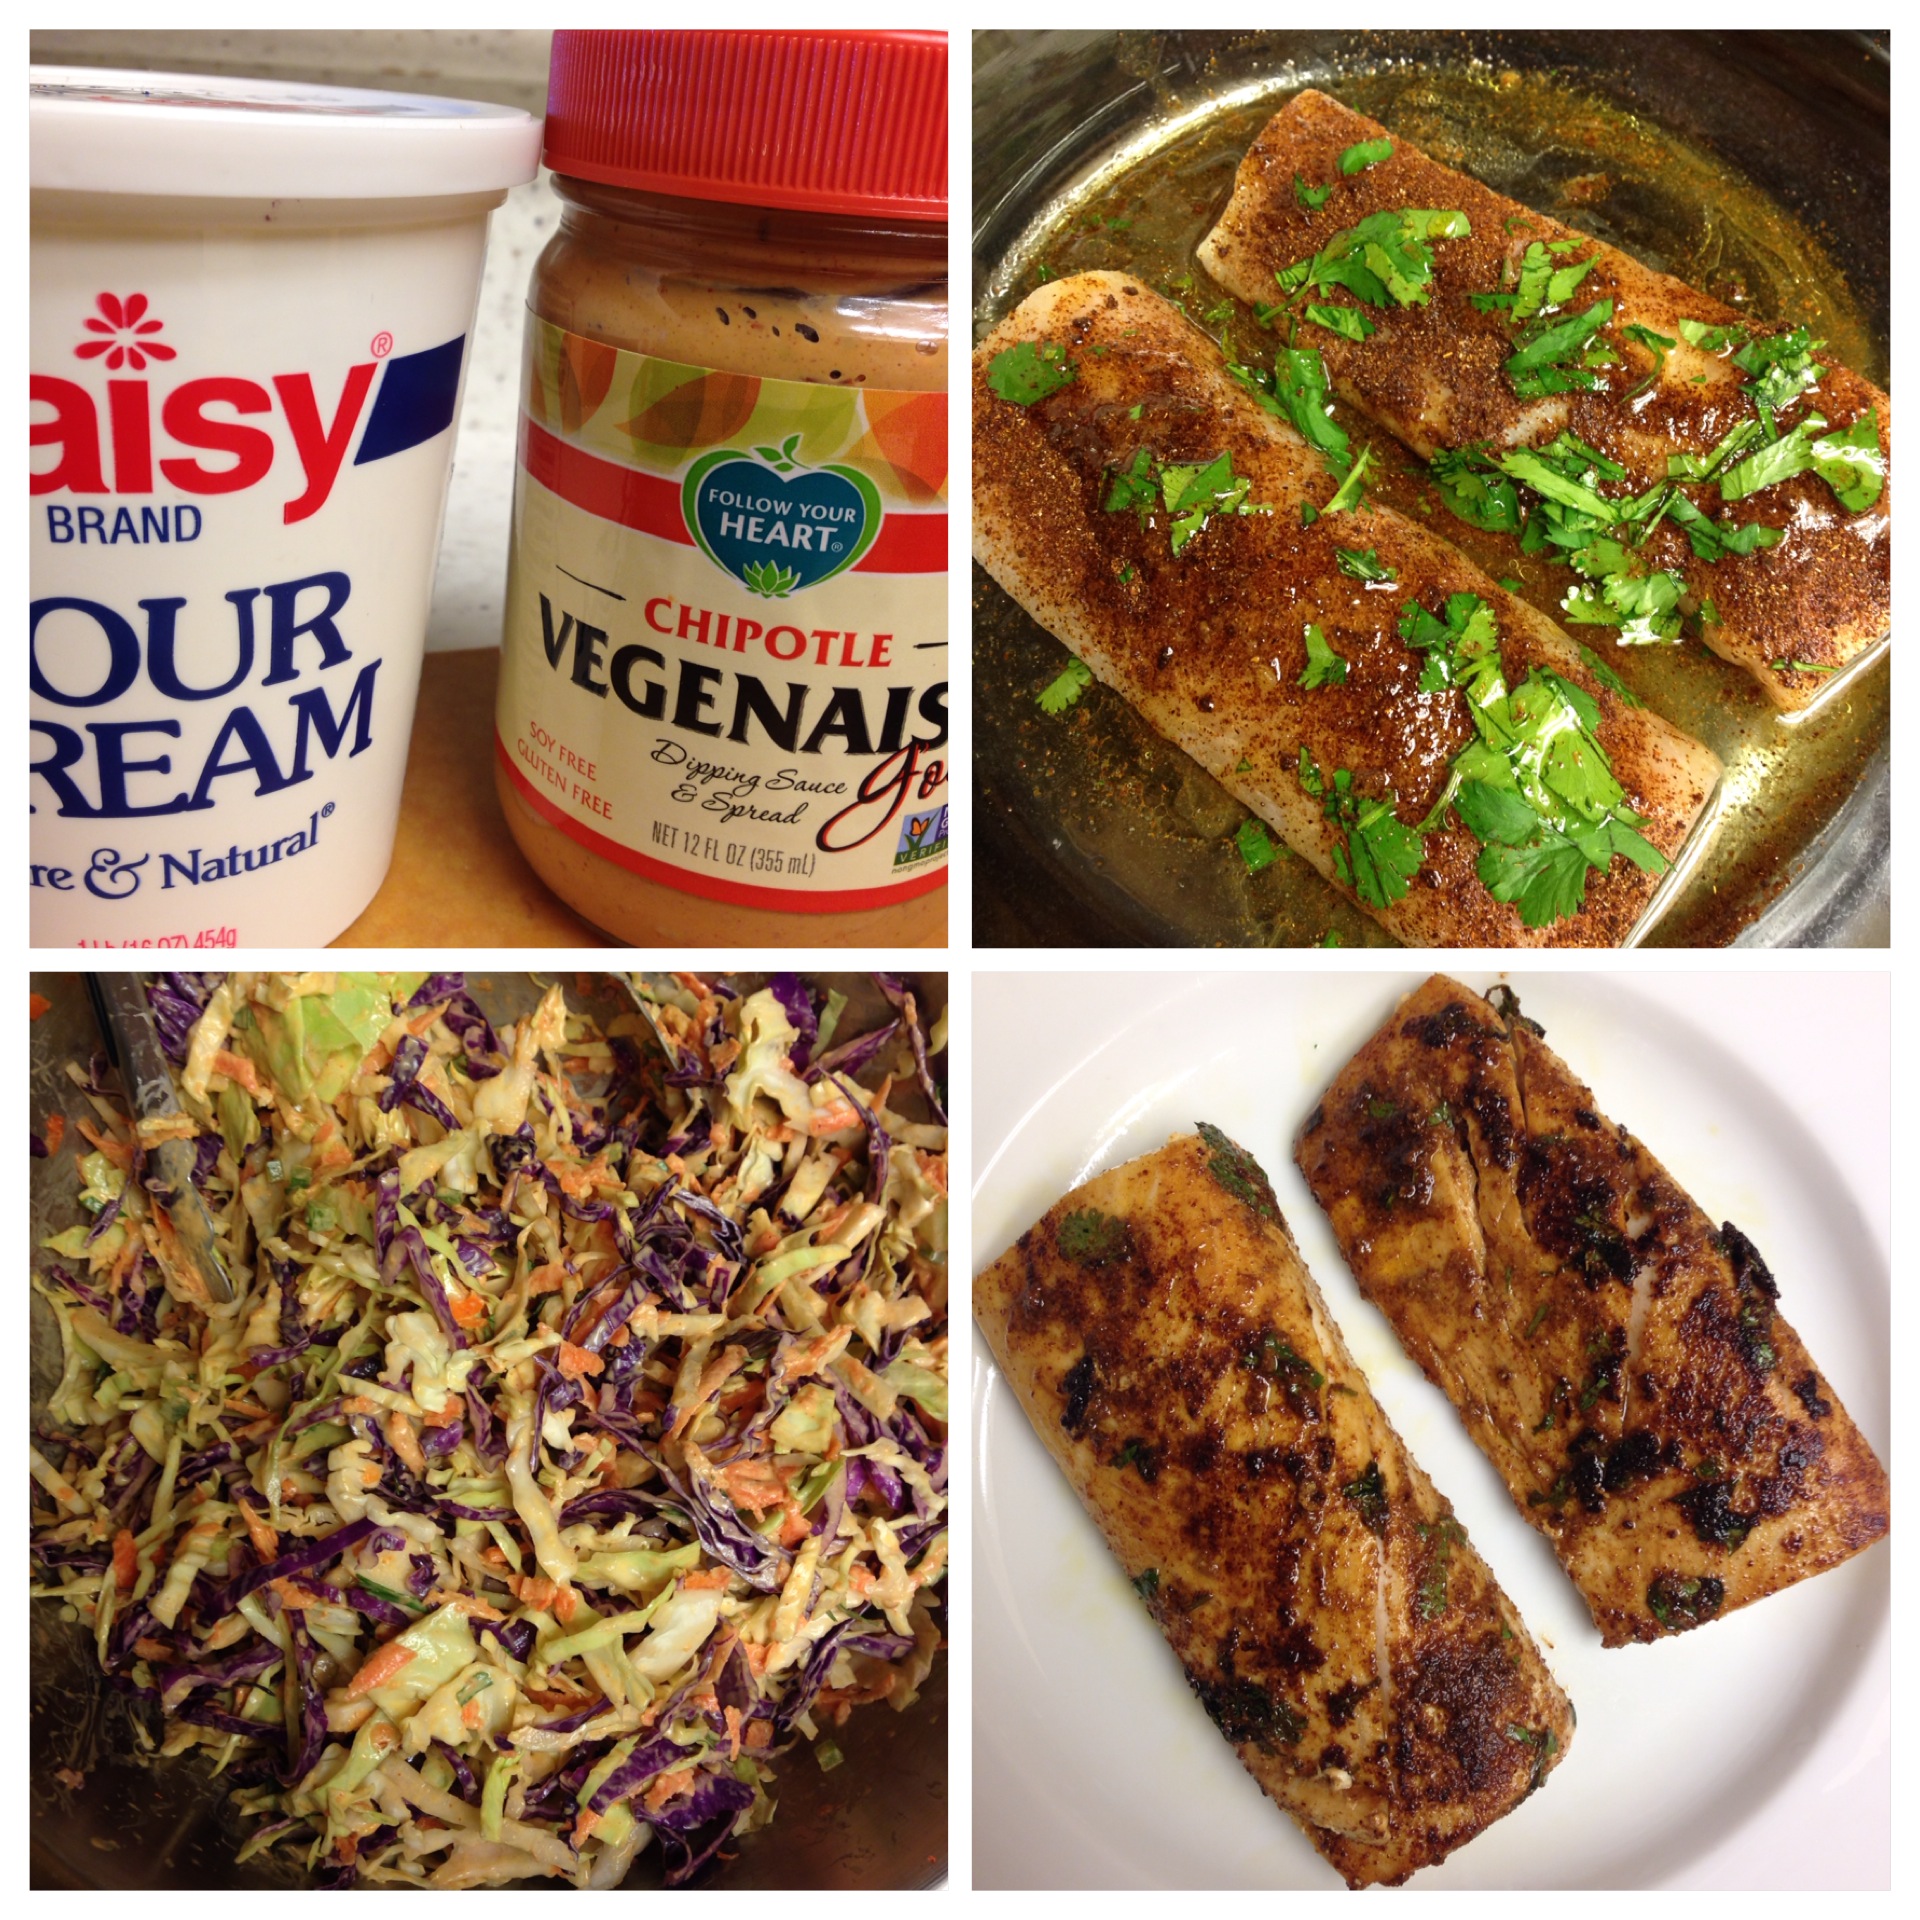
So I looked to one of my favorite fish taco recipes to easy my “the vacation is over” pains! I love all the fresh flavors of these tacos, the Chipotle slaw has a little spice which is balanced nicely by fresh cool mango and avocado. photo 2-20It’s the perfect taco Tuesday summer dish! The slaw is better when its made a day ahead which also helps cut down on prep time the day of. I usually save a little of the chipotle dressing to drizzle over the top of the tacos to give it an extra kick! photo-561So kick back with a cerveza or margarita, pretend you’re on the beach in Mexico and enjoy! Cheers!

Mahi-Mahi Tacos (Serves 4)

  • 1lb Mahi-Mahi (I use frozen if the fresh doesn’t actually look fresh)
  • 2 teaspoons chili powder
  • 1/4 teaspoon cumin
  • 1/2 teaspoon garlic powder
  • 1 tablespoon chopped cilantro
  • 2 tablespoons olive oil
  • 1 lime, juiced
  • salt and pepper to taste
  • corn tortillas

Chipotle Cabbage Slaw (Serves 4-6)

  • 1/2 small green cabbage, shredded (4-5 cups)
  • 1/4 small red cabbage, shredded (2 cups)
  • 2 large carrots, peeled and shredded
  • 4 large scallions, green and white parts, sliced thin
  • 1 jalapeno, diced (for less spice, remove some or all the seeds)
  • 1/2 cup Chipotle Vegenaise (you can substitute regular Vegenaise or mayonnaise and add 1 teaspoon chipotle powder)
  • 1/2 cup sour cream (or plain greek yogurt)
  • 1/4 cup fresh squeeze lime juice
  • 2 tablespoons honey
  • 1 teaspoon cumin
  • salt and pepper to taste

For the Fish

  1. Whisk together lime juice, olive oil and cilantro in a small bowl. Combine chili powder, garlic powder, and cumin and whisk into olive oil mixture.
  2. Place fish and marinade in a shallow baking dish or plastic bag and marinate for at least 20 minutes in the fridge.
  3. In a medium skillet, drizzle 1 tablespoon olive oil. Sear Mahi filets for 5-7 minutes each side, until it is cooked all the way through.

For the Slaw

  1. Combine cabbages, carrots, scallions and jalapeno in a large bowl.
  2. In a small bowl whisk together Vegenaise, sour cream, lime juice, honey and cumin until smooth.
  3. Pour half the dressing over the slaw, season with salt and pepper and toss to combine, adding more dressing if it looks too dry. I like to save some sauce for the tacos!

To assemble

  1. Place Mahi-Mahi on a corn tortilla, top with cabbage slaw and mango avocado salsa. Serve with rice and beans, top with sour cream, chipotle sauce and/or hot sauce. Enjoy!

For more recipes follow me on twitter, Facebook and Instagram!