Unknown's avatar

About skibootsinthekitchen

I love to cook, eat, travel, & drink wine. I enjoy mountain activities of all kind. Come have a bite with me! www.skibootsinthekitchen.com

Fresh Basil Lime Fruit Salad

photo-236

What a fantastic weekend of great weather, food and friends! I hope you all spent some quality time with someone special and soaked up some sunshine- I thought it was June it was so warm! I was in the mood for a fresh and light fruit salad that would be the perfectly refreshing desert on a warm afternoon. Only problem was, I got all the way home from the store and realized I forgot the mint I needed to make my fruit salad! With no time to go back to the store, I decided to improvise with what I had. I love fresh herbs with fruit and I had a whole bunch of fresh basil on hand for another recipe. I couldn’t have asked for a more perfect substitution, the flavors were so amazing, this will definitely become my go to combination for fruit salad, Enjoy!

Basil-Lime Fruit Salad (click for printer friendly version)

Ingredients:

  • 1/2 cup sugar
  • 1/2 cup water
  • 1/2 cup chopped basil leaves
  • 1 tablespoon lime zest
  • 1 medium size fresh pineapple cut into chunks (about 4 cups)
  • 2 mango’s peeled and cubed
  • 1 pound fresh strawberries quartered
  • 1 carton fresh blueberries
  • You can substitute any fresh fruit you enjoy such as Kiwi’s, Raspberries, Blackberries, Guava, etc.

Directions:

  1. Combine sugar and water in a small sauce pan and bring to a boil, stirring often until sugar is fully dissolved, about 1-2 minutes.
  2. Remove sauce pan from heat. Add lime zest and basil, stir and set aside to cool.
  3. Once the sugar mixture is completely cool, strain syrup through a mesh sieve into another bowl and discard solid pieces of basil and zest.
  4. Combine all fresh chopped fruit in one large bowl and drizzle with basil-lime syrup. Mix to coat fruit completely.
  5. Refrigerate and serve. Garnish with a few pieces of freshly chopped basil. photo-237

Mushroom-Spinach Stuffed Beef Tenderloin

IMG_6218Spring is here, or so the calendar says. It snowed all last weekend and now its warming up again. It’s seriously confusing. I want to take out my bright pants and tank tops and go for trail runs and mountain bike rides. Spring also means Easter! IMG_6187I always love celebrating a holiday that revolves around food and getting together with people. My grandparents used to serve lamb on Easter with that electric green “mint jelly” who knows whats actually in that stuff… its weird. This stuffed beef tenderloin is one of my favorite recipes- my mother makes it every year for Christmas but it would make the perfect dish for any special occasion. IMG_6192

The combination of Shiitake mushrooms, shallots, and brandy is literally the definition of heaven on earth. Then wrap that all up in the most tender filet of beef…You get the picture. IMG_6195

I usually make this dish with my favorite scalloped yukon gold and sweet potato recipe or celery root puree and finish it with some maple roasted brussel sprouts or absurdly addictive asparagus. IMG_6222That is the definition of a holiday feast- make sure you eat early, you’ll want to savor this meal! You can pick up a trimmed beef tenderloin at the meat counter of your local market or whole foods. Don’t be surprised when you see its $25 per pound (that is why I only make this dish on special occasions!) but its worth every penny! IMG_6197

Make sure you ask the butcher to put some twine in with your cut of beef, you’ll need it to tie the tenderloin together and keep the yummy stuffing inside. Sometimes they’ll butterfly it for you if you ask them to but I prefer to do it myself.IMG_6201

If you end up having a smaller piece of beef like we had, make sure you watch it closely so that you don’t over cook it- it will be finished earlier than the larger tenderloin. Whats not to love? I promise you’ll enjoy!!

Mushroom-Spinach Stuffed Beef Tenderloin (click for printer friendly version)

Ingredients:

  • 1 Tablespoon butter
  • 3 cups sliced shiitake or button mushroom caps (about 6 oz.)
  • ½ cup shallots
  • 2 Tablespoons brandy
  • 1 tsp olive oil
  • 8 cups torn spinach or  1 bag baby spinach
  • 1 clove garlic, minced
  • 1 tsp slat, divided
  • ¾ tsp black pepper
  • 1 (4-pound) Trimmed beef tenderloin
  • 1 tsp olive oil
  • cooking spray

Directions:

  1. Melt butter in a large nonstick skillet over med-high heat.  Add the mushrooms and shallots, sauté for 4 mins.  Add brandy, cook for 30 seconds or until liquid evaporates.  Spoon mixture into a large bowl, set aside.
  2. Heat 1 tsp oil in pan over medium heat. Add spinach and garlic, sauté 30 seconds or until spinach wilts.  Place spinach mixture in a colander, pressing with the back of a spoon until barely moist.  Add spinach mixture, ¼ tsp salt, and ¼ tsp pepper to mushroom mixture, stir well.
  3. Trim fat from tenderloin. To butterfly tenderloin slice lengthwise, cutting to, but not through, the other side.  Open halves, laying the tenderloin flat.  Place heavy duty plastic wrap over tenderloin, flatten to an even thickness using a meat mallet or rolling pin. Sprinkle ¼ tsp salt and ¼ tsp pepper over tenderloin. Spread spinach mixture down center of tenderloin to within ½ inch of sides, fold over 3 or 4 inches of small end.  Toll up tenderloin jelly roll fashion, starting with the short side.  Secure a 2 inch intervals with heavy string.  Brush olive oil over tenderloin, sprinkle with salt and pepper.  Place in broiler pan coated with cooking spray, cover and chill.
  4. To serve, preheat oven to 500 degrees
  5. Bake at 500 for 35 minutes or until the thermometer registers 145 (medium-rare) or 160 (med). You don’t want to over cook this cut of beef. Since it tapers at the ends those pieces will be more well done.  Place tenderloin on a large serving platter, let stand for 10 minutes before slicing.  Serve warm or chilled.

Serves 8 or more depending on size of tenderloin.  35 minutes is usually fine even if thermometer does not register 145 degrees.

Vietnamese Fresh Spring Rolls

photo-74I have always loved fresh spring rolls. There is a vendor at the West Tisbury farmers market that sells amazing fresh and fried spring rolls- they are always sold out. Why I have never tried to make these delicious little rolls my self is beyond me, now that I know how EASY they are to make. photo-75I looked up a few recipes on how to do it but none of them had all the ingredients I love- so I made up my own. The best part though is you can put anything you like in these and make them your own! Enjoy!

Vietnamese Fresh Spring Rolls (Click for printer friendly version)

Ingredients:

  • 2 ounces Thai rice noodles
  • 8 rice wrappers (8.5 inch diameter)
  • 8 large cooked shrimp – peeled, deveined and cut in half (tofu would also work)
  • 1 1/2 tablespoons chopped fresh Thai basil (or regular if you can’t find Thai)
  • 3 tablespoons chopped fresh mint leaves
  • 3 tablespoons chopped fresh cilantro
  • 2 leaves lettuce, chopped
  • 1/2 an avocado
  • shredded carrot (optional)
  • 3 tablespoons Hoisin sauce
  • 1 tablespoon chopped raw peanuts
  • Thai peanut dipping sauce or Sweet Chili Sauce

Directions:

  1. Bring a medium saucepan of water to boil. Boil rice noodles 3 to 5 minutes, or until al dente, and drain.
  2. Fill a large bowl with warm water. Dip one wrapper into the hot water for 1 second to soften. Lay wrapper flat.
  3. In a row across the center, place 2 shrimp halves, a handful of vermicelli
  4. Add chopped basil, mint, cilantro and lettuce to your taste, leaving about 2 inches uncovered on each side.
  5. Fold uncovered sides inward, then tightly roll the wrapper, beginning at the end with the lettuce. Repeat with remaining ingredients.
  6. Wet a paper towel and cover spring rolls with damp towel until ready to serve.
  7. For sauces- Any and all are great with the rolls- pick which flavor combo you prefer or use all three.
  8. Combine Hoisin sauce and chopped peanuts serve with rolls
  9. Thai Peanut Sauce and Sweet Chili Sauce can be purchased pre-made in the International foods aisle

photo-73

Ginger Soy Chicken Lettuce Cups

Hard to believe it’s almost the end of March! It also means our wedding is now just 3 months away! Its easy in the winter months to add an extra layer, to put it nicely, of insulation. It can get cold out there… but with spring here I’m ready to get out of the hearty pastas and stews and into the lighter spring/summer dishes! I love Asian food but I am always too intimidated to try and cook it. This recipe for ginger soy chicken is actually from a Rachel Ray cookbook that I’ve adapted slightly. The original recipe calls for shredded lettuce but I find it much easier to eat in the iceberg leafs than with a fork and knife. photo-235I also added peanuts to the recipe (tip from Greg!) which gives the chicken an awesome flavor and much needed crunch! This recipe is great because its not too complicated and its satisfying even though its low carb. I served it with fresh Vietnamese spring rolls (recipe coming soon, they were delicious!) and steamed baby bok choy. It was the perfect spring dish. Enjoy!
Ginger Soy Chicken Lettuce Cups (Click for printer friendly version)
Ingredients:
  • 3 tablespoons vegetable oil
  • 1 1/4 pounds chicken breast cutlets, cut into thin strips
  • Salt and coarse black pepper
  • 2-inch piece of fresh ginger, peeled and minced
  • 4 large garlic cloves, chopped
  • 1/2 teaspoon crushed red pepper flakes
  • 6 scallions, cut into 2-inch lengths, then cut lengthwise into thin matchsticks (or just chopped)
  • 1/4 cup tamari (dark aged soy sauce, found on the international aisle)
  • 3 tablespoons honey (3 times around the pan)
  • 1/3 cup chopped raw peanuts (or more depending on your tastes)
  • 1 head of iceberg lettuce

Directions:

  1. Heat a large nonstick skillet over high heat. Add the vegetable oil. It should smoke up a bit. Add the chicken and season with a little salt and lots of black pepper.
  2. Stir-fry for a minute to sear the meat at the edges, then add the ginger, garlic, and red pepper flakes and cook for 2 minutes more.
  3. Add the scallions and stir-fry for another minute, then add the tamari and honey to form a sauce and glaze the chicken.
  4. Add peanuts and Remove the pan from the heat.
  5. Cover a platter with lettuce cups, top with the chicken, and serve. (4 SERVINGS)

photo-234

Lentil and Sausage Soup for a (warm) winter’s night

IMG_6968

Although its starting to feel too much like spring here- I there’s nothing more satisfying than a big bowl of soup for dinner, even if it doesn’t look anything like winter out your door. This is more of a stew than soup, but it has a lot of fresh veggies and fresh spinach which gives it vibrant color and delicious flavor! I modified this recipe and used vegetarian sausage from Whole Foods instead of meat sausage and vegetable stock to make the stew vegetarian. photo-231The sausage was so tasty you’d never know it was vegetarian- I bought the Italian style with garlic and red pepper to give it a kick! Any sausage you use will taste great. I also added twice the amount of spinach as I am a huge fan of spinach and I wanted more green in my soup. The red wine vinegar really opens up all the flavors so don’t leave it out- its a must! Enjoy!!

Lentil & Sausage Soup (Click for printer friendly version)
Serves 4 hungry adults with lots of leftovers.
Ingredients:
  • 1 1/2 cup French green lentils
  • 2 bay leaves
  • 3 tablespoons olive oil, divided
  • 3 or 4 sausages made with herbs and/or garlic
  • 1 large yellow or white onion
  • 4 cloves of garlic
  • 1/2 cup sturdy red wine
  • 3 stalks of celery, and their leaves if possible
  • 1 tablespoon dried marjoram or an equivalent amount of fresh
  • 4 or 5 carrots, depending on their size
  • 4 cups chicken or beef stock (or vegetable)
  • 3 tablespoons organic ketchup
  • 2 cups chopped spinach (I did 4 cups)
  • 1/4 cup chopped parsley
  • Salt and pepper, to taste
  • Red wine vinegar, to taste

Directions:

  1. Fill at tea kettle and bring it to a boil while you prep the other ingredients.
  2. Heat the 4 cups of stock either on the stove or in the microwave if you don’t have time (or space) on the stove.
  3. Heat 2 tablespoons of olive oil in large pot/skillet with one bay leaf and cook sausage until browned on each side (even if the sausage is already fully cooked) remove with slotted spoon and set aside.
  4. Rinse the lentils in cold water two or three times, pick out any stones or other debris, and put the lentils on the stove in a saucepan with at least three cups of hot water from the kettle. Cook lentils over medium heat, stirring occasionally. (don’t worry if the lentils are not fully cooked when you add them to the soup.)
  5. Meanwhile, dice the onions so they are about ½” square; chop the garlic. Cut celery into small dices and carrots into slices or chunks depending on how thick they are, and set them aside. Add the remaining oil, as well as the onions and garlic, to the pan in which the sausages were browned; cook over medium heat, stirring occasionally. When the onions start to look a bit translucent, push them aside with a spoon and add the wine. Cook for a minute or two to deglaze the pot.
  6. Stir the lentils in with the cooking water. It doesn’t matter whether they are cooked. Just add them now, and add the stock to the pot with the onions and garlic. Add the celery and marjoram and stir well, continuing to cook.
  7. Add the carrots to the pot, with the reserved sausages, and the salt and pepper to taste, and stir well.
  8. Cook for at least another ten minutes, adding more water if necessary and stirring occasionally, to prevent the lentils from sticking.
  9. Add the ketchup and stir well (I didn’t measure the ketchup I just added enough till it looked good- but I am also weirdly obsessed with ketchup). Cook until the carrots are tender. Taste and adjust seasoning to your liking. Add the spinach and the parsley. Heat soup until very hot!
  10. Pass the red wine vinegar separately, for people to add, to taste. Serve with a hearty whole grain bread and fresh butter.IMG_6965

Original recipe from Food52

Mascarpone Mini Cupcakes with the Girl Scouts!

IMG_7140This past weekend I was asked by one of my friends, Helen Golden, to lead a cooking class for her daughters Girl Scout troop on how to make an Italian dessert for their cooking badge!  IMG_7151With the help of another one of Helen’s friends, who showed the girls how to make homemade ravioli and meatballs, the troop cooked an entire meal start to finish for themselves! It was such a fun experience and I was honored that Helen asked me to help them achieve their cooking badge! All of the girls did such a great job, I won’t be surprised when they all grow up to be great cooks!

IMG_7153Helen and her daughter with the Mascarpone Mini Cupcakes.

I chose to help them make mascarpone mini cupcakes with strawberry glaze. This recipe is great to make with first time bakers since you use a white cake mix as the base. Their is some measuring involved but most of it is included with the cake mix which makes this muffins a breeze!

IMG_7134Plus the strawberry glaze is delicious and pink, which the girls loved! The original recipe is from Giada De Laurentiis who is one of my favorite cooks. Hope you enjoy and congratulations to the Girl Scouts for earning their cooking badge!

Mascarpone Mini Cupcakes (Click for printer friendly version)

Ingredients:

  • 8 ounces mascarpone cheese (about 1 cup), softened
  • 2 egg whites
  • 1/4 cup vegetable oil
  • 1 box white cake mix
  • 1 cup water
  • 1/3 cup frozen strawberries, thawed and drained
  • 2 1/2 cups powdered sugar

Directions:

Special equipment: 4 mini muffin tins and 48 mini muffin paper cupcake liners

  1. Preheat the oven to 350 degrees F. Line the mini tins with paper liners.
  2. In a large bowl combine the mascarpone cheese, egg whites and vegetable oil. Using a hand mixer, beat the ingredients until combined and creamy. Add the cake mix and water and mix until smooth, about 3 minutes.
  3. Fill the mini cups to just below the rim and bake until puffed and golden, about 18 to 20 minutes. Remove from the oven, let cool slightly in the tin then transfer the cupcakes to a wire rack.
  4. Meanwhile, puree the strawberries in a blender or small food processor. Place the powdered sugar in a medium bowl. Pour in the strawberry puree and whisk until smooth.
  5. Top the cooled cupcakes with the strawberry glaze. Let the cupcakes sit for a few minutes for the glaze to firm up, then serve. (This part didn’t happen because the girls were to excited to eat them!)

IMG_7158Our victory photo after the meal!

Wine Wednesday and how to drink it!

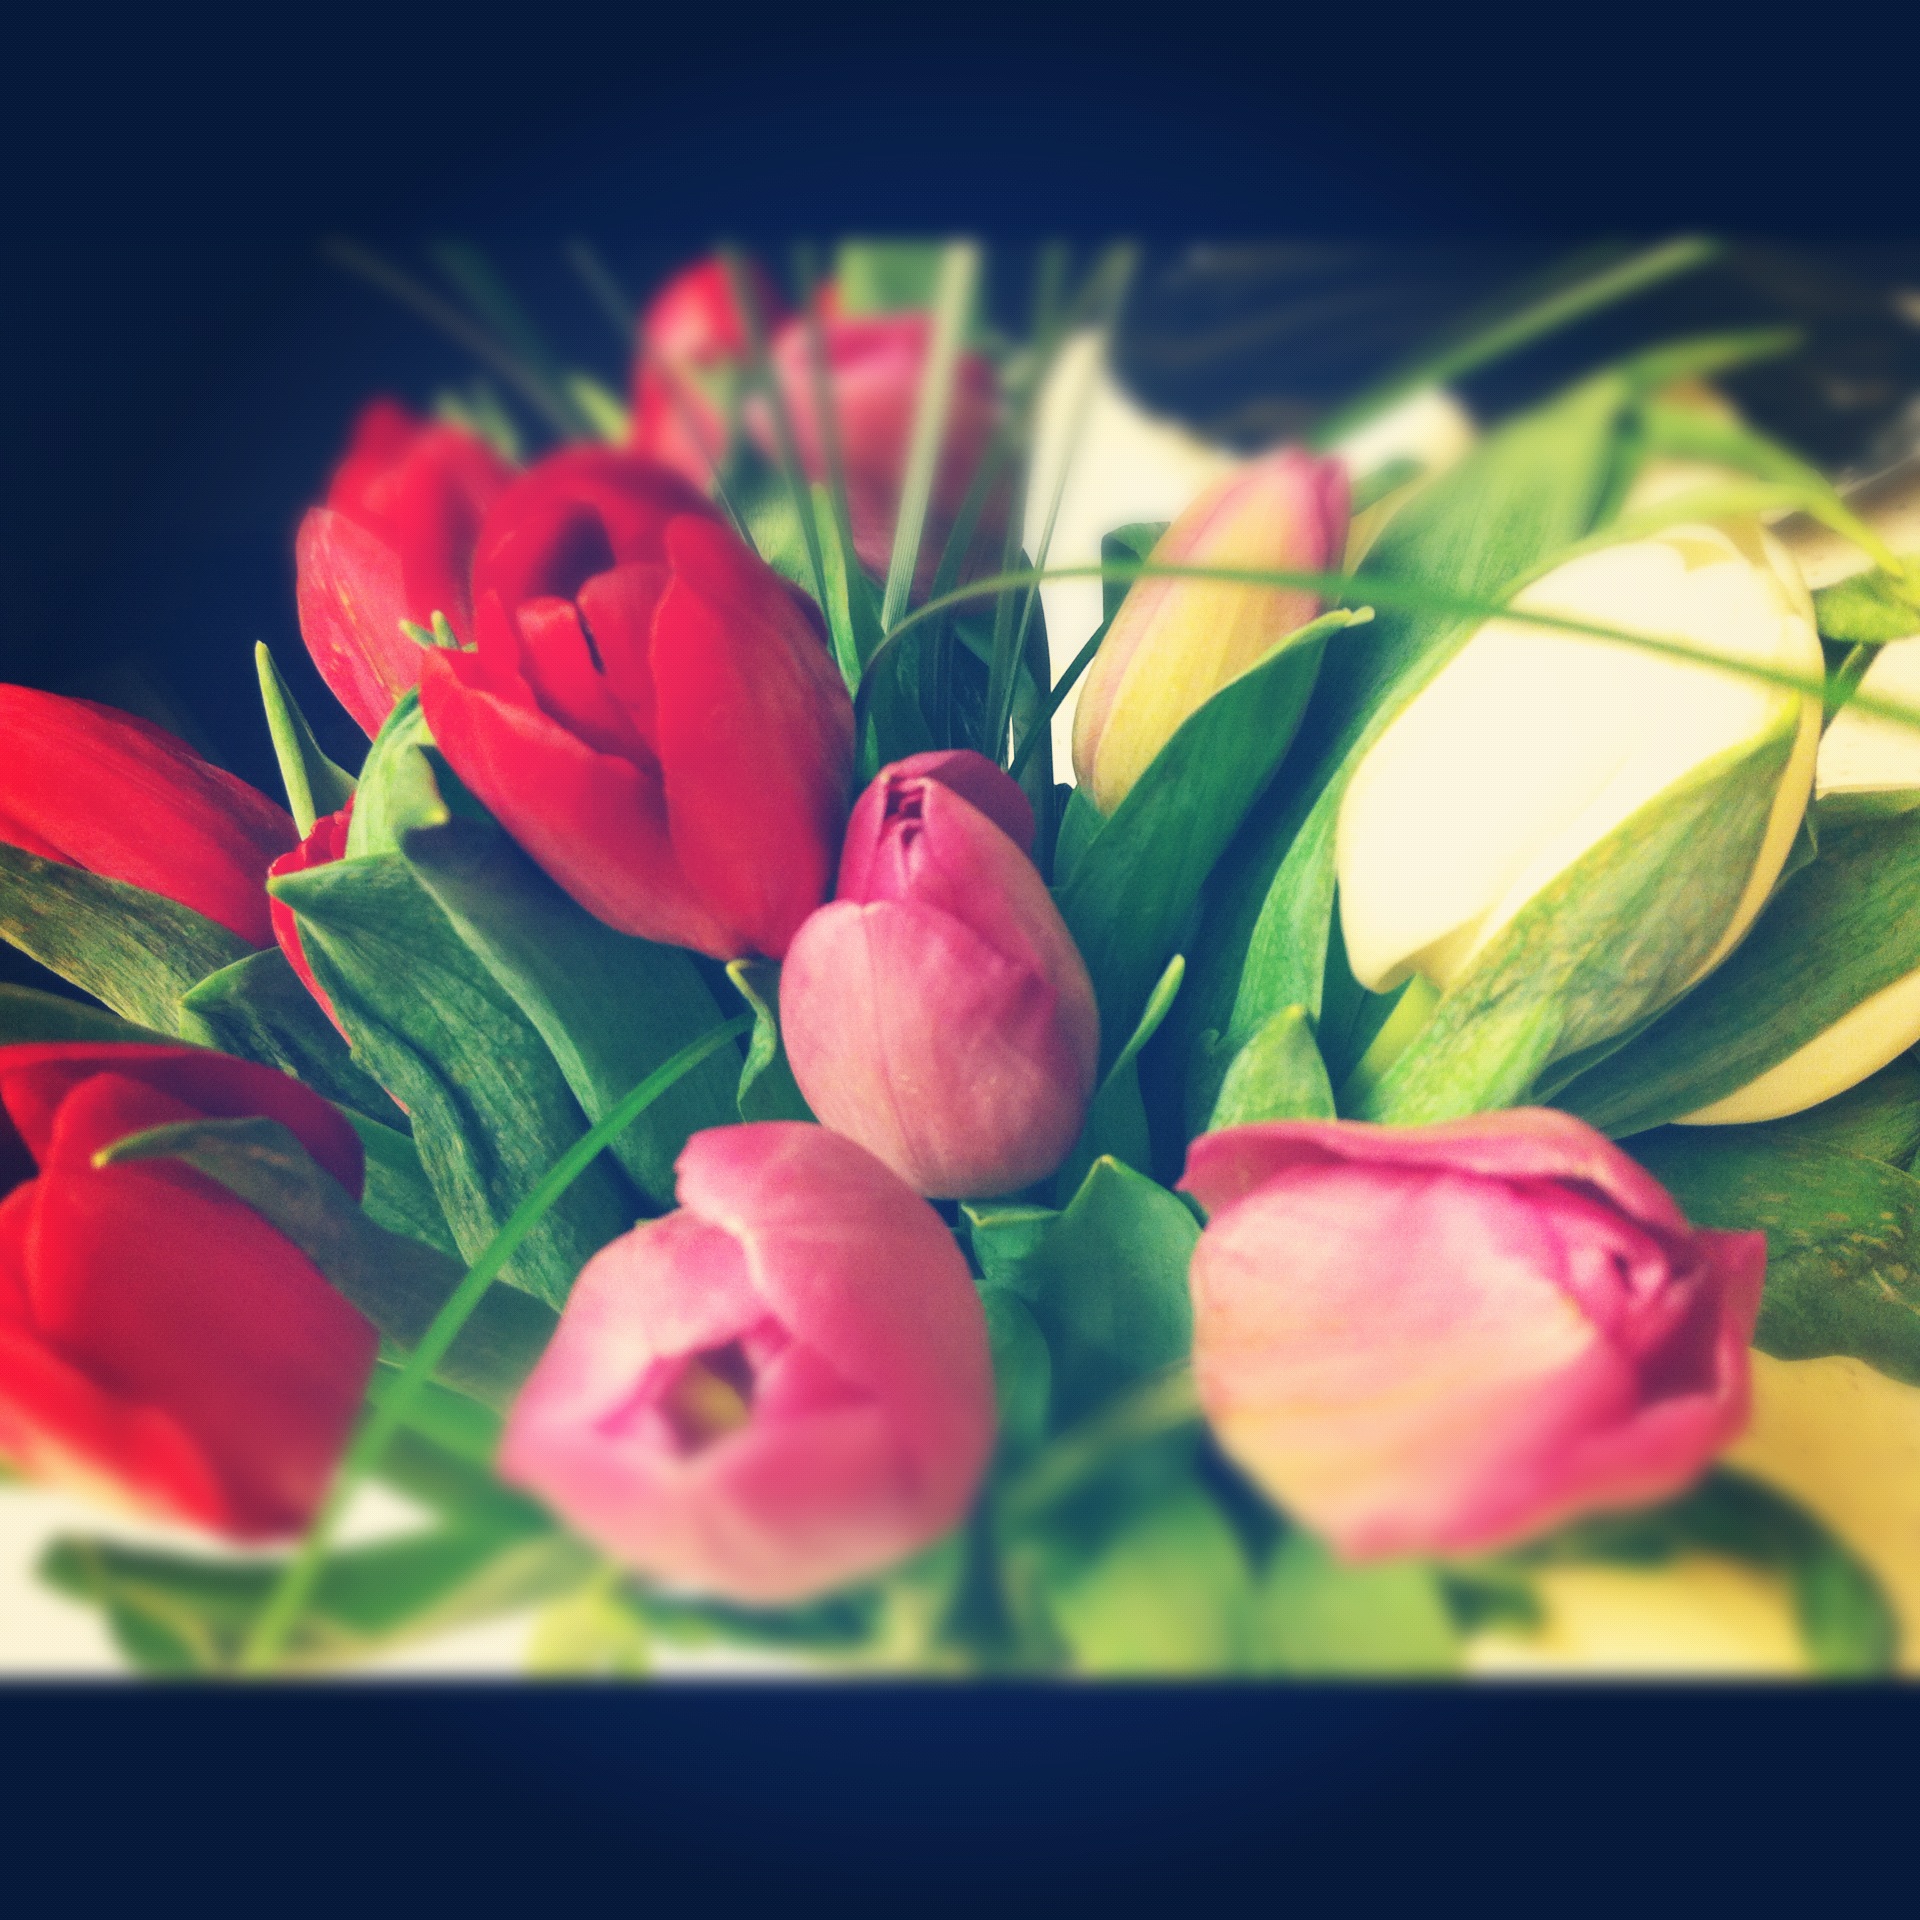
As you might already know…I love a glass of wine anytime. If it was socially acceptable I would probably pour some over my oatmeal in the morning. I’m pretty jealous of Kathie Lee and Hoda on the fourth hour of the Today show, they literally sip wine at 10am while talking about random things, like how many calories are in a candy cane or take a poll on how often you wash your jeans… Unfortunately, not everyone can have a job that basically promotes being an alcoholic, although its funny to think about.

My dad introduced me to the world of wine and I was always in awe of his knowledge of different varietals, regions and vintages. Its nice to dream about drinking fancy wines like Chateauneuf du Pape on a daily basis, but lets bring it back to reality. I love finding inexpensive wines that still taste great and don’t require you to sell your first born child to drink it. I make it a rule not to spend more than $20 on a bottle and surprisingly you can do quite well at the liquor store for under $20. So for Wine Wednesday I’ve picked a bottle of wine, under $20 that you’ll love!
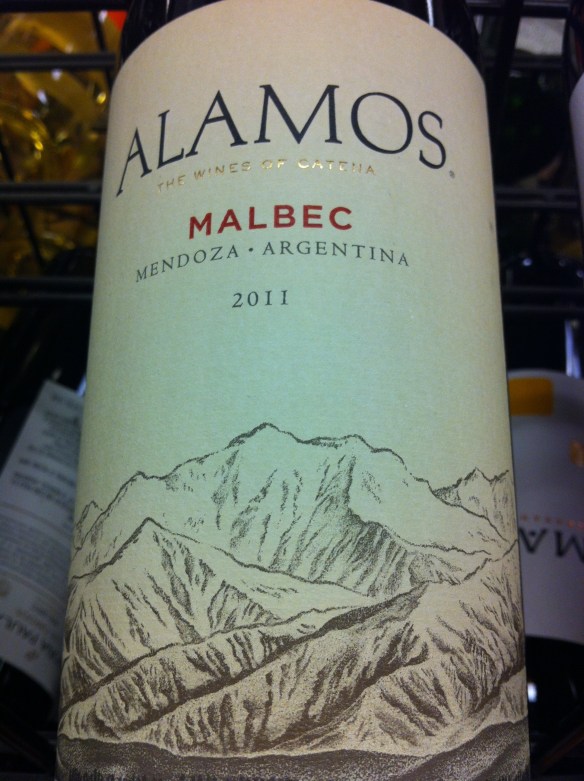
  • Price: $13
  • Varietal: 100% Malbec
  • 85 points
  • Mendoza is by far the largest wine region in Argentina, responsible for roughly 70% of the country’s annual wine production.
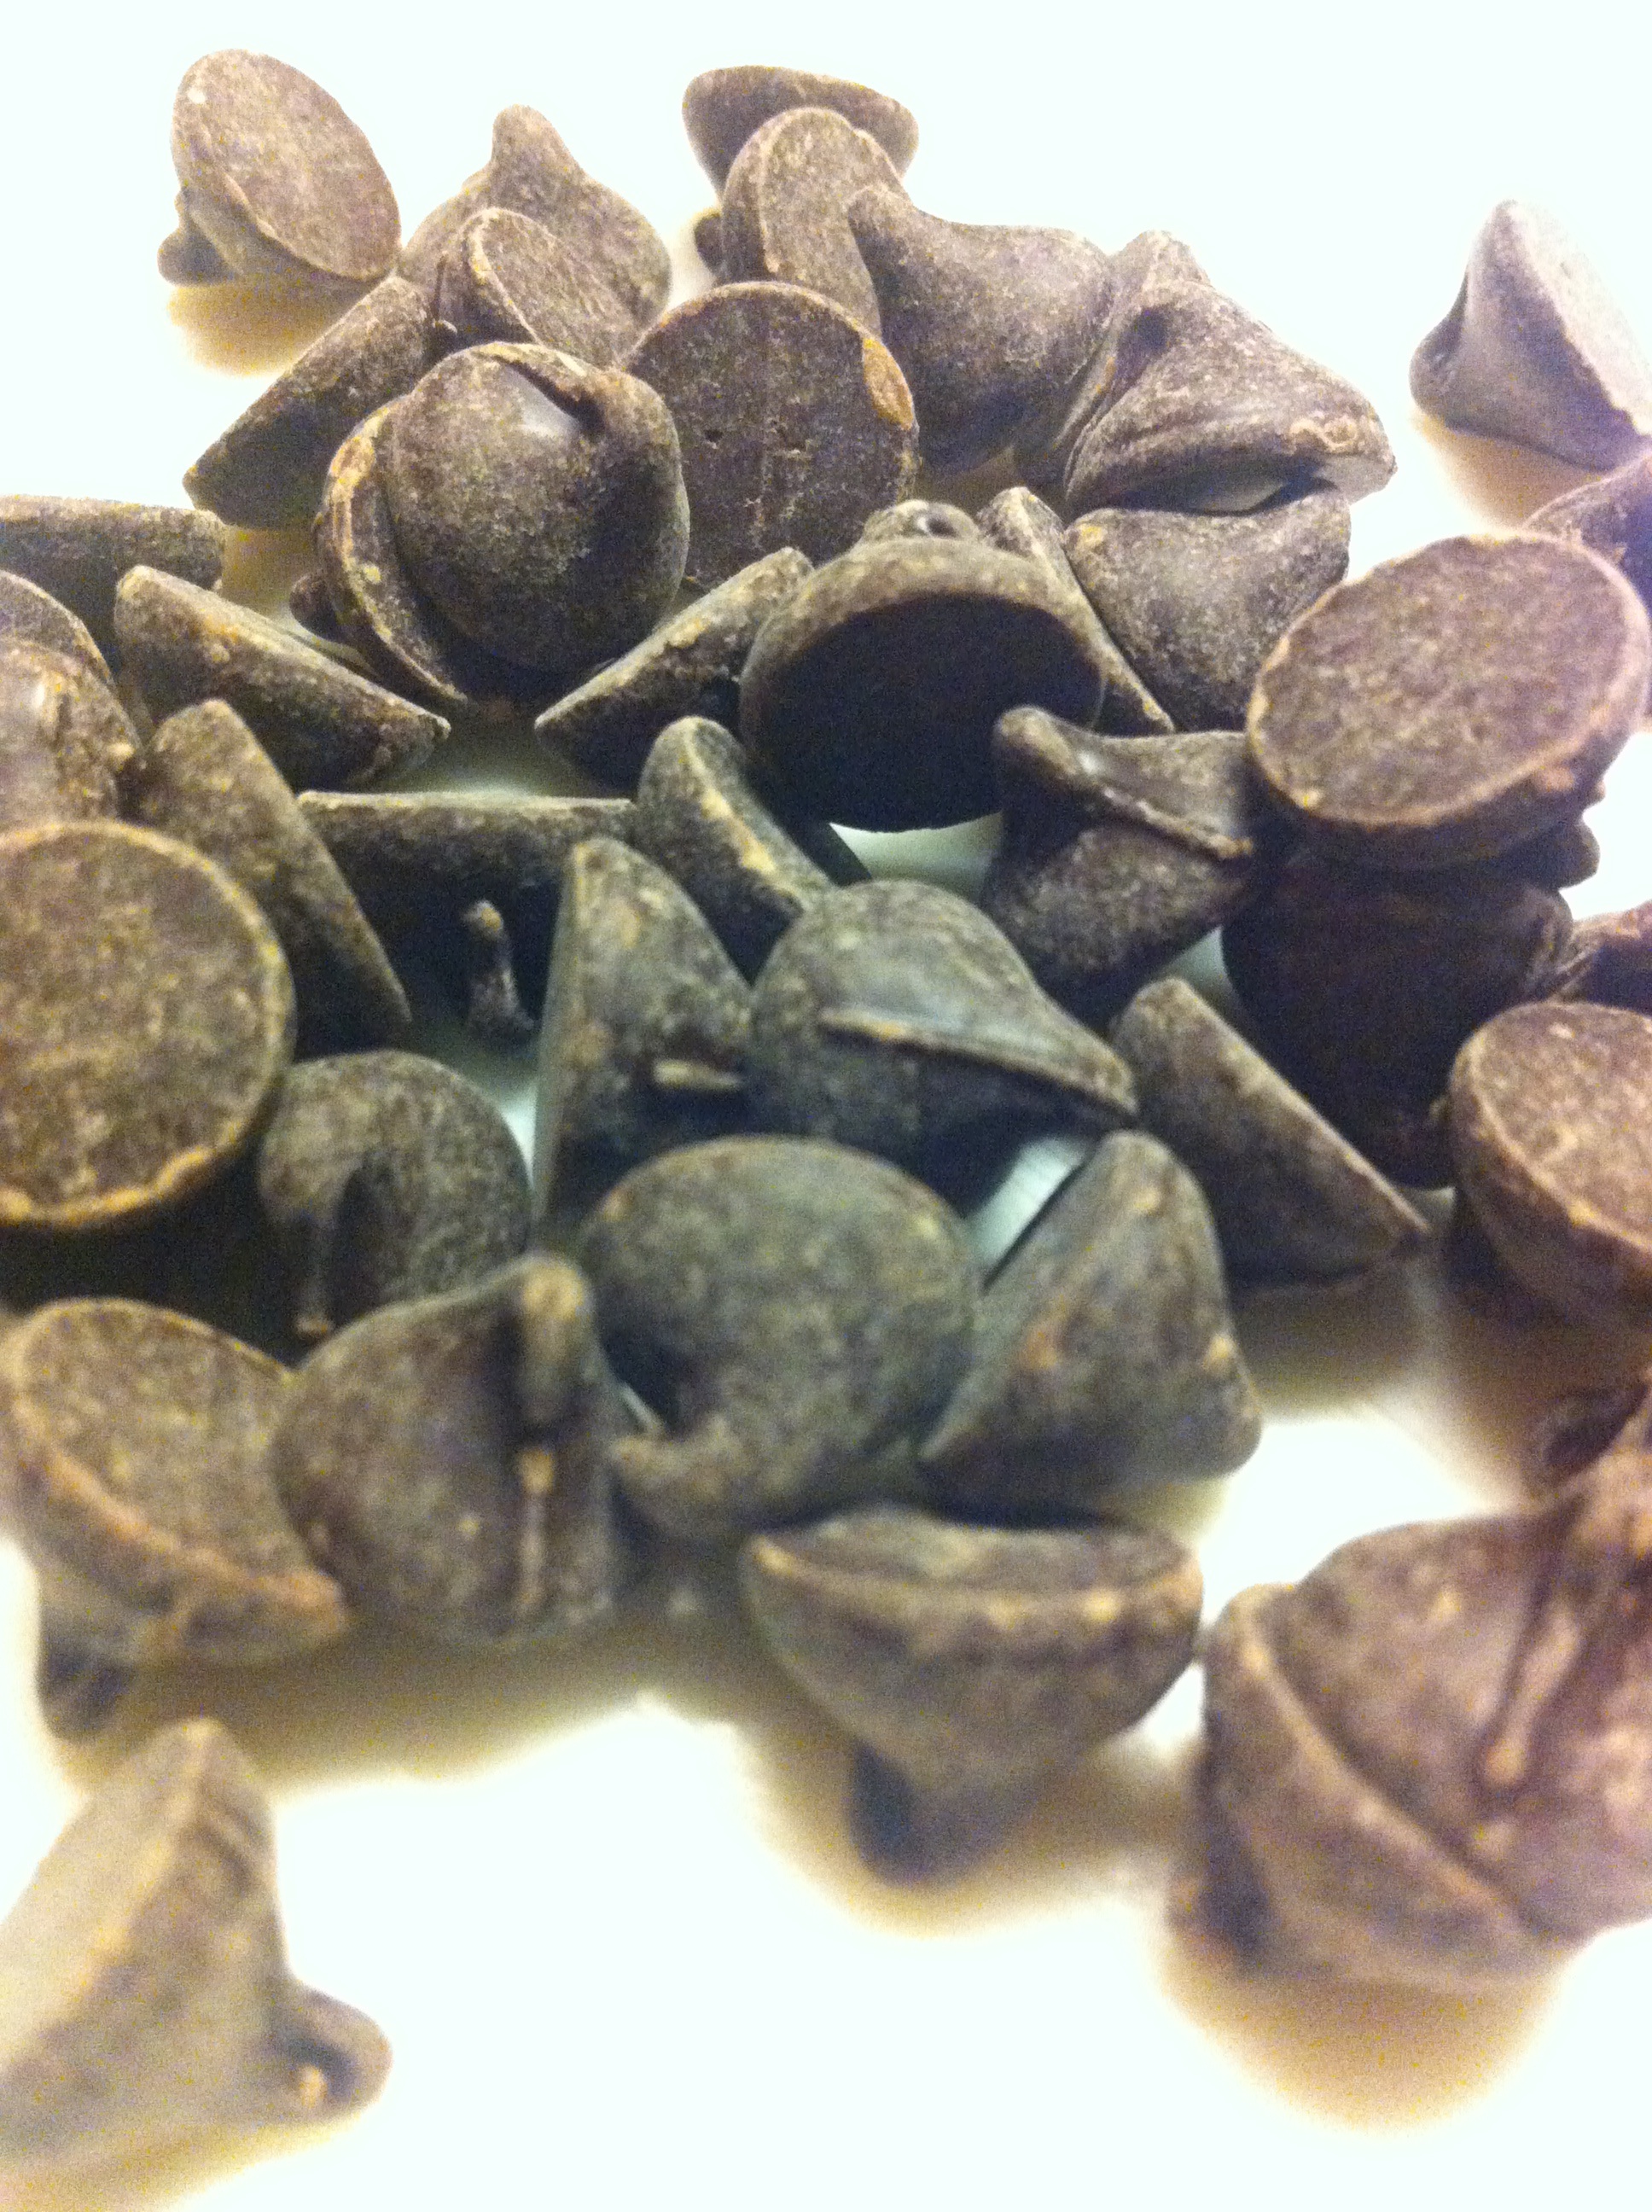
  • Alamos Malbec is a good everyday table wine or party wine. It is a deep purple color with hints of fruit and chocolate with a sweet spicy finish. Basically… this is a full bodied red wine that goes well with anything but has a little South American spice to keep things interesting!

Here is a little Wine Etiquette I found again from on of my favorites blog “A Cup Of Jo” I am a big believer in the rule about when you cheers, eye contact is a must! Enjoy!

Wine etiquette

Today I’d love to share 8 fun tips for drinking wine! It’s nerdy, but I like learning etiquette tips (do you?) and thought you might like to hear these fascinating wine dos and don’ts before heading out to holiday parties and romantic dinners. Below, I (Cup of Jo) wrote out the tips, and the genius Gemma Correll illustrated them. Here goes…
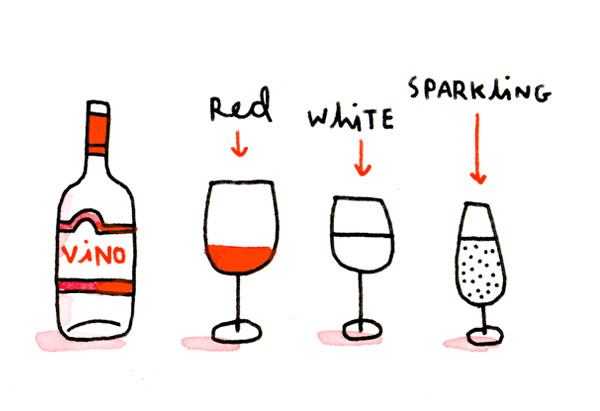
1. Fill red wine glasses 1/3 full, white wine glasses 1/2 full, and sparkling wine 3/4 full.
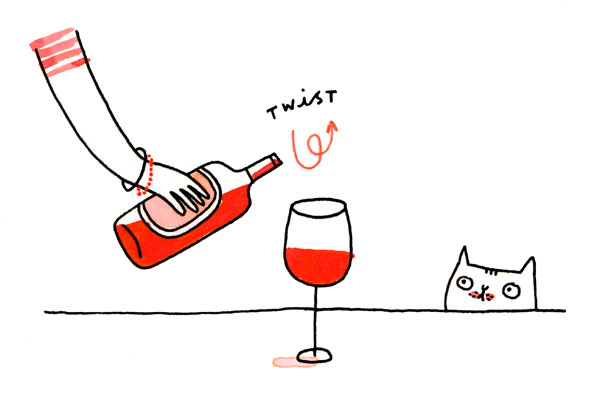
2. Twist the bottle at the end of pouring a glass of wine, to prevent drips (and to give it a flourish!).
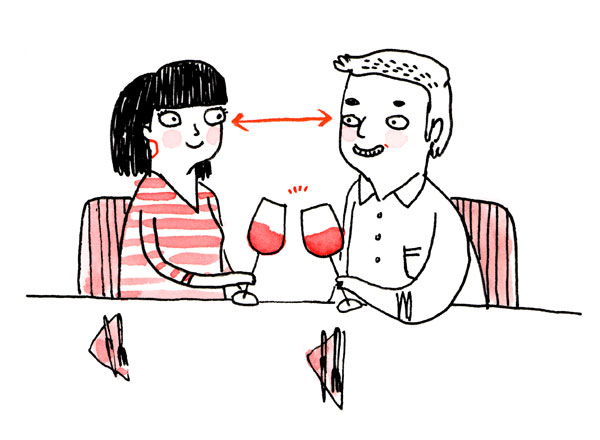
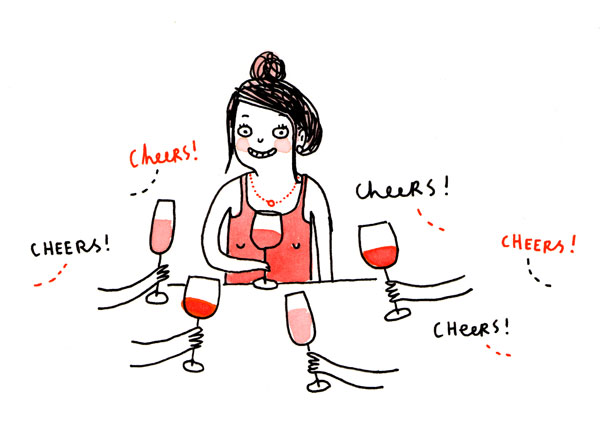
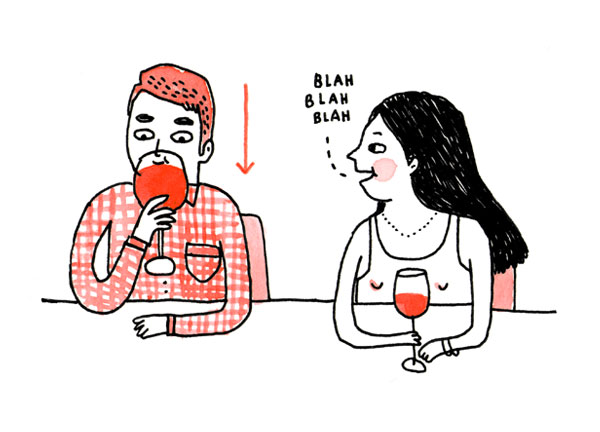
3. Cheers! When clinking glasses, make eye contact with the other person. Otherwise, according to French superstition, you’ll risk seven years of bad luck (read: bad sex). You also should clink glasses individually with each person at the table without crossing anyone’s arms.
4. If someone is toasting you (your wedding, your birthday, your general awesomeness), don’t take a sip. Just smile and look humble.
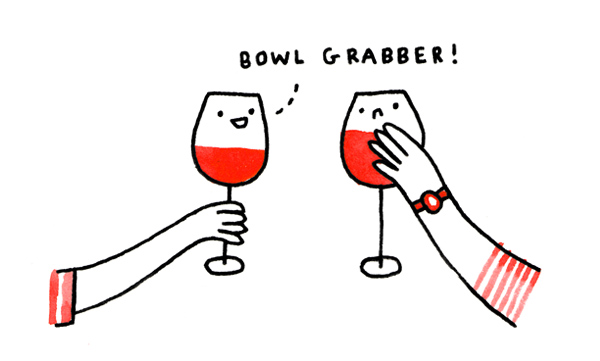
5. Always hold your wine glass by the stem. Many people mistakenly think you only need to hold white wine by the stem (so you don’t warm up the wine), but experts say you should hold red wine by the stem, too, so you can see its color and clarity, as well as to avoid smudging the glass with your fingerprints. Otherwise, wine snobs might call you a “bowl grabber”! 🙂
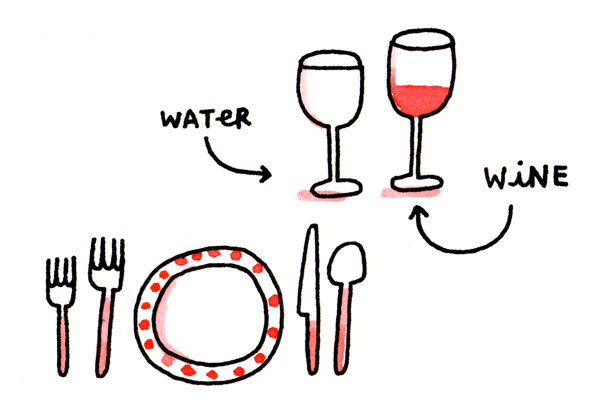
6. On the table, your wine glass goes to the right of your water glass.
7. While taking a sip, you should politely look into your glass. (And not at another person, if you’re in the middle of a conversation.)
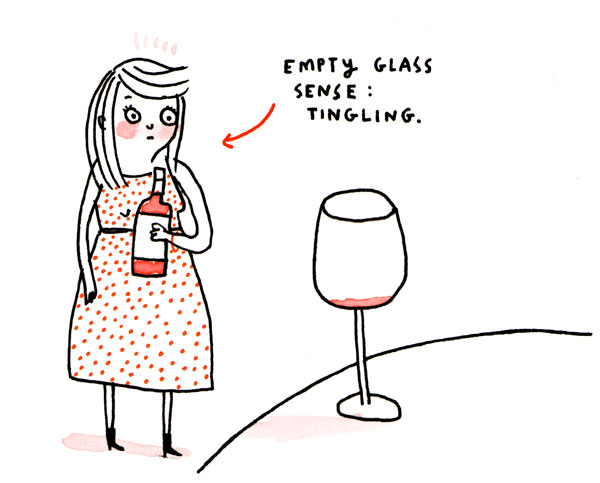
8. The host’s duty is to make sure glasses stay filled. “My eyes go to empty glasses immediately,” wine expert John Thoreen says. “It’s a real radar thing for me.”
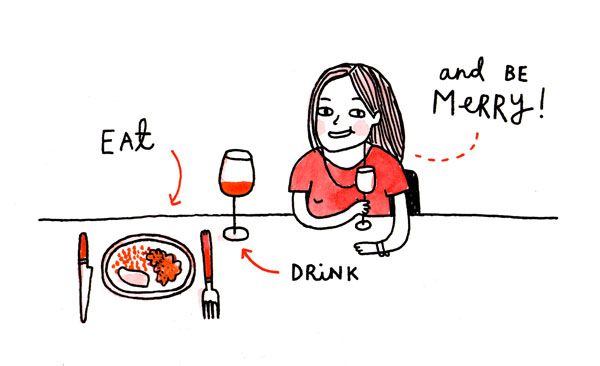
9. Or happily forget all the tips above, and just eat, drink and be merry!

P.S. A lipstick trick with wine, and the #1 etiquette tip to remember for the holidays.

Wine Etiquette Re-posted directly from “A Cup of Jo”
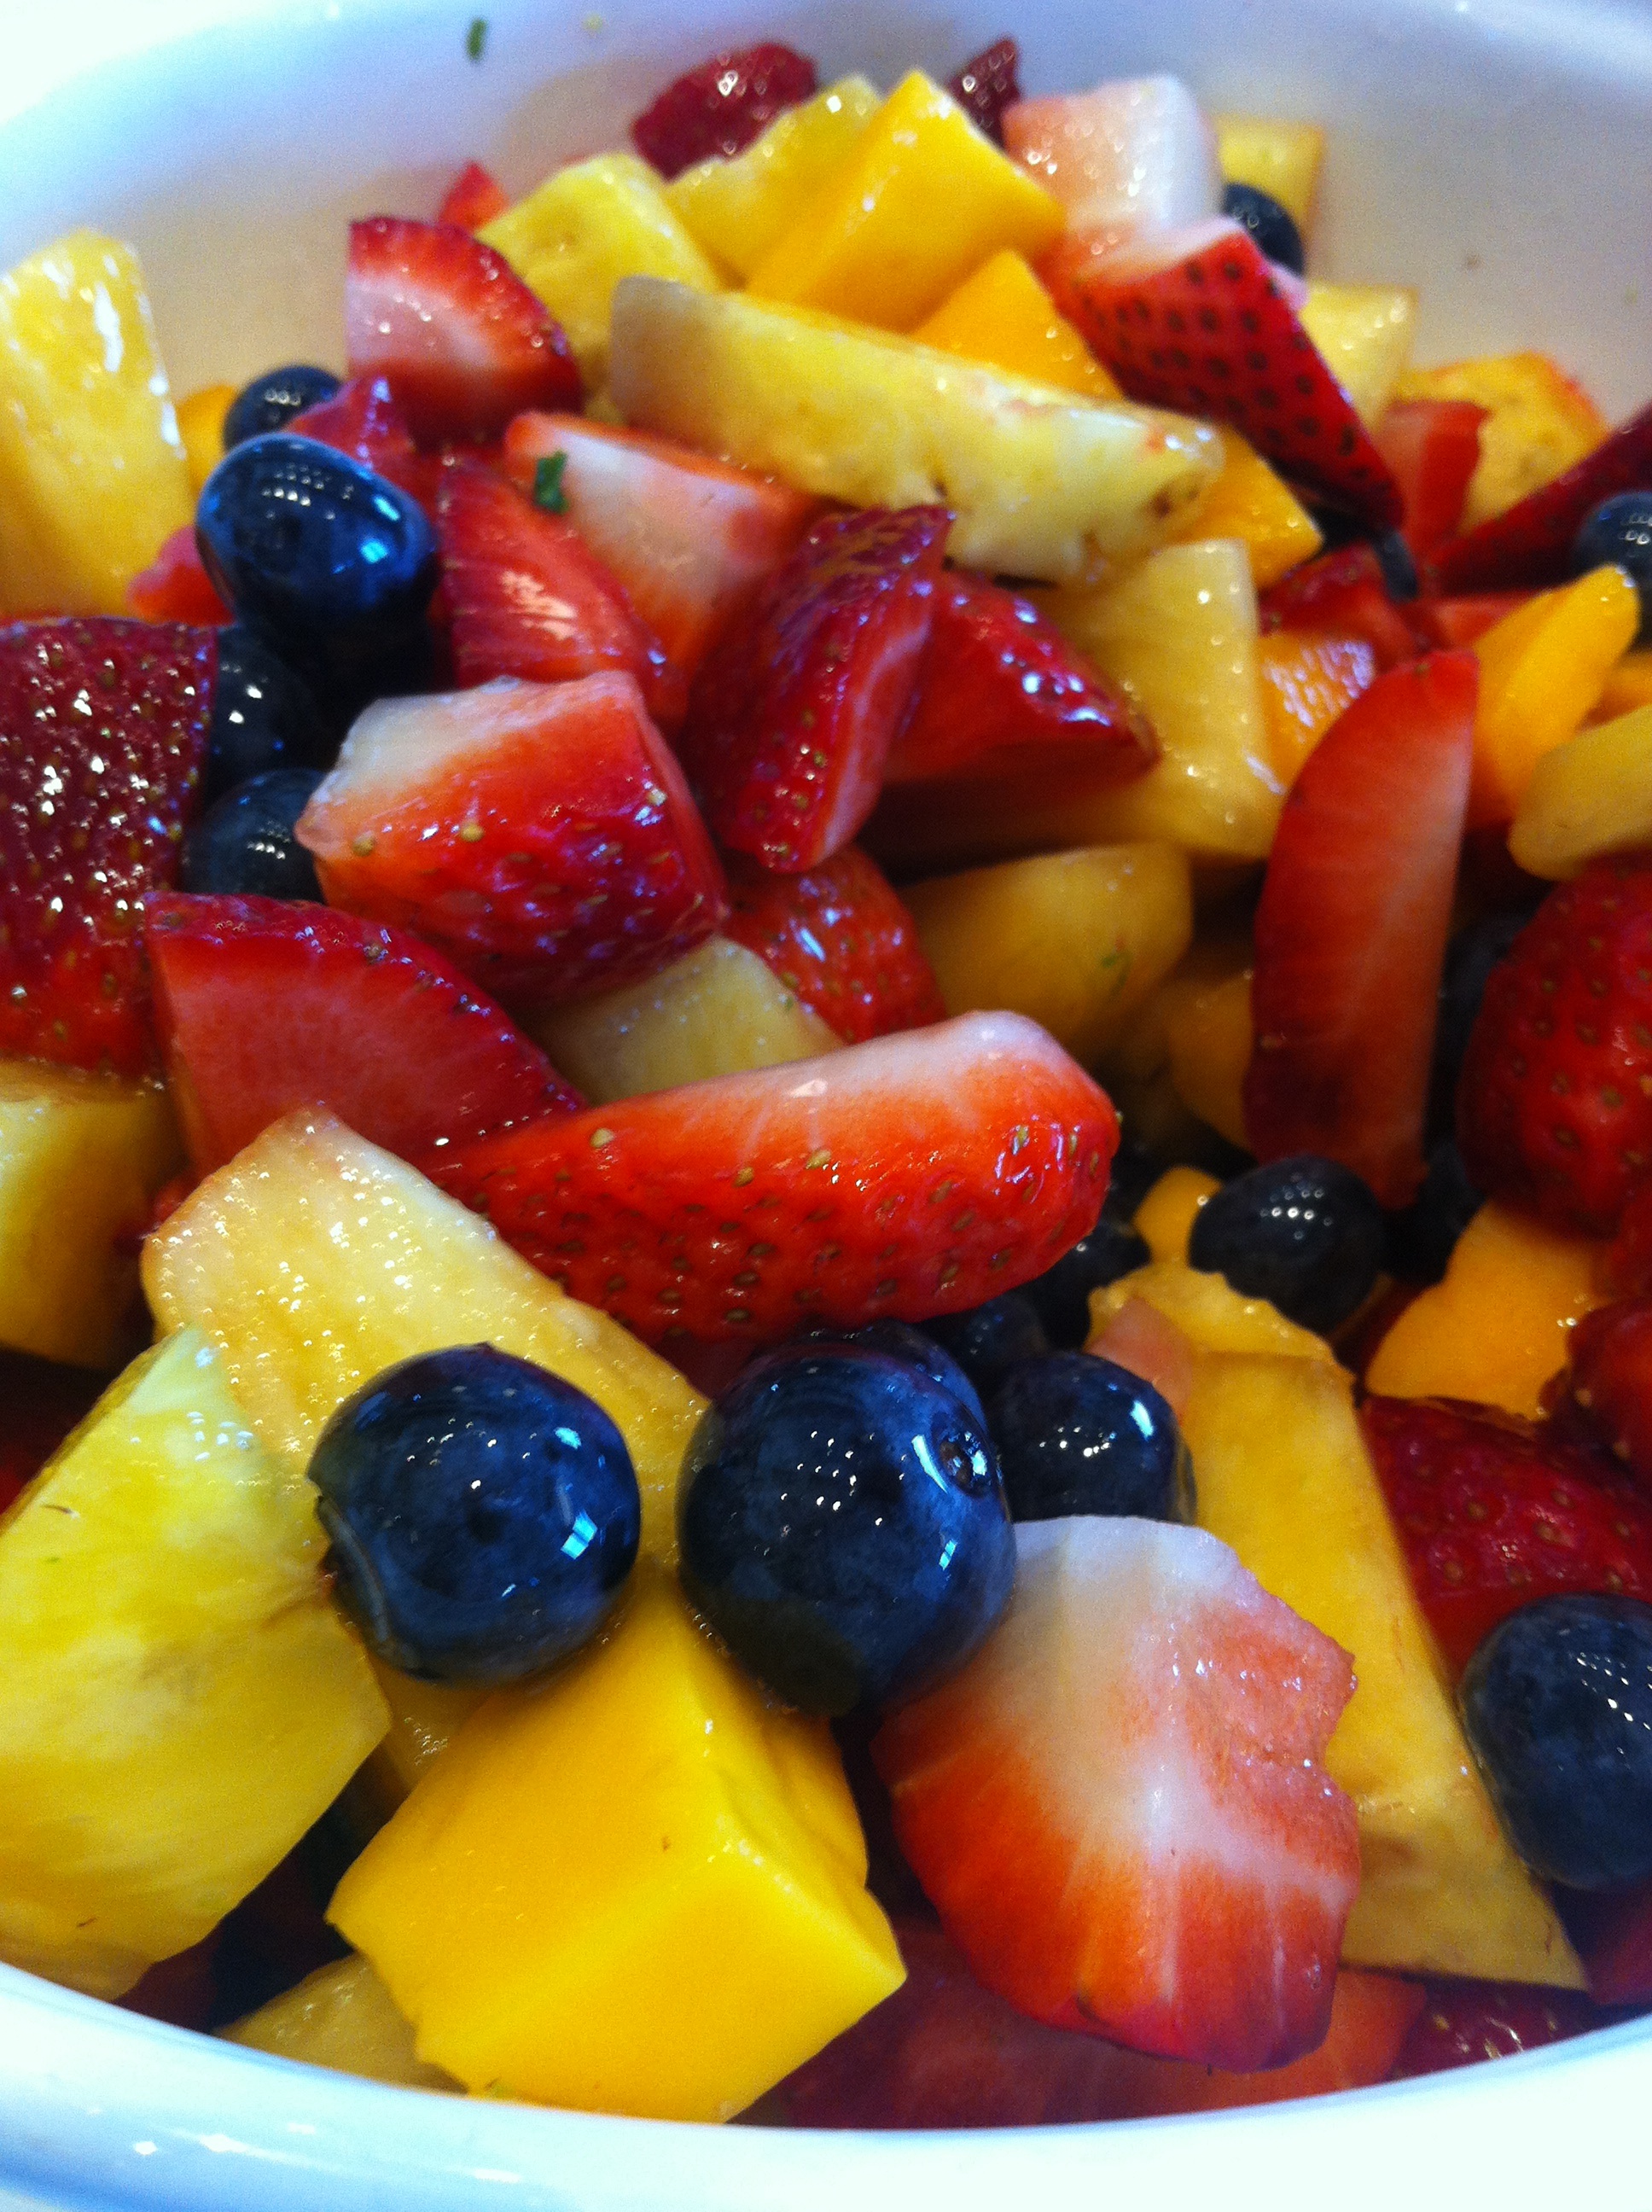
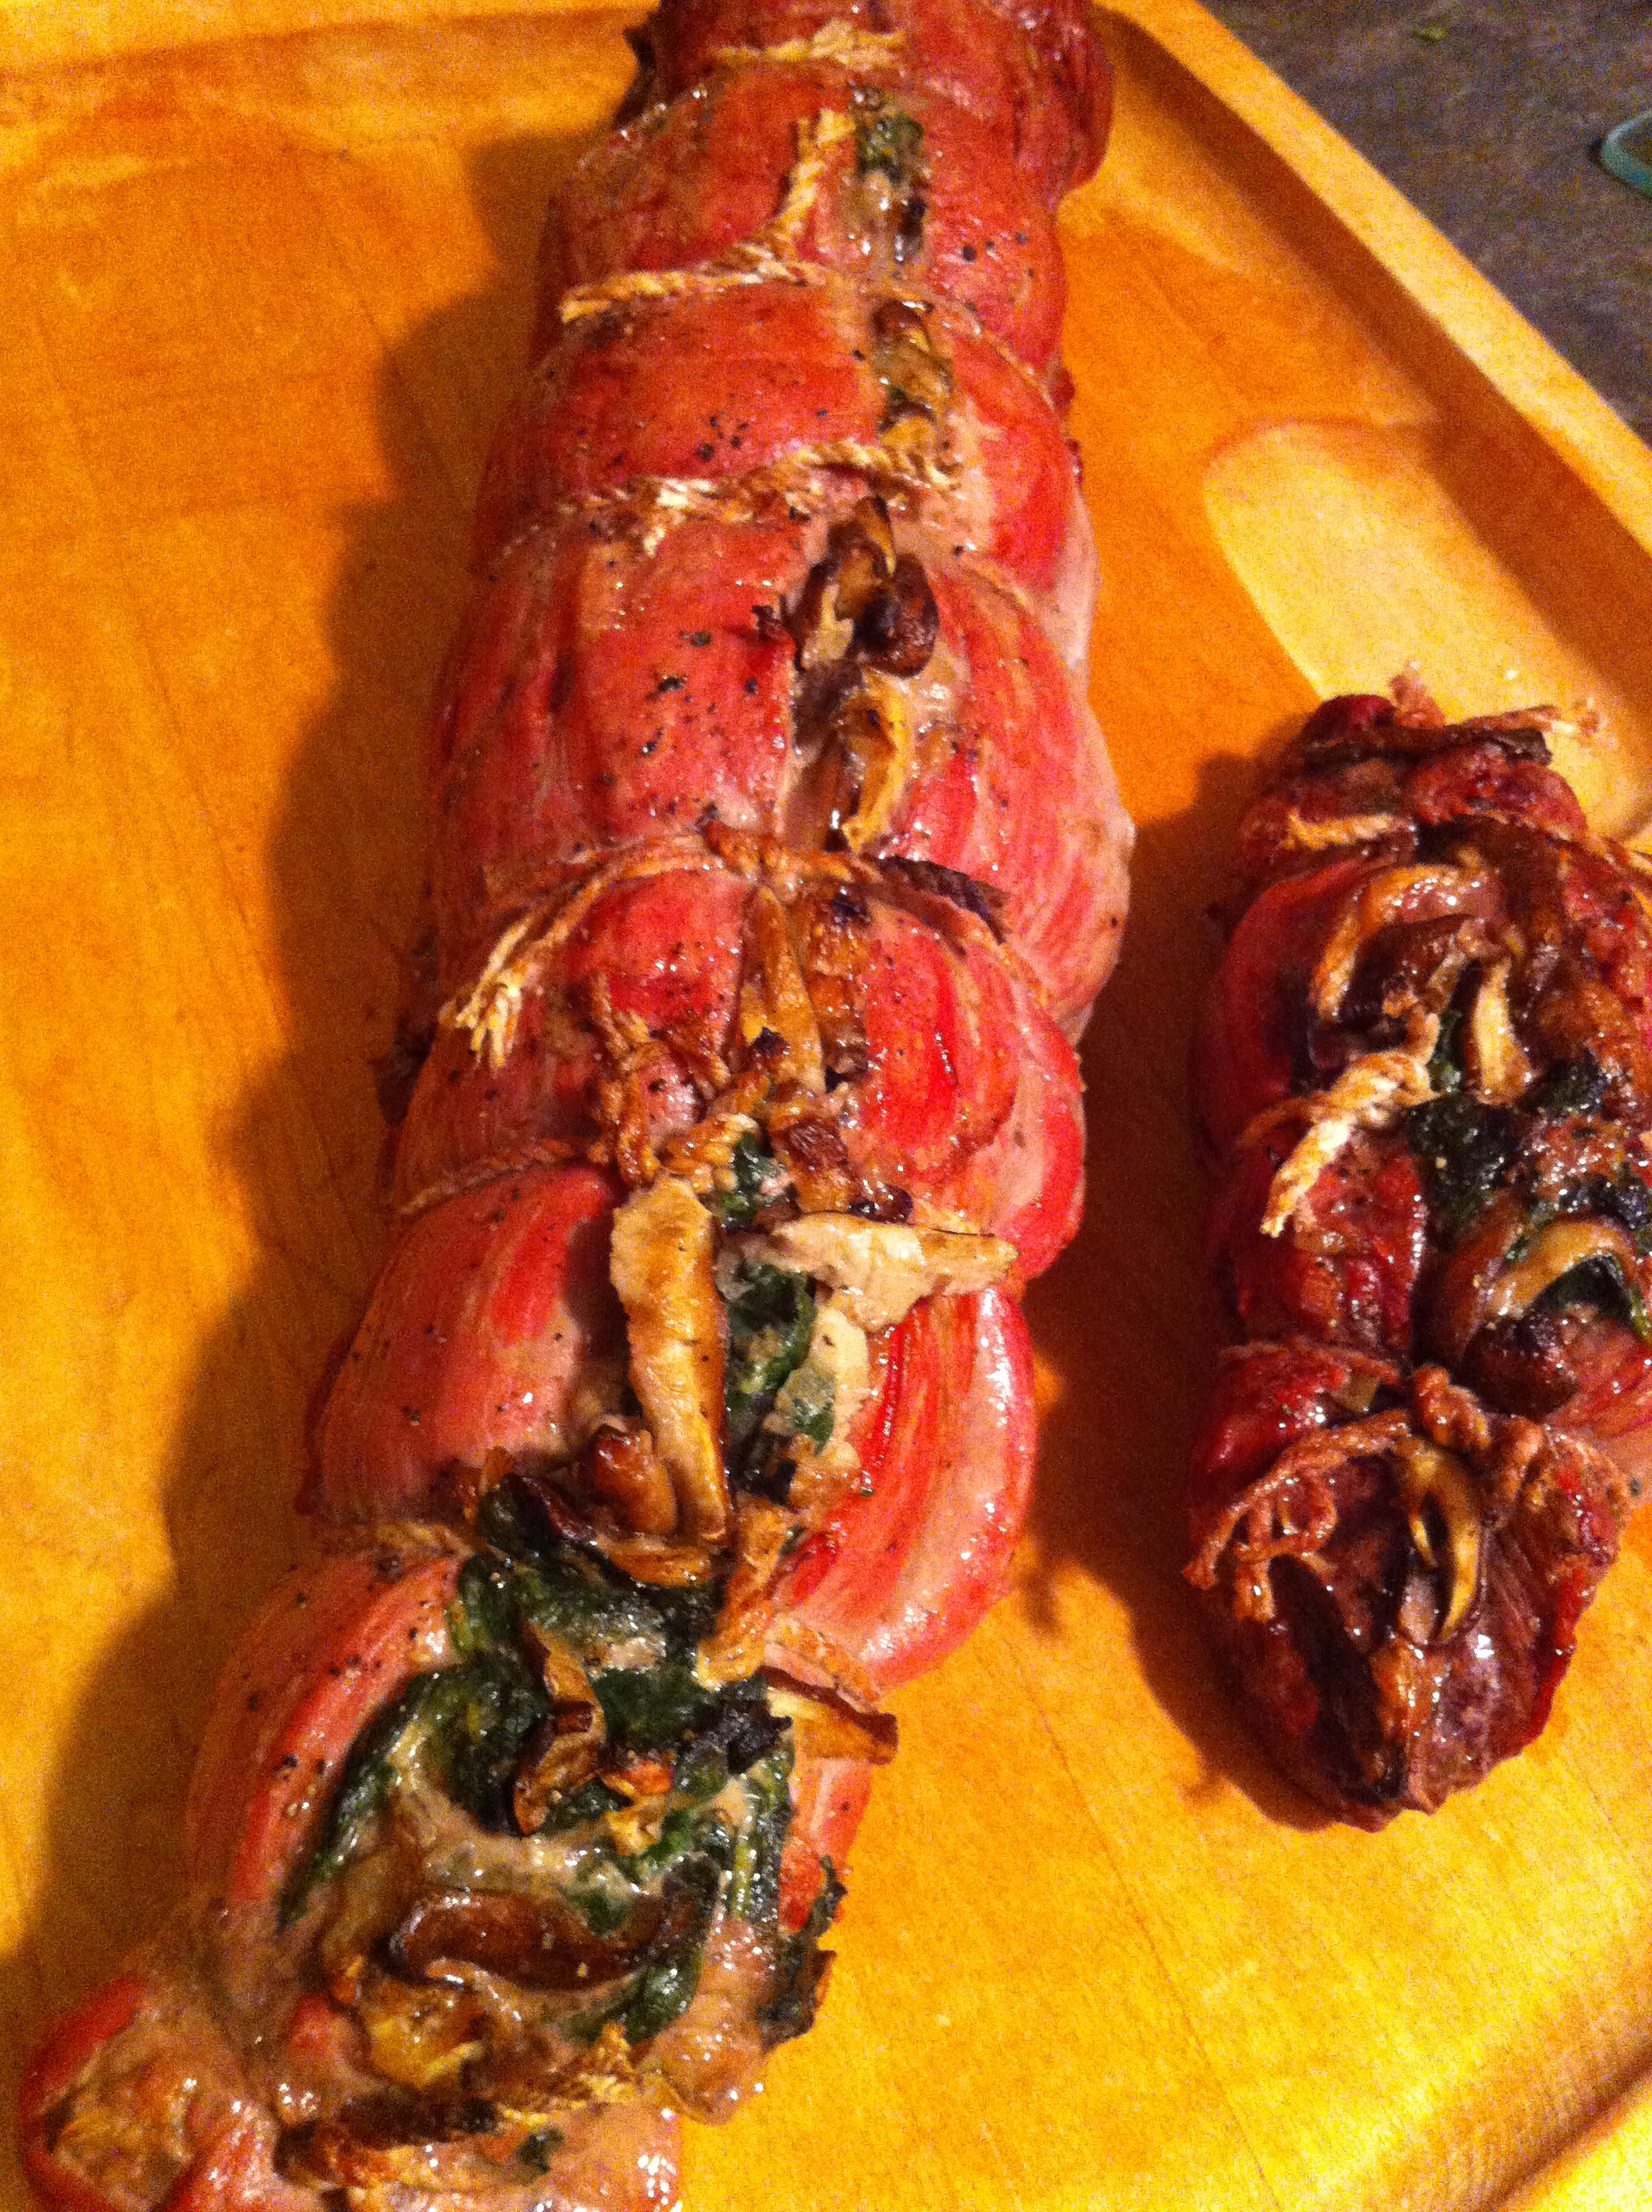
One Pot Hot Oat & Quinoa Cereal for some East Coast Visitors

Quinoa mixes with steal cut oats for a hearty breakfast that you can make the night before for those busy mornings!photo-69 Its always fun having visitors come and stay with us. My parents were just here for a week and they drove a U-haul all the way from Connecticut with lots of furniture and goodies! photo-67Our previously empty dinning room now has a gorgeous table that we can eat our meals at (we were doing Japanese style sitting on the floor before- Piper, our dog, benefited from a low table and she snagged a few bites of pizza the other night!) photo-71My dad being the diehard skier that he is must be on the hill from first chair to last chair regardless of the conditions. Breakfast is the most important meal before a big day of skiing- as you never want to stop too long for lunch, especially on a powered day. Getting out the door in the morning is equally as important though and that is why this filling and delicious breakfast is perfect for winter activities! photo-68The majority of the cooking is done the night before! All you have to do is combine all the ingredients in one pot the night before, heat the next morning and serve! Cinnamon and Cardamom give it a wonderful flavor unlike regular hot oatmeal and cereals. photo-70The toppings for this cereal are endless too- pumpkin seeds, almonds, fresh fruit, maple syrup or peanut butter to give it that protein punch. It’s fast & filling for your powder hungry guests or a great option on a busy morning! Enjoy!

From Feb 2013 Bon Appetit

Serves 4 (comfortably)

Ingredients:

  1. 1/2 cup dried fruit (such as goji berries, cranberries, or barberries)
  2. 1/2 cup steel-cut oats
  3. 1/2 cup well-rinsed quinoa
  4. 1/4 cup raisins
  5. 1 teaspoon kosher salt
  6. 1/2 teaspoons ground cinnamon
  7. 1/4 teaspoons ground cardamom
  8. 4 cups water

Combine all ingredients and bring it to a boil in a medium saucepan. Cover and let sit off heat overnight. Before serving, reheat cereal in saucepan, covered, over medium-low heat, stirring occasionally and adding water if needed, until warmed through, 5-8 minutes. Serve with your favorite toppings (almond milk, maple syrup, pumpkin seeds, granola, etc) To make the morning of bring mixture to a boil; reduce heat and simmer, stirring occasionally, until grains are tender, 20-25 minutes.

Chocolate Fudge Brownies… with Black Beans and Avocado!

photo-226

So you must be thinking that Ski Boots has gone off the deep end… Black bean brownies? Perhaps it’s the lack of snow we’ve been getting lately that’s made me want to experiment with some new recipes and ingredients. I had to try this one for a few reasons but mostly because I wanted to see if I could taste the black beans… Which you can’t… AT ALL.photo-225

In fact, everyone I served them to didn’t believe I actually made them with black beans. Nothing about these brownies are normal. Unlike your typical fudge brownies, where you feel sick after eating just one, these are dangerously perfect. They are rich AND light and you will most definitely not be able to stop at eating just one, Oh and did I mention they are gluten free? photo-228

Oh and did I also mention they are low fat? I wouldn’t feel guilty for a second eating these brownies for breakfast, they’ve got almost 5 grams of protein and only 150 calories per square (less if you use sugar substitute)… say what?! You won’t believe it until you try them for yourself but I promise you will enjoy them!

Black Bean & Avocado Fudge Brownies (Click for printer friendly version)
Ingredients:
  • 1 (15.5 oz) can black beans, rinsed and drained
  • 1 egg plus 2 egg whites
  • 1/3 of a large ripe avocado
  • 1 teaspoon olive or canola oil
  • 1/3 cup, plus 1 tablespoon unsweetened cocoa powder
  • 1/4 teaspoon baking powder
  • 1/4 teaspoon baking soda
  • 1/4 teaspoon salt
  • 1 teaspoon pure vanilla extract
  • 3/4 cup sugar or sugar substitute of choice
  • dark chocolate chips (to sprinkle on top)

Directions:

  1. Preheat oven to 350 degrees. Grease a 8×8 inch baking pan.
  2. Put all the ingredients besides chocolate chips into food processor (or a blender). Process or puree until ingredients form a smooth batter (scrapping down the sides with a spatula in between to make sure all the cocoa powder is incorporated.)
  3. Pour into prepared pan, sprinkle with chocolate chips, nuts, or any other desired brownie topping and bake for 35-40 minutes or until knife inserted in center comes out clean and top of the brownies begin to crack.
  4. Cool pan completely on wire rack then cut into 16 squares.

And if the kitchen didn’t smell amazing enough with all those brownies baking… my valentines day flowers are just starting to blooming and its like heaven on earth in my living room!photo-227Enjoy!

Original recipe from Ambitious Kitchen

Joanie’s Chocolate Chip Almond Cookies

photo-220Happy Valentines Day everyone! Whether you’re a lover or a hater of this pretty ridiculous holiday- You’ve gotta love an excuse to stuff your face with baked goods, chocolates, fruit covered in chocolate, candy hearts and then wash it down with wine or (but preferably AND) champagne with out getting a belly ache… Yeah, good luck!

My friend Aly brought me these beautiful tulips, I’m feeling pretty lucky and its not even officially Valentines Day!photo-223These almond cookies are pretty outrageous- in the healthiest way possible. Pom Pom got this recipe from her friend Joanie and Joanie must have got this recipe from an angle because they are that good. photo-219

They are made with almond flour/meal which gives it a chewy, nutty texture. Then you mix that with a hint of mint extract and dark chocolate chips and it’s like a Girl Scout Thin Mint Cookie and a chocolate chip cookie got married and had little chocolate mint almond cookie babies. Plus… they are gluten free, vegan and guilt free (kind of) after you eat the whole plate. Enjoy!

Heaven on Earth Almond Cookies:

Ingredients:

  • 2 1/2 cups Almond flour/meal (this can be found in the bulk section at Whole Foods or any health food store. Bob’s Red Mill also makes it, usually in the gluten free section)
  • 1/2 teaspoon Kosher sea salt
  • 1/2 teaspoon baking soda
  • 1/2 cup grapeseed oil or canola oil (I used canola this time because I didn’t have grapeseed on hand but either is good)
  • 1 tablespoon vanilla extract
  • 1/2 cup agave nectar
  • 1 cup 70% dark chocolate, chopped (or use dark chocolate chips)
  • 1/2 teaspoon mint extract

Directions:

  • Preheat oven to 350
  • Combine dry ingredients in a large bowl
  • Combine wet ingredients in a smaller bowl
  • Mix dry and wet ingredients together and stir in chocolate chunks
  • Roll dough into 1″ balls and softly press/flatten dough onto a well greased cookie sheet
  • Bake for 8-12 minutes until edges begin to brown.
  • Cool on wire wracks (if you can wait that long)
  • These would also make really good ice cream sandwiches- place a scoop of your favorite flavored ice cream or sorbet and let them set in the freezer for at least 1 hour before serving.