Sausage & Vegetable Campfire Pockets

IMG_7704Memorial day is right around the corner and many of you will be pulling out your camping stuff for the first time this year! I will be heading out to the dessert this weekend to enjoy some nature and pitch at tent too! I am already thinking about what I can easily cook in the wilderness after consuming a few glasses of wine.

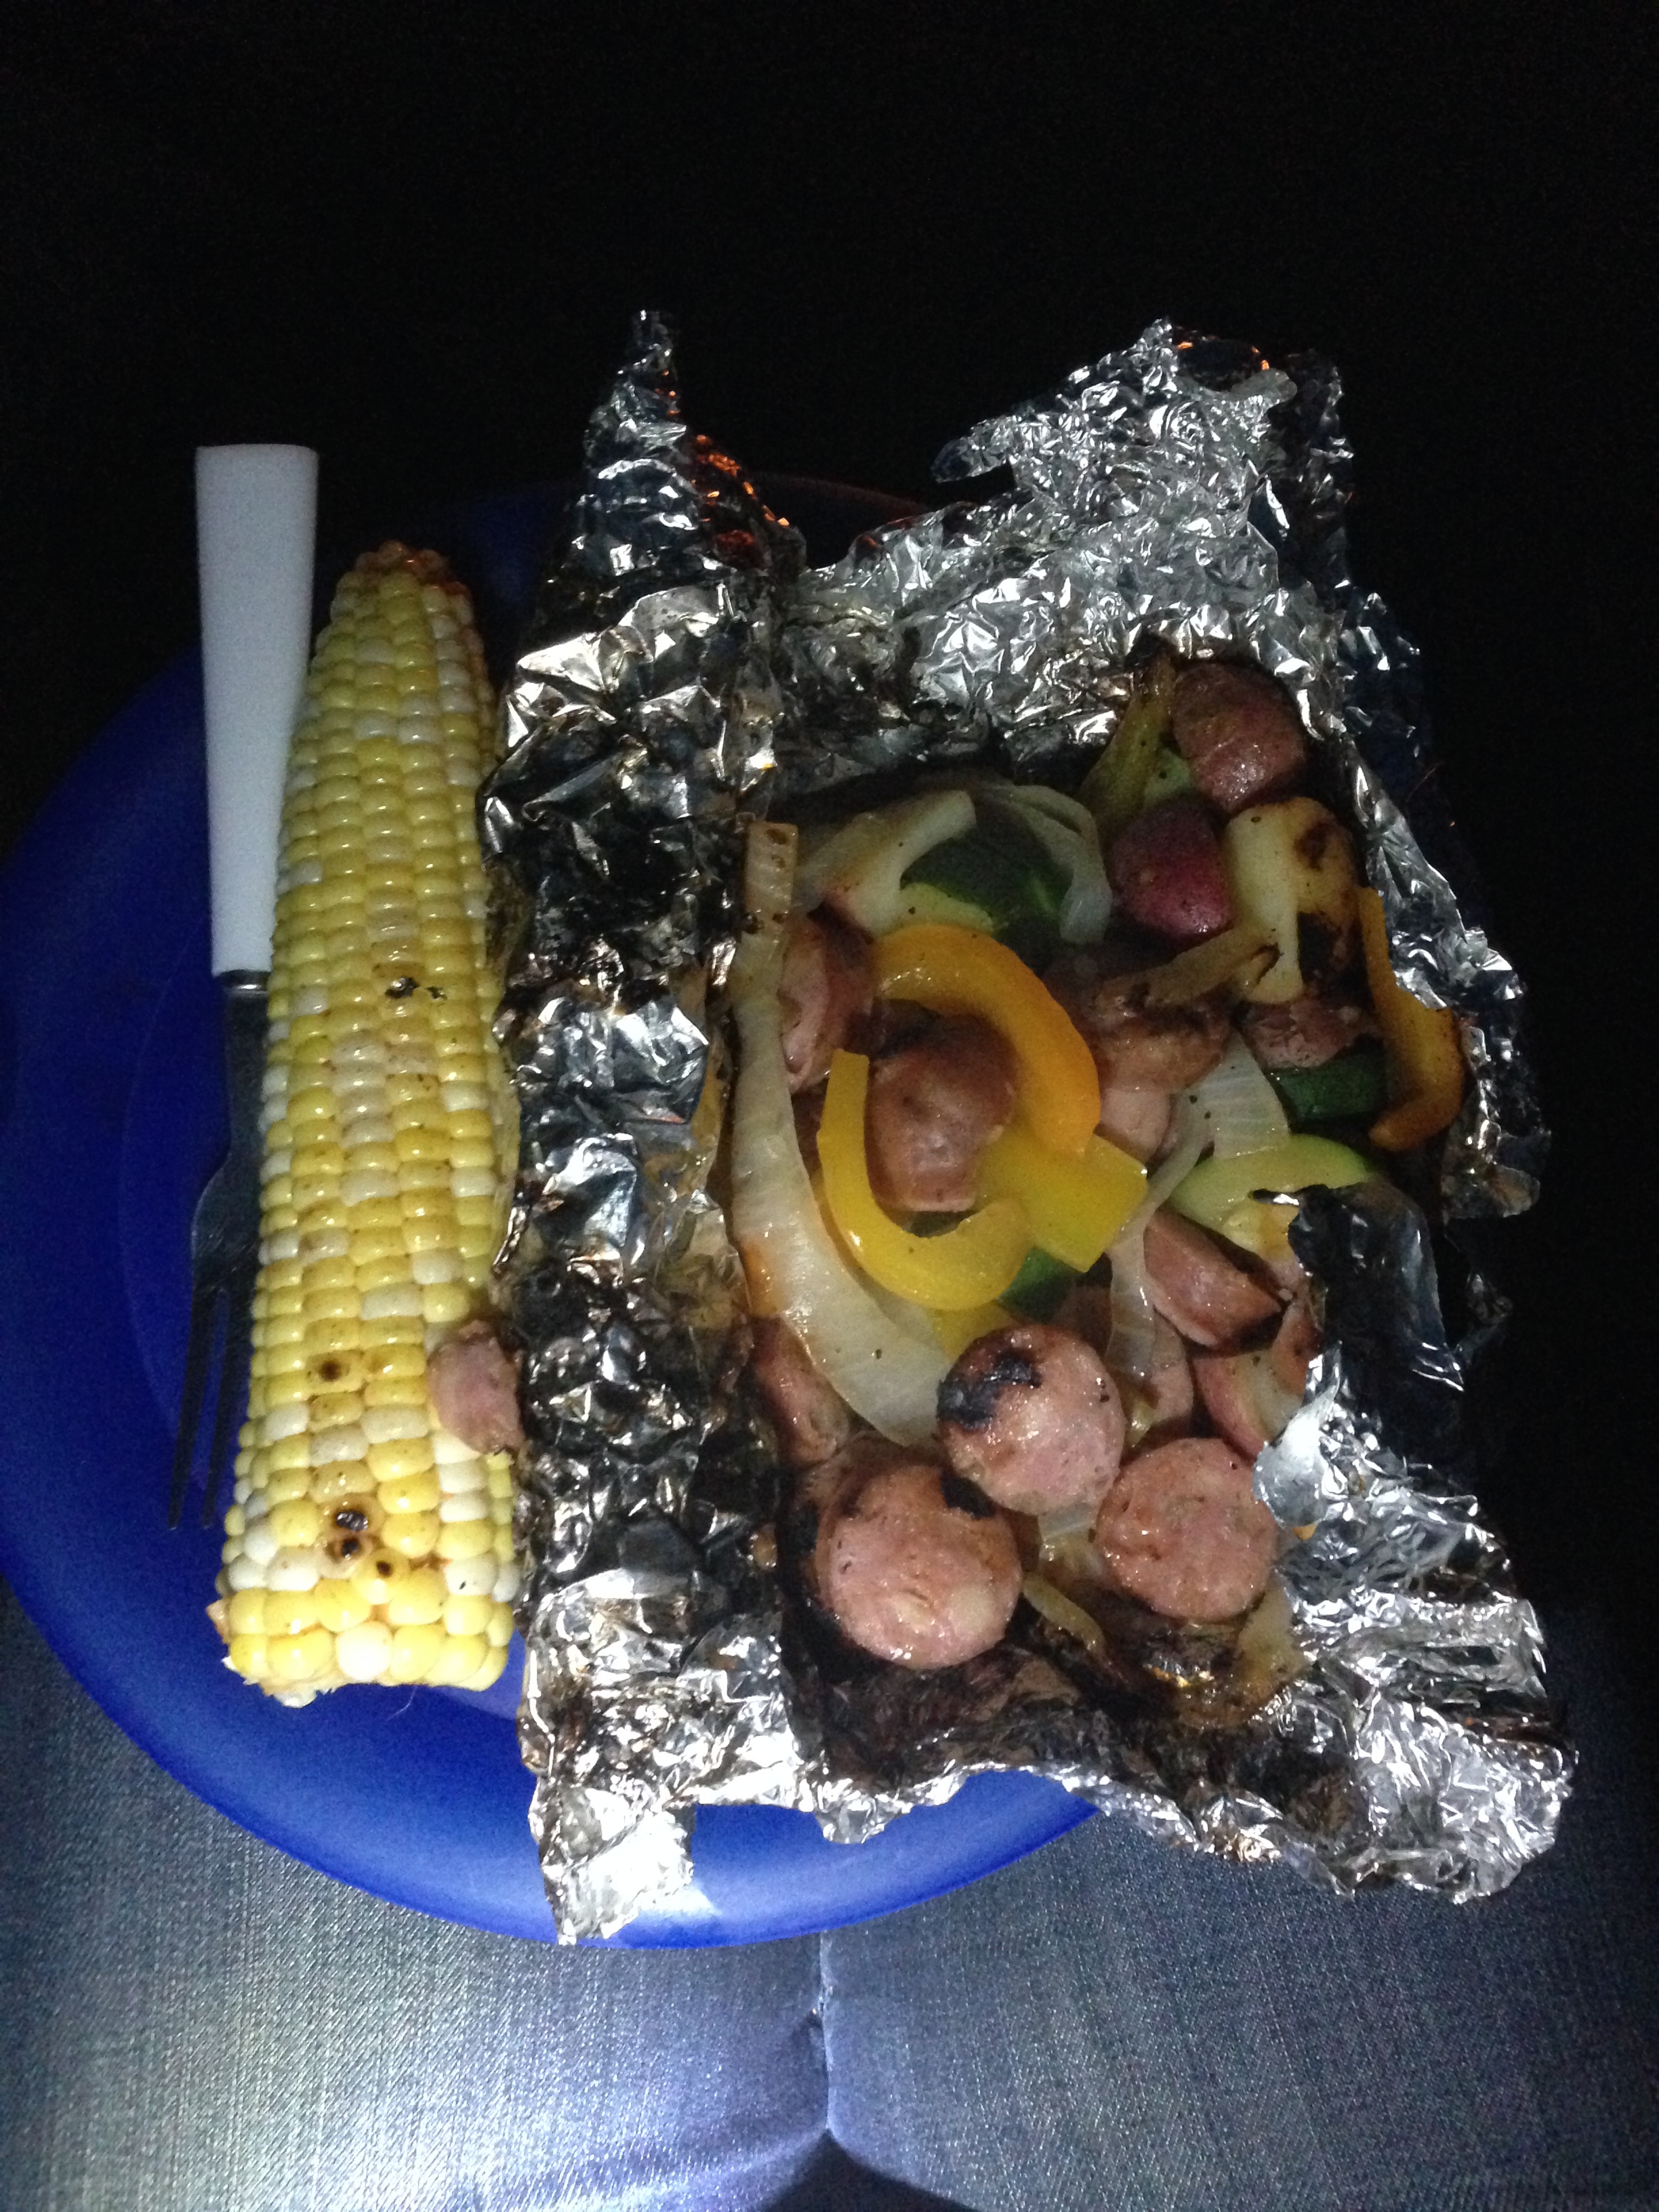
My number one favorite cooking tool while camping… Tinfoil. It is a life savor! Tinfoil pockets trap all the flavor in and there is minimal clean up when you’re done which is an added bonus! Now there are a few reasons I love this recipe, number one being the tinfoil thing again, second its easy and delicious, third you can make this recipe your own by using your favorite vegetables and sausage.

I used Aidells chicken sausages for this recipe because they are already fully cooked and you won’t run the risk of under cooking meat but feel free to use your favorite sausage, kielbasa or brat (just cook the pockets a little longer!) You can stuff all the veggies and sausage into a hotdog bun or eat with a fork right out of the tinfoil! I love eating it with some spicy campfire corn (recipe to come!) and wash it down with some box wine! Happy Memorial Day y’all, be safe out there! IMG_7744Sausage & Vegetable Campfire Pockets (Serves 4-6)

Ingredients:

  • 1 package of Aidells chicken sausage (or another favorite kind)
  • 1 small onion, sliced
  • 1 small zucchini, sliced
  • 1 pepper, sliced
  • 1/2 lb. baby potatoes, quartered
  • Olive oil
  • Salt and pepper
  • Hot sauce (optional)

Directions:

  1. Combine all the ingredients in a bowl or zip lock bag, I used the plastic bag my vegetables were in from the grocery store. Drizzle with olive oil (about 2 tablespoons) and season with salt and pepper- Mix or twist the bag closed and shake it until everything is fully coated.
  2. Divide the mixture evenly onto 6 rectangular pieces of foil, bring two ends together and roll them together, then do the same with the sides to make a nice little pocket.
  3. Place them on the campfire grill for about 10minutes before turning them over and cooking another 10 minutes. Check one pocket first to make sure everything looks tender and cooked.


Chicken Suiza Enchilada’s with Avocado Cream

IMG_2570If you follow this blog regularly you know that one of my favorite things to cook with is rotisserie chicken. I actually dis-like eating chicken unless it is rotisserie style and I have come to the conclusion that I should stop cooking regular chicken all together, because its always dry and tough. I also love rotisserie chicken because it is fast, easy and always cooked to perfection!

So in honor of Earth Day last week I wanted to make something green- as you can see I didn’t get around to posting it in time for Earth Day but better late then never right? I found this recipe on the FoodieCrush blog and when I read the ingredients I knew I had to make it- all of my favorite things in one recipe, how could I resist!? (and after making them I can say they lived up to my expectations!)IMG_2573

Chicken Suiza Enchilada’s with Avocado Cream (Serves 4-5)

Ingredients:

  • 4 cups cooked and skinned shredded chicken meat (about 1 store-bought rotisserie chicken)
  • 2 4-ounce cans diced Fire Roasted Hatch Chiles
  • ½ medium white onion, diced
  • 2 cups whipping cream (or 1 cup whipping cream & 1 cup half & half)
  • 1 cup chicken broth
  • 2 Avocados
  • 1 cup fresh cilantro, stems and leaves
  • 1 teaspoon cumin
  • 1 teaspoon garlic salt
  • 1 teaspoon kosher salt, divided
  • Juice of one lime
  • 2 ½ – 3 cups shredded Mexican blend cheese (or just Monterey Jack if you prefer)
  • 8-10 7”-8” flour tortillas
  • ¼ cup chopped green onion

Directions:

  1. Preheat oven to 350 degrees.
  2. To prepare the sauce: Mix whipping cream, chicken broth, 2 avocados, cilantro leaves and stems, cumin, garlic salt, lime juice and ½ teaspoon kosher salt in a blender and mix well to combine. Season with more salt if needed.
  3. In a large bowl mix together chicken, chiles and onion. Add half of the avocado cream and stir to mix well. Add more salt if needed (this will depend on how salty your rotisserie chicken is.)
  4. Prepare a 9 X 12 baking dish by giving it a light coat of cooking spray and ¼ cup of avocado cream spread evenly on bottom of baking dish.
  5. To assemble enchiladas: Place about ⅓ cup chicken mixture along bottom third of tortilla and top with ¼ cup of shredded cheese. Carefully roll tortilla and place it seam side down in the baking dish. Repeat placing tortillas side by side until you’ve run out of space. Pour avocado cream evenly over the tortillas and spread 1 cup cheese on top.
  6. Cover with foil and bake for 20 minutes, remove foil and bake for another 10 minutes or until enchiladas are cooked through and cheese is lightly browned.
  7. Garnish with chopped green onion, cotija cheese, additional avocado, cilantro leaves and salsa or fresh tomatoes.

Cheesy Baked Rigatoni

IMG_2490I have been posting a lot of pasta dishes lately and its for one reason… pasta is delicious and easy. Maybe its because I have some Italian blood in me as well but I just can’t resist a plate of pasta with a big glass of red wine! Since I always love cooking for crowds and since I’m pretty bored with lasagna I decided it was time to play with a new recipe that is good for a group. I also made this recipe for the first time because I have a friend that loves (and I mean LOVES) sour cream and I knew this would be right up her alley.

I know it sounds a little odd to add sour cream to a pasta recipe but it makes the sauce extra creamy and amazing! The recipe also calls for 3 different kinds of cheese which makes it gooey and melty and everything you’d ever want in a pasta bake. There is no need to spend lots of time on a yummy meal and that is what I love about this recipe! Everything can be prepared in about 15 minutes and then all you have to do is throw it in the oven for 30 minutes to let all the cheese melt and presto… Dinner is ready!

Cheesy Baked Rigatoni (Serves 6-8)

Ingredients:

  • 1 pound dry rigatoni pasta
  • 1 sweet onion, diced
  • 1 pound ground Italian sausage (mild or spicy depending on your taste!)
  • 2 26oz jars sweet basil spaghetti sauce
  • 6-8 slices provolone cheese
  • 16 oz ball fresh mozzarella, sliced
  • 1 1/2 cups sour cream
  • 1/4 cup shredded mozzarella cheese

Directions:

  1. Preheat the oven to 350 degrees. Butter a 9×13 baking dish and set aside. Bring a large pot of salted water to boil and add the pasta. Cook for 8 minutes until al dente- do not cook for as long as you normally would, you want the pasta to have a little crunch so it does not get soggy when you bake it!
  2. In a large skillet cook the sausage and onion until brown. Once the sausage is totally cooked, add both jars of pasta sauce and allow to simmer for 15 minutes. After 15 minutes remove the mixture from the heat and carefully stir in the sour cream.
  3. Layer half the drained/cooked pasta into the bottom of the pan and top with half the sauce mixture. Layer 6-8 slices of provolone cheese on top. Layer remaining pasta, and remaining sauce and spread evenly. Lay slices of fresh mozzarella on top and sprinkle with Parmesan cheese.
  4. Bake for 30 minutes at 350 or until the cheese is melted and bubbly. Enjoy!

Avocado, Cheddar and Arugula Breakfast Sandy

IMG_2441They say breakfast is the most important meal of the day and I couldn’t agree more! Not only is it the most important meal of the day but it is my favorite, epically when it comes to breakfast sandwiches! There are so many options… you can have it on a bagel, English muffin or toast; topped with bacon, sausage or ham- or throw on some cheddar, American or pepper jack cheese… as you can see the options are endless.

I prefer my breakfast sandwich on an English muffin (Thomas’ only please!) with cheddar so sharp it’ll cut you! I’ve learned that you don’t need meat to make a sandwich hearty, put a little avocado on that baby and not only do you get all those good fats in your diet, it fills you up quickly too! The Arugula adds a little peppery kick that is extra delicious. All in all you better make two of these breakfast sandys because you’ll be sad when the first one is gone! Happy weekend everyone!

Bomb Breakfast Sandy (Makes 1 Sandwich)

Ingredients:

  • 1 Large egg, fried
  • 1 English Muffin, toasted
  • 1 slice extra sharp cheddar
  • 1/4 Avocado
  • 2 slices of tomato
  • handful of Arugula
  • Salt and Pepper to taste

Directions:

  1. Melt some butter in a medium skillet. Crack the egg into the frying pan and let cook for 2 minutes. Flip the egg and cook for a minute more (now is when you’d want to break the yolk!). Place slice of cheddar cheese on top of the egg and cover with lid for 30 seconds. Leave covered and remove from heat, let it sit in the pan while you assemble the sandwich. Meanwhile, toast your English muffin.
  2. Take 1/4 of the avocado and smash it into the English muffin. Place the fried egg on the muffin and top with tomato and arugula. Season with salt and pepper.
  3. Server with hot sauce or ketchup (if you love ketchup as much as me!) Enjoy!


“Appy Hour” Pear and Boursin Cheese

IMG_2332I’m always on the look out for fun new apps to try when we have people over. The problem with having a big tray of appetizers out to nibble on before dinner is I usually end up filling up on the snacks and I’m not hungry for dinner! I mean who can resist a cheese and charcuterie board?! This app is much lighter and slightly healthier then a basket of bread and crackers and you won’t fill up before you sit down for the meal. This would be perfect before Easter brunch or dinner this weekend! IMG_2333Added bonus, this appetizer is gluten free and I am always trying to think of yummy apps that are gluten free! One of my favorites are these smoked salmon and cucumber rounds with Boursin cheese (they are always a big hit!) So it turns out I might have a slight obsession with Boursin Cheese and this appetizer is proof of that! Find some delicious ripe pears at the store and serve them along side this cheese, its heaven on Earth!

Ingredients:

  • 3 ripe pears
  • 1 container Garlic and Fine Herb Boursin Cheese

Directions:

  1. Wash, core and slice the pears (leave the skin on). Remove Boursin from its foil and place on a platter with the pears around it.

Red & White Lasagna

IMG_1899Anyone who doesn’t like lasagna has something wrong with them. Sorry I’m not sorry! How could you NOT love cheesy pasta with veggies and meat? And It is the easiest, most delicious meal that feeds a crowd! What makes this recipe even more amazing (and not healthy at all..) the whole lasagna is topped with Alfredo sauce!

Yup, I went there! Well I can’t lie, I got this recipe from the back of a Prince lasagna box 10 years ago… shhhh don’t tell! Over the years I have put a few personal twists on the recipe and now its my favorite go to when I’m having a lot of people over or just want something quick and easy for the week- the leftovers are even better!  Enjoy!

Ingredients:

  • 12 Lasagna noodles
  • 1 (15-ounce) container Ricotta cheese
  • 1 (10-ounce) package frozen chopped spinach, thawed and well drained
  • 2 cups (8-ounces) shredded mozzarella cheese
  • 1/2 cup shredded Parmesan cheese, divided
  • 2 eggs
  • 1 pound bulk Italian sausage or ground beef, cooked and drained (optional)
  • 1 onion, chopped
  • 8 oz mushrooms, sliced
  • 1 (26-ounce) jar Sweet Basil Marinara pasta sauce
  • 1 (16-ounce) jar Alfredo pasta sauce
  • Chopped fresh parsley
Directions:
  1. Preheat oven 350 degrees. Cook Lasagna according to package directions; drain.
  2. Meanwhile, heat olive oil in a medium skillet and saute onions and mushrooms until tender, set aside. In another medium skillet cook sausage until brown, drain and set aside.
  3. In large bowl, combine ricotta cheese, spinach, mozzarella cheese, 2 tablespoons Parmesan cheese and eggs; mix well.
  4. In a 15×9-inch baking dish, spread 1 cup marinara sauce. Layer 4 Lasagna noodles over sauce. Top with half cheese mixture, 1 cup marinara sauce and all the cooked sausage and onion/mushroom mixture.
  5. Layer 4 more Lasagna noodles, remaining cheese mixture and remaining marinara sauce. Top with 4 remaining Lasagna noodles. Spread Alfredo sauce evenly on top; sprinkle with remaining Parmesan cheese and chopped parsley.
  6. Cover and bake 40 minutes. Uncover, bake and addition 15 minutes or until hot and bubbly. Let stand 10 minutes before cutting. Serving 10-12.

Wedge Fries with Sour Cream & Sweet Chili Sauce

IMG_2102Back in my college days (which seems like yesterday but was actually almost 6 years ago now!) I was lucky enough to spend a semester abroad in New Zealand. I was hoping to spend my semester over there sight seeing and experiencing my first “endless winter.” I went down in July during our summer, which is actually New Zealand’s Winter and had intended to train and ski race while I was there (here’s a picture of me and Jake in Queenstown while I was abroad… we were just babies!)DSC_0342 I wanted to be ready when I returned to the States in November for my up coming season on the Bates Ski Team. Sadly, I blew out my knee just months before leaving for New Zealand and my plans of training while abroad when down the drain. My plans for eating my way through the country were shaping up very nicely however!

I tried all the traditional cuisine, beer, wine etc. I ate spicy sausages on white bread outside an All Blacks rugby game (not my favorite) but very traditional! One of my absolute favorite snacks were potato wedges served with sour cream and sweet chili sauce. The combination is a classic New Zealand staple and they serve it a many local bars and pubs. I know it sounds like a bizarre combination but I promise you, once you try it you’ll be totally addicted!

Ingredients:

  • 4 large potatoes, washed and sliced in to wedges
  • 1/2 teaspoon paprika
  • 1 teaspoon kosher salt
  • 2 tablespoons olive oil
  • 1/2 cup sour cream and 1/2 cup sweet chili sauce for dipping.

Directions:

  1. Pre-heat the oven to 375 degrees. Line a baking sheet with foil and spread the sliced potatoes evenly on the baking sheet.
  2. Drizzle the olive oil, salt and paprika over the potatoes and toss to coat evenly. Place the potatoes in the oven for 25-30 minutes tossing frequently so the potatoes don’t stick to the baking sheet.
  3. Cook until the potatoes are brown and crisp. Remove from the oven and serve with a bowl of sour cream and a bowl of sweet chili sauce.


Russian Borscht

IMG_1199RBWhile the east coast was getting slammed with snow and cold weather over the last few weeks, we have been enjoying spring in Park City… Until Sunday! All of the sudden the cold weather and snow came roaring back and winter is here once again. Most people think of classic borscht as the bright red beet borscht however this recipe is a quite different. IMG_1195This borscht is still packed with lots of delicious vegetables but has a rich buttery flavor instead of the more vinegary base of beet borscht. Extra bonus… this recipe wont stain your clothing and pots like beet borscht! Don’t be fooled by this seemly light vegetable soup, it is very very filling! The base of the soup is potato and carrots which makes it a little more substantial then you’d think! Enjoy! IMG_2083Ingredients:

  • 5 large potatoes, peeled and cut into 1′ pieces
  • 5 large carrots, peeled and chopped
  • 3/4 cup butter
  • 1 large sweet onion
  • 1 small green cabbage, coarsely chopped
  • 5 celery stalks, sliced
  • 4 garlic cloves, sliced
  • 1/3 bunch of parsley, chopped
  • 2 14.5oz cans petite diced tomatoes
  • 3 cups of chicken broth (or vegetable broth)
  • 1 teaspoon salt and pepper (plus more to taste)
  • Sour cream for garnish (optional)

Directions:

  1. Add potatoes and carrots to a large stock pot and add enough water to cover the vegetables completely. Bring to a boil, stirring occasionally, until the potatoes and carrots are very tender.
  2. Using a hand held potato masher, mash the carrots and potato into small pieces creating thicker potato based water.
  3. Meanwhile in another large pot melt the butter. Saute the onion, cabbage, celery, garlic, and parsley until the cabbage has wilted and the vegetables are tender.
  4. Add the cabbage mixture to the pot with the potatoes and carrots, then add the chicken stock and petite diced tomatoes.
  5. Bring to a boil and then reduce the heat and simmer for 30minutes.
  6. Season to taste with salt and pepper. Serve with a dollop of sour cream and crusty bread!

Chicken Gyros with Tzatziki and Cucumber Salsa

IMG_2087Wow! its been a while since I’ve posted a new recipe! I’m so sorry but I have to admit life has been a little busy here in Utah! First there was the craziness of Sundance (it was a blast and I saw some amazing films!) Then my husband and I bought a house! Wouldn’t you know that the perfect place would come on the market at our busiest time of year! but is there really ever a good time to move? It really is a huge pain in the ass. Packing and boxing everything up and having no idea where anything is, it’s so frustrating!! I was without a kitchen for almost a week. IMG_2030But then I was greeted with a beautiful kitchen! My favorite part of it all… It has a gas stove!! I grew up cooking on a gas stove and I’ve been spoiled with how awesome it is, so I was beyond excited about that aspect. IMG_1998Here is a picture of my family enjoying our first meal in the new house, it was a really wonderful night. So after all that moving I’ve been a little tired and not really feeling like I want to cook. I’ve been looking for some easy recipes that are done in under 30minutes so I can get back to unpacking and setting up the new house. Back to my favorite staple, the rotisserie chicken… but seriously, is there anything better than rotisserie chicken? the meat is so tender and delicious plus it is SO easy. Adding rotisserie chicken to these chicken gyros make them irresistible, espically when you top it all off with some home made tzatziki and cucumber salsa. So if you’re ready to get your Greek on… here we go! Enjoy.

Chicken Gyros with Tzatziki and Cucumber Salsa (Serves 4)

Ingredients:

  • 1 Cucumber, peeled and diced
  • 1 teaspoon lemon juice
  • 2 garlic cloves, minced
  • 1 pint grape tomatoes, quartered
  • 1/2 small red onion, diced
  • 1/3 cup flat leaf parsley, chopped
  • salt and pepper to taste
  • 2 tablespoons olive oil
  • 1 teaspoon dried oregano
  • 1 teaspoon dried rosemary crumbled
  • 1 rotisserie chicken, meat removed and shredded
  • 1 bag (4 or more) of pocketless pita rounds or naan

Directions:

  1. Make the Tzatziki dip and chill for 1-2 hours (directions and ingredients below. this can be made up to 24 hours in advance) You don’t have to chill the dip for 2 hours but I think the flavors are better when it sits for longer
  2. Preheat oven to 300 degrees
  3. Combine the diced cucumber, onion, tomatoes, parsley, 1 teaspoon of lemon juice and 1/2 teaspoon of salt and pepper in a medium bowl and toss to combine. set aside.
  4. In a medium skillet, combine olive oil, garlic, rosemary and oregano until garlic becomes fragrant about 1-2 minutes. Meanwhile place the pita pockets in the oven to head. Add shredded chicken to the pan and toss to coat with garlic oil for about 30 seconds. Remove from heat.
  5. Place the cooked chicken, tzatziki and cucumber salsa on a warm pita pocket, serve immediately. Enjoy!

Tzatziki Dip

Ingredients:

  • 3 Tablespoons Olive Oil
  • 1 Tablespoon white wine or champagne vinegar
  • 2 gloves garlic, minced or pressed using a garlic press
  • 1/2 lemon, juiced
  • 1/2 teaspoon salt (more to taste)
  • 4-5 turns of fresh pepper
  • 1 cup Greek yogurt
  • 1 cup sour cream
  • 2 cucumbers, peeled, seeded and diced (smaller is better)
  • 1 1/2 teaspoons chopped fresh dill (I use freeze dried sometimes too)

Directions:

  1. In a small bowl, combine olive oil, vinegar, lemon juice, garlic, salt and pepper. Mix to combine, set aside.
  2. Peel cucumbers and slice them lengthwise. Using a spoon, scoop the seeds from the flesh and discard them. Diced the cucumber into small bite size cubes.
  3. In another medium bowl, use a whisk to blend yogurt with sour cream.
  4. Add the olive oil mixture to the yogurt mixture and stir until none of the oil remains.
  5. Fold in cucumber and dill until fully incorporated. Chill for 1-2 hours before serving.


Park City Peanut Chicken and Rice

IMG_0993Howdy Ski Boots followers! I am sorry for the lack in posts lately, life has been a little busy! More on that later! I was just recovering from the craziness of the holidays and now Sundance has descended on Park City! It’s going to be 10 wild days of films, parties and lots of celebrity sitings! Last year I got to meet my cooking idol Giada! I’ll keep you posted on all the fun people I get to meet this year! When life gets busy, no one has a lot of time to spend on dinner and cooking.

This recipe for peanut chicken is so delicious plus its easy and quick! Everything you’ve always wanted from a meal. The recipe is originally one of Rachael Ray’s but her version was called Park City Cashew Chicken. I’ve made a few tweaks and since I am allergic to cashews, I decided to used peanuts instead. Happy Sundancing everyone and bon appetit!

Park City Peanut Chicken (Serves 4)

Ingredients:

  • 3 tablespoons vegetable oil
  • 1 tablespoon unsalted butter
  • 1 large onion, divided, 1/4 finely chopped, 3/4 thinly sliced
  • 1 1/2 cups Botan Calrose Rice (Japanese sticky rice)
  • 3 cups chicken stock or low-sodium chicken broth
  • 2 pounds chicken meat (tenders; skinless, boneless breasts; skinless, boneless thighs), cut into 2-inch pieces
  • 2 tablespoons grill seasoning blend, such as McCormick Montreal Steak Seasoning
  • 2 – 3 tablespoons dark soy sauce, such as tamari
  • 4 garlic cloves, chopped
  • 1 red bell pepper, seeded and thinly sliced
  • 3 tablespoons canned chipotle chiles in adobo sauce, finely chopped
  • 1 tablespoon ground cumin
  • 2 tablespoons honey
  • 1/4 cup pure maple syrup
  • 2 – 3 tablespoons cilantro leaves, chopped
  • 1 cup raw peanuts

Directions:

  1. In a medium saucepan over medium heat, combine 1 tablespoon of the vegetable oil and the butter. When the butter melts into the oil, add the 1/4 chopped onion and cook for 2 minutes, then add the rice and cook for 3 minutes more. Add the chicken stock and cover the pot. Raise the heat and bring the stock to a rapid boil. Once the stock boils, reduce the heat to low and cook, stirring occasionally, until the rice is tender, about 18 minutes.
  2. While the rice cooks, make the chicken. Heat a large skillet over high heat. Season the chicken with the grill seasoning. Add the remaining 2 tablespoons of vegetable oil and then the chicken. Brown the chicken on both sides, season with the soy sauce, then move the chicken to 1 side of the pan. Add remaining sliced onion, garlic and bell pepper. Cook for 2 to 3 minutes, then mix the vegetables and chicken together and add the chipotle chiles and cumin. Toss to coat. Glaze the chicken mixture with the honey and maple syrup and turn off the heat. Add the chopped cilantro and the peanuts.
  3. Spoon the rice into bowls, top with the peanut chicken and serve.