Egg in a Basket with Goat Cheese & Avocado

photo-563Good Morning! Maybe you haven’t had your coffee yet, so its only an OK morning so far, get that caffeine pumping through your veins and the day will seem a little more tolerable! This week is vacation week for a lot of people in Park City, I’m envious of you if you’re off on a lovely vacation… It was snowing here AGAIN yesterday!

This coming weekend is also Easter, which means another excuse to cook and eat food (like I needed an excuse!) I’m excited to decorate some Easter eggs, make some delicious brunch and sit back with a cup of coffee (or bloody mary!) and enjoy the day! Growing up one of my favorite breakfast dishes was “eggs in a basket” also know as “eggs in a hole” I’m sure you have your own name for it if you’re familiar with this meal! But since its almost Easter, today I’m calling it Egg-in-a-basket! photo 5-9
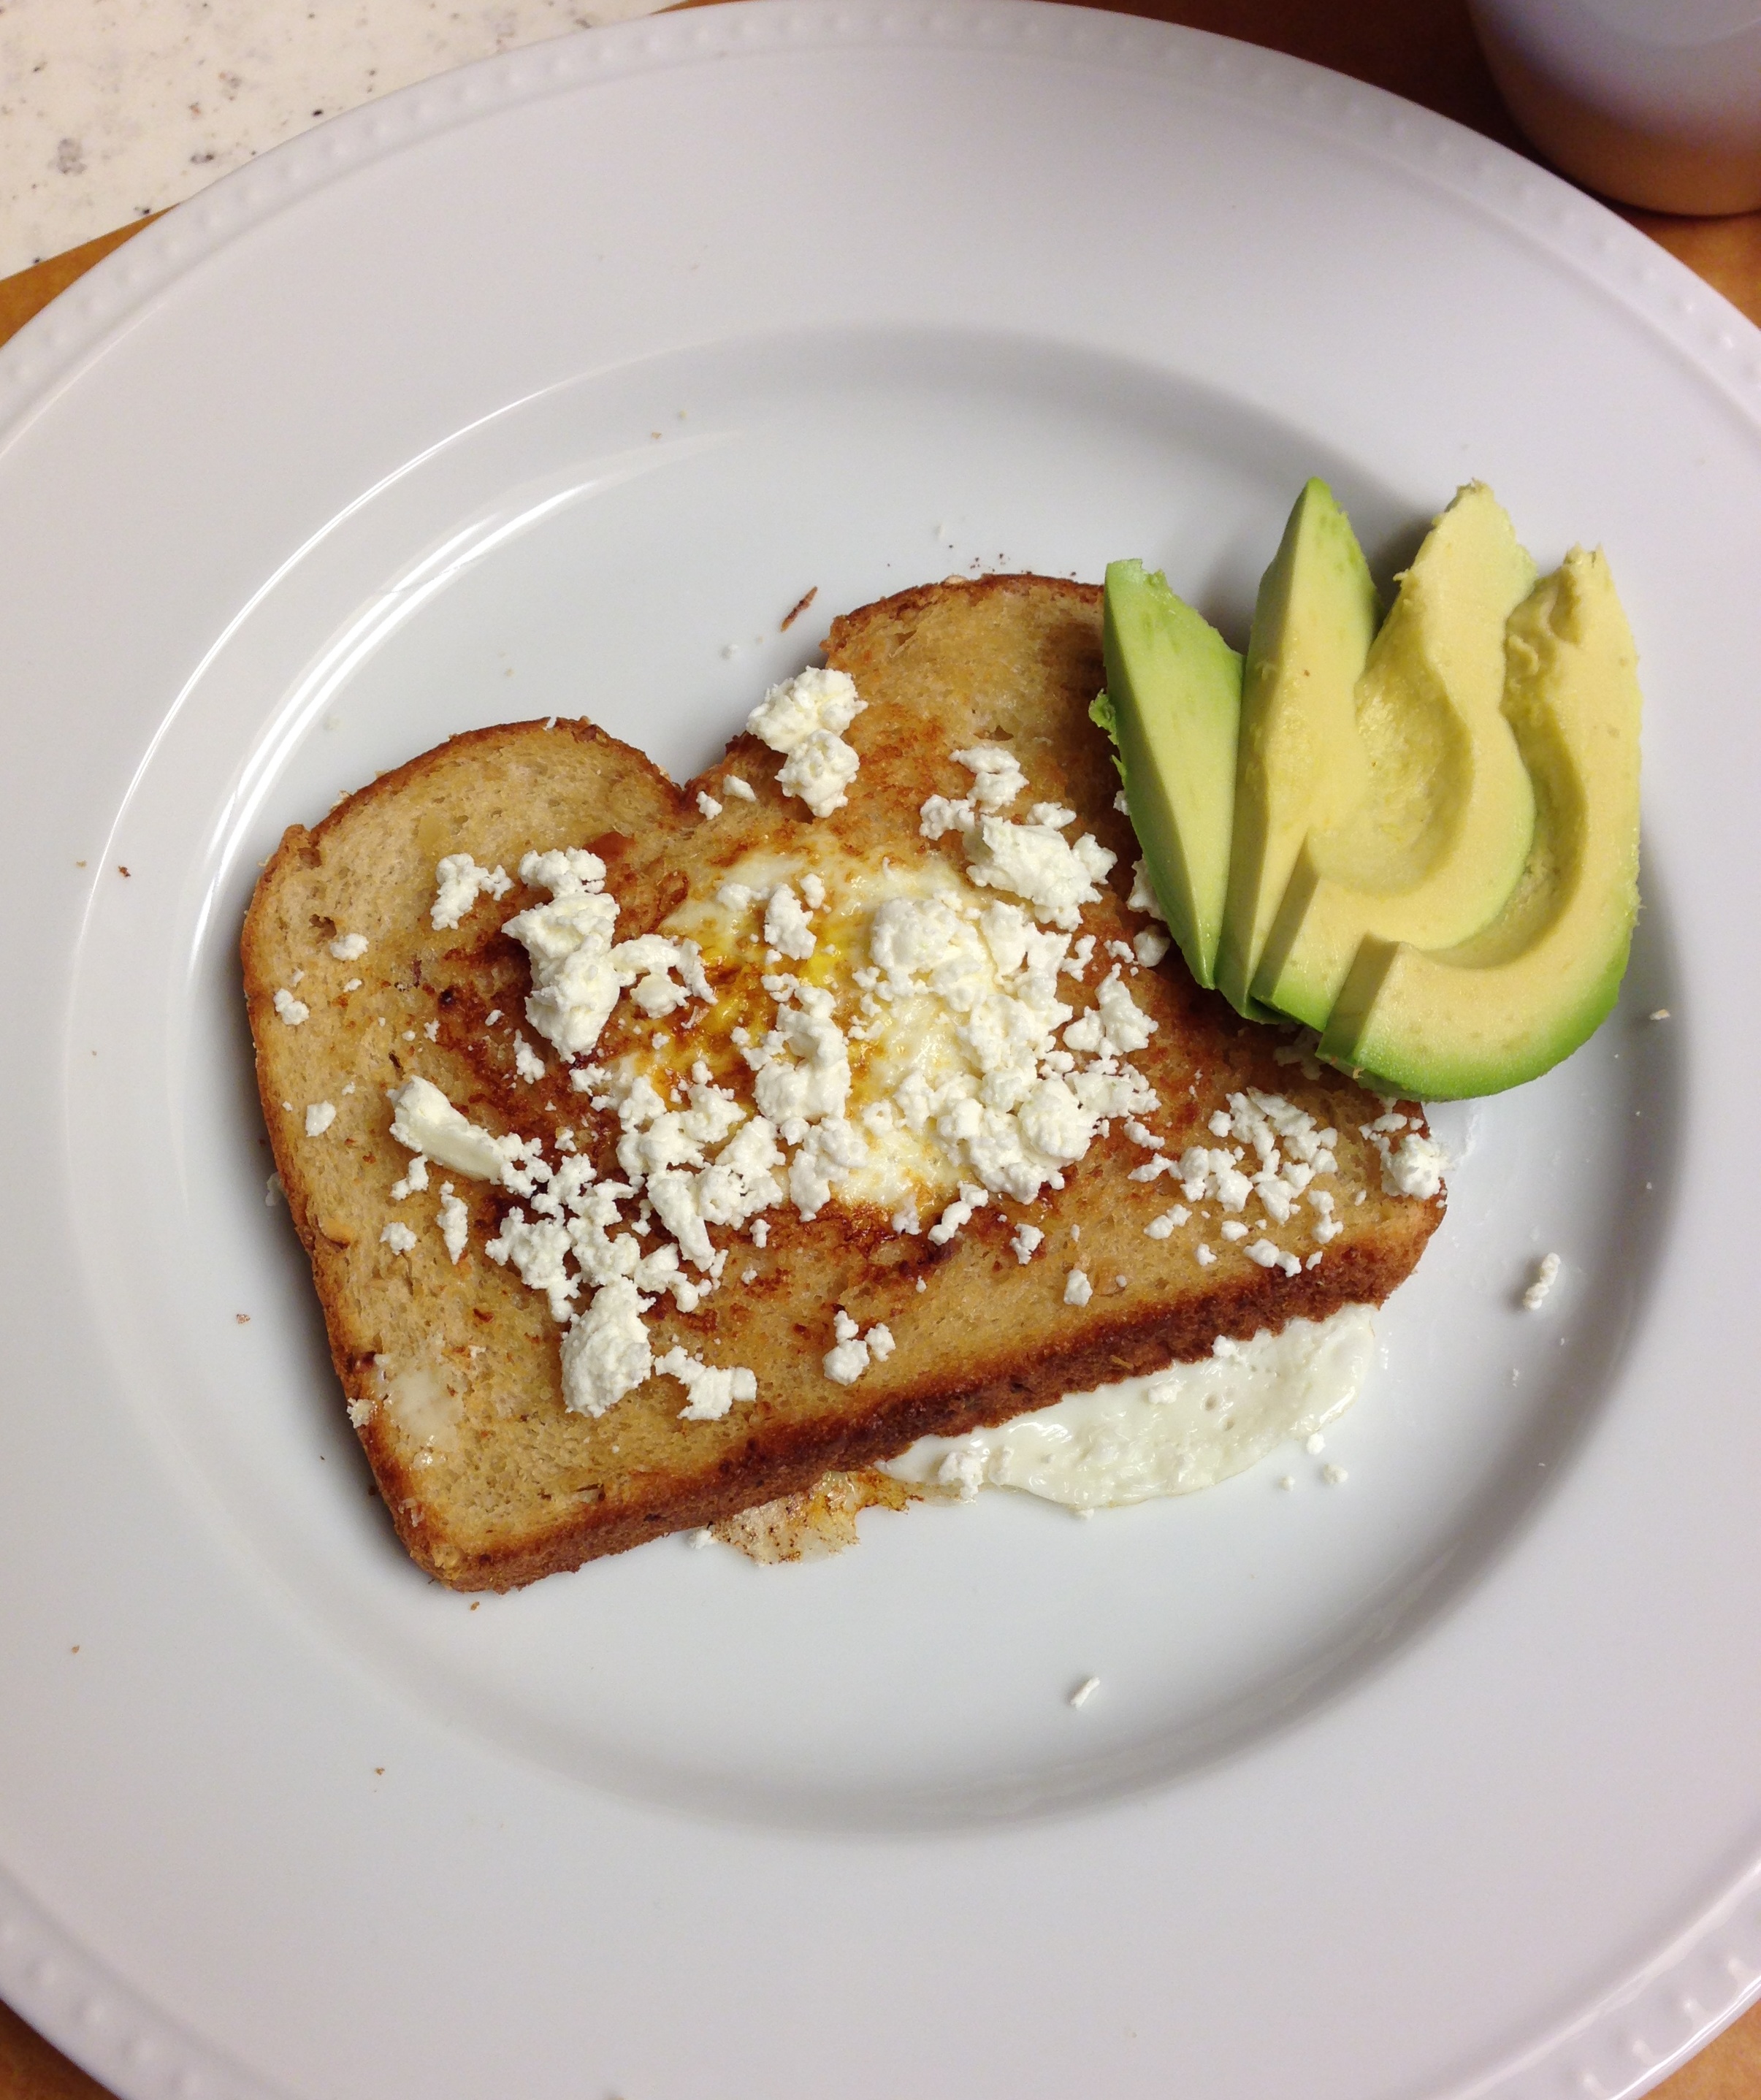
You’re taking two essential breakfast items, eggs and toast, and marrying them into one awesome creation! Sometimes the simplest of things taste the best! As a kid I used to put maple syrup over the top but in this version of eggs-in-a-basket I’ve dressed it up with creamy goat cheese and avocado! Hope you have a great Monday! Enjoy!

Ingredients (Serves 1)

  • 1 fresh egg
  • 1 slice whole grain bread
  • 1 tablespoon butter
  • 1 tablespoon goat cheese, crumbled
  • 1/2 avocado, sliced
  • 2-3 dashes paprika
  • salt and pepper to taste

Directions

  1. Melt 1/2 the butter in a medium skillet over medium heat. Using a sharp knife or the rim of a glass, cut a golf ball sized hole in the middle of the bread. Spread the remaining butter evenly on the slice of bread. (spread some butter on the little bread circle and throw it into the pan as well as an added crispy treat!)
  2. Place the bread butter side down in the skillet and allow it to brown 1 minutes. Crack the egg, carefully, into the hole, add 2-3 dashes of paprika over the egg and fry 2 minutes until the egg has set slightly.
  3. Carefully flip the egg with a spatula and cook for 2-3 minutes longer. You don’t want to over cook the egg so the yolk is hard but you want to be sure the whites are cooked. Let it cook until the yolk feels, to the touch, soft but not over jiggly!
  4. Remove the egg-in-a-basket from the pan, sprinkle with salt and pepper then crumble 1 tablespoon of goat cheese (or more if you love it!) over the egg. Slice up the avocado and serve it on the side.
  5. Bon Appetit!


Chunky Monkey Overnight Oats

photo 3-2You know those crazy mornings when there isn’t time for breakfast? Like this past week when the mountain predicted 2-inches of fresh snow, only to realize when I woke up it was actually 8+ inches of fresh POW. Yup, now you’re thinking to yourself, I needed to be out the door 10 minutes ago!

If you didn’t already know, breakfast is the most important meal of the day! Skip it and you definitely won’t have the energy you need to be active all day. Whether your crazy morning is getting out on the mountain, getting the kids ready for school, or getting yourself to work on time, these overnight oats are the perfect grab-and-go meal! Most mornings I eat these right out of the mason jar in the car on my way to the mountain or work. The best part? NO cooking required! You just throw all your favorite ingredients together, pop it in the fridge overnight and boom, breakfast is in your belly!

If you are allergic to peanut butter feel free to substitute another kind of nut butter, such as almond butter or sunflower butter, or leave it out all together! And please, only use REAL maple syrup! As you can see, I used Maine maple syrup because there are a lot of “Mainers” at Ski Butlers and my husband is convinced it tastes better because its from Maine!

This hearty breakfast is also vegan, gluten free (if you get gluten free rolled oats) and super filling so you can charge those powder runs all morning! Enjoy!

Chunky Monkey Overnight Oats (Serves 2, or 1 hungry person)

Ingredients:

  • 1 cup traditional rolled oats (not the instant kind or steal cut)
  • 1 cup almond milk (vanilla or original)
  • 1/2 a large ripe banana
  • 2 tablespoons chunky peanut butter
  • 1 tablespoon real maple syrup
  • 2 tablespoons mini semi-sweet chocolate chips (or regular)
  • 1 tablespoon ground flaxseed (optional)

Directions:

  1. In a medium bowl mash together the peanut butter and banana using a fork until fully mixed together.
  2. Pour oats and almond milk into the same bowl and stir. Be sure to scrape the peanut butter from the sides of the bowl so all the goodness is fully incorporated! Finally, mix in maple syrup, chocolate chips and flaxseed.
  3. Transfer the oats into a 16oz (Pint) mason jar with a tight fitting lid. Cover and refrigerate overnight. In the morning, stir oats and enjoy! You can also add some crunchy granola, fresh banana slices or nuts on top before eating!

Thank you to Ski Butlers for featuring this post on their blog! Check it out here! Want more delicious recipes? Visit me at http://www.skibootsinthekitchen.com, follow me on Twitter @skibootskitchen and ‘like’ me on Facebook!

Beautiful day here in Park City looking out at Deer Valley and Park City Resorts!  photo-171

Buttermilk Pancakes *Stuffed with Nutella*

photo-503Did you have any idea that February 5th was World Nutella day?! I just found this out and I couldn’t be happier- A whole day dedicated to Nutella! If I had the time to make pancakes for breakfast every morning I would, they are my favorite! Growing up I used to be superstitious about eating pancakes the morning of all my ski races.

It all started when I ate 12 pancakes before the Francis Piche race in Gunstock New Hampshire- you’d think it might have slowed me down but I ended up winning! Thus began my ritual before all my ski races- Pancakes! With the Sochi Olympics starting tomorrow it only seemed right to post my favorite pancake recipe in support of all the Alpine racers going for Gold in Sochi! I went for “gold” at Mohawk Mountain when I was 10 (above) so these pancakes are obviously the magic elixir (that is not a proven fact). Ok, I doubt elite level athletes are stuffing their faces prior to a race with Nutella pancakes but they are super delicious regardless!

I love these buttermilk pancakes because you can dress them up anyway you like- Nutella stuffed, blueberry, raspberry, chocolate chip, banana, even plain is good! You can also substitute whole wheat flour to make them a little more healthy! Don’t forget to top them off with real maple syrup – (not that fake crap from a plastic bottle!) Whether you’re hanging around the house on a lazy Sunday, going out to ski some fresh powder or getting ready for an Olympic Downhill these pancakes will fill you up and give you the boost you need! Good luck to all the Olympic athletes competing in Sochi! I am especially psyched to watch Leanne Smith and Julia Ford (yah New Hampshire girls!) and Park City native Ted Ligety to throw down and ski fast!

Buttermilk Pancakes (makes 12-16 pancakes)

  • 3 Cups flour (you can sub 1.5 cups whole wheat flour if you desire)
  • 4 tablespoons baking powder
  • 1 teaspoon salt
  • 1 cup sugar
  • 1/4 cup butter, melted
  • 2 eggs, beaten
  • 1 teaspoon vanilla
  • 3 cups buttermilk (you can sub vanilla almond milk too)
  • Nutella, blueberries, bananas or whatever else you like on your pancakes
  • butter for the skillet
  • real maple syrup

Directions:

  1. Mix flour, baking powder, salt and sugar in a large bowl.
  2. In another bowl, mix butter, eggs and vanilla
  3. Mix dry and wet ingredients, stir to combine. Lastly stir in buttermilk.
  4. Melt butter in a large skillet or griddle over medium-high heat. Pour batter onto skillet and allow batter to rise (about 1 minute).
  5. Place a dollop of Nutella (about 1/2 teaspoon) in the center of the pancake, cover Nutella with a little more batter. If you prefer other toppings add them here- sprinkle pancake with blueberries, chocolate chips or other desired treats!
  6. Cook until edges rise and bubbles form on top of the pancake. flip and cook until golden brown on both sides.
  7. Serve with butter and maple syrup, Enjoy!


Kale Monster Detox Smoothie

photoI hope you all had a Happy Thanksgiving! Sorry for the delay in posts- I’ve been recovering from cooking and eating overload! I can’t wait to share some of the awesome recipes I made for our Thanksgiving feast. I was in serious need of a detox after the holiday weekend- I ate pumpkin pie for breakfast Friday, Saturday and Sunday of Thanksgiving weekend… Sorry I’m not sorry- it was delicious! img_7398BUT with only two and half weeks until Christmas and all those holiday parties around the corner, I’m feeling the need for a healthy dose of green goodness. If you’re looking for the ultimate super food or “queen of greens” its KALE. IMG_5547It literally has all the good stuff- it’s an excellent source of antioxidant vitamins A, C, and K, its also packed with fiber and anti-cancer health benefits- You get the picture, this stuff is GOOD! I understand, drinking straight kale in the morning doesn’t sound super appealing- but you throw some strawberries, banana and almond milk in the picture and you’ve got a delicious, healthy and detoxifying breakfast! Enjoy!

Kale Monster Detox Smoothie

Ingredients:

  • 5- 6 large frozen or fresh strawberries
  • 1 large frozen banana, cut into pieces
  • 1/2 a large cucumber, peeled and sliced
  • 1 1/12 cups vanilla almond or soy milk
  • 4 large kale leaves, chopped (stems removed)
  • 1 large handful spinach
  • 1 tablespoon ground flax seed (optional)

Combine almond milk, frozen banana and cumber in a blender. Add kale, spinach, strawberries and flax seed. Blend until smooth. If the smoothie is looking too thick add more almond milk until desired consistency. If you’re using fresh strawberries you may wish to add a hand full of ice.  Enjoy!

Baked Eggs with Country Toast

photo-404It was such a wonderful fall weekend! I hope you enjoyed the good weather (on Saturday least), maybe if you’re lucky enough to live in Boston you checked out the Red Sox parade and of course that extra hour of glorious sleep. Fall daylight savings is one of my favorite weekends of the year- your body thinks its late but you realize its early and you can roll over and go back to bed. There is nothing better! Except realizing that extra hour of sleep has also allowed you an extra hour for breakfast, my favorite meal of the day!

Breakfast literally makes my day- I mean seriously, breakfast is the best in the morning… but who doesn’t love pancakes or eggs for dinner to? It’s the ultimate meal and it always makes me happy. It’s also a time where you can catch up or wind down with friends or alone with the morning paper. My best friend Connie and I always had crazy schedules when we lived together, but breakfast was our time to catch up, drink some coffee and start our day off right; if we had breakfast together, I knew it was going to be a great day.

As a kid my mother used to make me baked eggs, they are simple but they are so satisfying and delicious. My favorite part about them? You pop them in the oven, set the timer and there ready before you know it! photo-401There is no worry or fuss like there is with scrambled, poached or fried eggs. Simple, easy and delicious- just the way breakfast should be on Sunday mornings so you can sit back and enjoy it with the ones you’re with! Red Bicycle Breadworks is a local Park City company. They sell their bread out of The Market in town and it’s totally delicious.

Their gold creek cheddar bread is the perfect breakfast toast. They also make an amazing sea salt and olive oil bread that we’ve started calling ‘crack’ bread. We have to buy two loaves at a time because we inevitably eat one loaf before we even leave the grocery store- its that good (if you’ve had it you know what I’m talking about!). If you live in Park City I highly recommend checking out their bread- if you don’t (that’s too bad for you!) but any good fresh bread will do! Enjoy!

Baked Eggs with Country Toast

  • 1 Tablespoon Olive Oil
  • 1 Tablespoon heavy cream
  • 2 farm fresh eggs
  • 1 dash paprika
  • 1 tablespoon Parmigiano
  • salt and pepper to taste
  • country bread, toasted with butter

Directions:

Preheat oven to 375 degrees. Put 1 tablespoon olive oil into the cocotte (baking dish, small tart pan or souffle dish), followed by the eggs and cream. Season with dash of paprika, salt and pepper. Cover with 1 tablespoon grated Parmigiano-Reggiano and bake just until the white is set, about 15 minutes. Serve with toast.

Pumpkin Maple Protein Smoothie

photo-114It’s fall, so obviously everyone is into anything pumpkin related. I thought people were going to die of excitement when Starbucks finally released their PSL (pumpkin spice latte… who knew it was being abbreviated these days?) on September 3!! Three days past August is NOT considered fall people. So now that its October and it actually IS fall, I’m jumping on the pumpkin wagon!photo-346 I love getting my fix of pumpkin treats but if you’re not careful that casual PSL in the morning can run you close to 400 calories! I don’t know about you but that is way more than I’m willing to waist on a cup-o-joe! This protein smoothie is a great way to satisfy your pumpkin craving without killing your waistline (which is always an added bonus going into the holiday season!) photo-347I use Teras Whey protein powder that I purchase from Whole Foods but any kind of vanilla protein powder will do. Also be sure to use canned pumpkin puree and not canned pumpkin pie filling (there is a difference!)photo-348Pumpkin Maple Protein Smoothie by Ski Boots in the Kitchen

Ingredients:

  • 8 oz vanilla almond milk
  • 1 scoop vanilla protein powder
  • 1/4 cup pumpkin puree (not pumpkin pie filling)
  • 1 tablespoon real maple syrup
  • 1/8 teaspoon pumpkin pie spice (make your own if you don’t have it)
  • hand full of ice cubes

Combine all the ingredients in a blender, blend until smooth. Enjoy! photo-349

Healthy Banana “Ice Cream”

photo-344Last weekend was the autumnal equinox which means bye, bye summer, welcome autumn, fall, bright colored leaves, pumpkins and… snow? Yup that’s right it was snowing in the mountains today! photo-341 Big fluffy flakes, which we are all hoping means its going to be a great ski year. I am still trying to hold on to a few last pieces of summer and nothing says summer like ice cream. Unfortunately, I have a slight intolerance to classic ice cream, which is a HUGE bummer, because its so unbelievably delicious. Then I found out you can make “ice cream” from frozen bananas and my whole life changed. I wish that I was brilliant enough to come up with this idea because it actually is brilliant. photo-343It’s creamy, thick, and tastes like real ice cream, you’d never know it was just frozen whipped bananas. Yup that’s it- ONE ingredient. Which means its vegan, dairy free, sugar free, low calorie but it tastes like the full fat, total guilty pleasure stuff… I promise! This recipe falls into my favorite category of should I eat it for “breakfast or dessert?” It’s so healthy you could eat if for breakfast sprinkled with your favorite granola or put a scoop on pie, peach crumble or chocolate cake for an unbelievable topping. photo-342Add your favorite ingredients to make it your own: peanut butter, chocolate chips, Nutella, maple syrup, almond butter, even a few strawberries and you’ve got a totally different treat! All those ripe bananas you’ve been saving for banana bread but haven’t gotten around to it- this recipe requires less time, effort and is more delicious! Enjoy!

Ingredients:

  • 3 frozen bananas

Optional:

  • 3-4 Tablespoons peanut butter, almond butter or Nutella
  • 1/2 Cup chocolate chips
  • 3 Tablespoons Maple syrup or honey
  • 1/4 teaspoon sea salt
  • 1 Cup frozen strawberries

Directions:

  1. Slice bananas (like you would for cereal- pictured above) and freeze for a minimum of 3 hours or overnight, on a flat cookie sheet, baking dish or Tupperware.
  2. Place bananas in a food processor with desired ingredients (peanut butter, syrup, strawberries etc). I did peanut butter chocolate chip! Add bananas and 3-4 Tablespoons peanut butter (depending on how much you love peanut butter add more or less) and pulse until fully combined, use a spoon or spatula to break up large chunks of frozen banana.
  3. Once mixed, stir in chocolate chips at the last minute with a spoon (otherwise the food processor will chop them up.)
  4. Scoop into bowls and top with chocolate sauce, sprinkles, pretzels or your favorite ice cream sunday toppings or put a scoop on pie, cake or another delicious dessert and enjoy!
  5. If your bananas don’t seem to be mixing as easily as you’d like, add 2-3 tablespoons of almond milk or soy milk which will speed up the mixing process.
  6. Looking for more ideas to mix with your banana ice cream? Dark chocolate chunks and sea salt, strawberry banana, peanut butter and honey, Nutella banana, 2 teaspoons mint extract and dark chocolate chunks… mint chip! the options are endless… get creative!

Zucchini Bread with Honey Butter

photo-292Happy Monday! I hope you had a wonderful weekend doing whatever it is that you love. I spent my weekend camping, relaxing, and making enough zucchini bread to feed a small country. One of our friends harvested a huge zucchini from his garden and gave it to me- It was one of the largest zucchinis I’ve seen!photo-289Unfortunately, once zucchinis get that size they are not as tender and delicious to cook with but they are still great for making zucchini bread. Morning Glory Farm on Martha’s Vineyard is notorious for their zucchini bread and since I was having a small case of FOMO (fear of missing out) after seeing all my friends and family enjoying a beach picnic OTV, I pulled out my comfort cookbook and made some zucchini bread, which allowed me to briefly pretend I was on the Island. photo-294I normally enjoy my zucchini bread plain or with a little cream cheese but the idea to make honey butter came to me and I thought zucchini bread and honey butter would make an amazing combination. I was right. Turns out honey butter is good on EVERYTHING! photo-295 I took some of the honey butter and made french toast with it this morning. I used a little in the pan to cook the french toast. I topped it with some fresh peaches and some more honey butter instead of maple syrup… It was heavenly. photo-290I love this recipe for zucchini bread because its light, simple and totally delicious! The hardest part about this recipe is waiting for it to cool down before enjoying it!!

Zucchini Bread with Honey Butter (Click for printer friendly version)

Preparation time: 25 minutes | Cooking time: 1 hour | Servings: 2 Loaves

Ingredients:

  • 2 to 2 1/2 cups shredded zucchini (if using a very large zucchini remove the large seeds before shredding it.)
  • 1 cup vegetable oil
  • 3 eggs
  • 1 tsp. vanilla
  • 2 cups sugar
  • 3 cups all-purpose flour
  • 1 tsp. baking soda
  • 1/4 tsp. baking powder
  • 1 tsp. salt
  • 1 tsp. cinnamon

Directions:

  1. Preheat oven to 325 degrees. Spray two 9″x5″ bread pans with nonstick spray.
  2. In a large mixing bowl, combine zucchini, oil, eggs and vanilla. Mix thoroughly.
  3. Beat sugar into mix until it is thoroughly creamed.
  4. In a medium mixing bowl, combine dry ingredients.
  5. Once liquids and sugar are well mixed, add dry ingredients. Mix until batter is well blended and even in texture. The batter should be smooth, outside the zucchini shreds.
  6. Pour batter evenly into pans
  7. Bake for approximately 1 hour or until bread is brown and springs back when gently pressed in the middle.

Honey Butter by Ski Boots in the Kitchen

Ingredients:

  • 2 sticks of butter
  • 1/4 cup of honey
  • 1/2 tsp. vanilla

Directions:

  1. Place butter in microwave safe bowl and microwave on high for 15-20 seconds, so the butter is very soft but not melted.
  2. Add honey and vanilla.
  3. Using an electric hand mixer or kitchenaid mixer beat on low speed until thoroughly combined.
  4. Using a rubber spatula scoop butter onto a large piece of parchment paper or plastic wrap and roll into a log.
  5. Refrigerate for 2 hours. Serve on zucchini bread, french toast, pancakes or just about anything! Enjoy!

photo-293

One Pot Hot Oat & Quinoa Cereal for some East Coast Visitors

Quinoa mixes with steal cut oats for a hearty breakfast that you can make the night before for those busy mornings!photo-69 Its always fun having visitors come and stay with us. My parents were just here for a week and they drove a U-haul all the way from Connecticut with lots of furniture and goodies! photo-67Our previously empty dinning room now has a gorgeous table that we can eat our meals at (we were doing Japanese style sitting on the floor before- Piper, our dog, benefited from a low table and she snagged a few bites of pizza the other night!) photo-71My dad being the diehard skier that he is must be on the hill from first chair to last chair regardless of the conditions. Breakfast is the most important meal before a big day of skiing- as you never want to stop too long for lunch, especially on a powered day. Getting out the door in the morning is equally as important though and that is why this filling and delicious breakfast is perfect for winter activities! photo-68The majority of the cooking is done the night before! All you have to do is combine all the ingredients in one pot the night before, heat the next morning and serve! Cinnamon and Cardamom give it a wonderful flavor unlike regular hot oatmeal and cereals. photo-70The toppings for this cereal are endless too- pumpkin seeds, almonds, fresh fruit, maple syrup or peanut butter to give it that protein punch. It’s fast & filling for your powder hungry guests or a great option on a busy morning! Enjoy!

From Feb 2013 Bon Appetit

Serves 4 (comfortably)

Ingredients:

  1. 1/2 cup dried fruit (such as goji berries, cranberries, or barberries)
  2. 1/2 cup steel-cut oats
  3. 1/2 cup well-rinsed quinoa
  4. 1/4 cup raisins
  5. 1 teaspoon kosher salt
  6. 1/2 teaspoons ground cinnamon
  7. 1/4 teaspoons ground cardamom
  8. 4 cups water

Combine all ingredients and bring it to a boil in a medium saucepan. Cover and let sit off heat overnight. Before serving, reheat cereal in saucepan, covered, over medium-low heat, stirring occasionally and adding water if needed, until warmed through, 5-8 minutes. Serve with your favorite toppings (almond milk, maple syrup, pumpkin seeds, granola, etc) To make the morning of bring mixture to a boil; reduce heat and simmer, stirring occasionally, until grains are tender, 20-25 minutes.

Healthy Whole Wheat Carrot Coconut Morning Glory Muffins with Sour Cream Frosting

I have a serious weakness for carrot cake. My mother makes the most delicious carrot cake- She’s made it for me on my birthday for as long as I can remember. I usually eat the leftovers for breakfast the whole week. Turns out all that cream cheese frosting, butter and sugar is not so good for you when you eat it three meals a day. Then I came across this recipe… fantastically delicious and healthy but tastes just like her buttery, creamy carrot cake.

Carrots, raisins, apple sauce and almond milk make this recipe moist and hearty. photo-205

Topped with toasted coconut and a sour cream frosting, it was hard not to eat the whole plate of muffins. And its gets even better…photo-204

Each muffin is only about 188 calories! They are a perfect power breakfast before heading out to ski. Wrap them individually and freeze them, when you’re looking for a quick bite, pop it in the microwave. The whole wheat flour makes them filling and nutty! photo-203

These are delicious without the frosting too but why would you ever want them without frosting? I know you are going to love these! Enjoy!

Whole Wheat Carrot Coconut Morning Glory Muffins (Click for printer friendly version) 

Here’s what you need:

  • 2 cups whole wheat flour or whole wheat pastry flour
  • 1 teaspoon baking soda
  • 1 teaspoon baking powder
  • 1/2 teaspoon salt
  • 1 teaspoon ground cinnamon
  • 1/4 teaspoon ground ginger
  • pinch of nutmeg
  • 2/3 cup brown sugar, packed
  • 2 tsp vanilla extract
  • 2 tablespoons olive, coconut, or canola oil
  • 1 egg
  • 2 egg whites
  • 2 1/2 cups shredded carrots
  • 1/3 cup unsweetened almond milk
  • 1/2 cup applesauce
  • 1/4 cup unsweetened shredded coconut (or you can use sweetened)
  • 1/2 cup raisins
  • 1/4 cup chopped walnuts (optional)
  • 1/2 cup sour cream
  • 2 tablespoons powdered sugar
  • Extra coconut (toasted for topping)

Here’s what you do:

  1. Preheat oven to 350 degrees.
  2. Line a 12-cup muffin pan with liners and spray the inside of the liners with cooking spray.
  3. In a medium bowl sift together flour, baking soda, baking powder, cinnamon, ginger, nutmeg and salt and set aside.
  4. Beat brown sugar, vanilla, oil, egg, and egg whites together until creamy. Add in almond milk and beat again. With a wooden spoon fold in carrots, applesauce, raisins. Mix in flour mixture until just combined be careful not to over mix! Fold in the walnuts and the coconut flakes.
  5. Spoon batter into the liners and bake for 23-28 minutes or until a toothpick comes out clean. Oven temperatures vary so you may find you need more or less time depending on the flours you use.
  6. Cool completely on a wire rack.
  7. While muffins are cooling combine sour cream and powdered sugar in a small bowl and set aside until muffins are cool.
  8. With a small spoon drizzle the sour cream frosting over muffins. Lightly toast coconut in oven or toaster oven until golden brown (about 2minutes) and sprinkle over the top of frosting. photo
  9. Enjoy!

Recipe adapted from Ambitious Kitchen.